白盒攻击算法
一.概述
分类
对抗样本按照攻击成本可以分为白盒攻击,黑盒攻击和物理攻击。
-
白盒攻击
白盒攻击需要完整获取模型,了解模型的结构以及每层的具体参数,攻击者可以控制模型的输入,甚至对输入数据进行比特级别的修改
-
黑盒攻击
黑盒攻击是把目标模型当做一个黑盒来处理,对模型的内部细节不了解,攻击者仅能控制模型的输入
原理
对抗样本的本质就是在原数据上叠加一些使机器学习模型可接受而人眼无法察觉的细微改变,使得机器学习模型对输入数据产生误判。
从数学的角度看:输入数据
x
x
x
,机器学习模型
f
f
f
,叠加的扰动
ϵ
\epsilon
ϵ
使得:
∣
ϵ
∣
<
δ
|\epsilon|<\delta
∣
ϵ
∣
<
δ
且
f
(
x
+
ϵ
)
!
=
f
(
x
)
f(x+\epsilon)!=f(x)
f
(
x
+
ϵ
)
!
=
f
(
x
)
那么
x
+
ϵ
x+\epsilon
x
+
ϵ
就可以称之为一个对抗样本
二.基于优化的对抗样本生成算法
原理
在深度学习模型的训练过程中,我们通过计算对输入数据的预测值与真实值之间的损失函数,以减小损失函数的值为优化目标,在反向传播的过程中通过链式法则调用模型参数,迭代更新模型各层参数。
生成对抗样本的过程与上述过程是非常相似的,所不同的是此时模型是我们的攻击目标,模型及其参数应该是固定不变的,输入数据是需要调整的,所以在训练的时候,要把网络参数固定下来,把模型的输入作为唯一需要更新的值。
实现
基于Pytorch框架构建对抗样本,攻击模型为基于Imge-Net2012训练的图像分类模型Alexnet
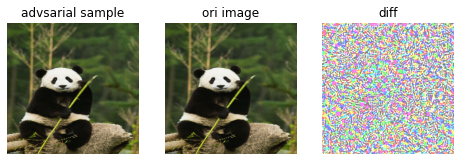
输入图像为熊猫,对应标签388;定向攻击对象为松鼠猴,标签为383;
数据处理
#对图片数据进行预处理
img_pig=cv2.imread("./panda.jpg")
img_pig=cv2.resize(img_pig,(224,224))
ori_img=img_pig.copy()  #原始图像备份
#数据标准化
mean=[0.485,0.456,0.406]
std=[0.229,0.224,0.225]
img_pig=img_pig/255.0
img_pig=(img_pig-mean)/std
# ori_img=img_pig.copy()
img_pig=torch.from_numpy(img_pig)
img_pig=torch.permute(img_pig,(2,0,1)).float().unsqueeze(0)
img_pig.shape,img_pig.dtype
参数配置与模型加载
#加载模型,攻击模型为alxnet
model=torchvision.models.alexnet(pretrained=True)
output=model(img_pig)
label=torch.argmax(output)
label  #标签值为388,panda类
#对目标进行定向攻击,将标签为388的panda叠加干扰,使模型误以为是松鼠猴383
#将模型参数冻住,只对梯度进行更新
for param in model.parameters():
  param.requires_grad=False
img_pig.requires_grad=True
#设置优化器与损失函数
optimizer=torch.optim.Adam([img_pig])
criterion=torch.nn.CrossEntropyLoss()
#设置定向与迭代次数
epoches=100
target=torch.Tensor([383]).long()
对抗样本训练
#迭代训练
for epoch in range(epoches):
  optimizer.zero_grad
  output=model(img_pig)
  loss=criterion(output,target)
  label=torch.argmax(output)
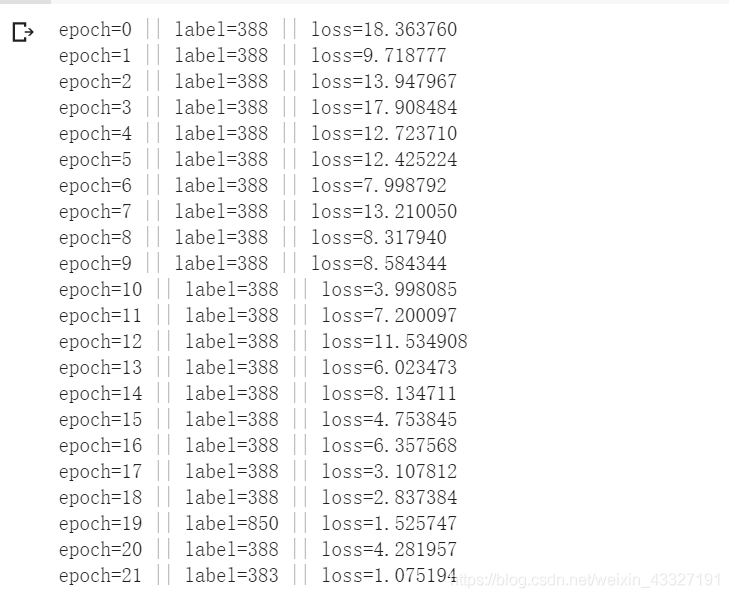
  print("epoch=%d || label=%d || loss=%f"%(epoch,label,loss))
  if label==target:
    break
  # optimizer.zero_grad
  loss.backward()
  optimizer.step()
一共训练了21轮

结果展示
adv=img_pig.detach().squeeze(0).permute(1,2,0).numpy()
adv=((adv*std+mean)*255.0).astype(np.uint8)
ori_img=cv2.cvtColor(ori_img,cv2.COLOR_BGR2RGB) #opencv与plt的图片显示格式不同
adv=cv2.cvtColor(adv,cv2.COLOR_BGR2RGB)
diff=(adv-ori_img)
diff=(diff-diff.min())/(diff.max()-diff.min())+0.5
plt.figure(figsize=(8,12))
plt.subplot(311),plt.imshow(adv),plt.axis("off")
plt.subplot(312),plt.imshow(ori_img),plt.axis("off")
plt.subplot(313),plt.imshow(diff),plt.axis("off")
结果
:

三.基于梯度的对抗样本生成
前面基于优化的对抗样本生成算法是在反向传播的过程中更新输入,生成对抗样本;还有一种是基于梯度来生成对抗样本的算法。
1.FGSM
FGSM快速梯度下降算法,其本质与前面的基于优化的对抗样本算法是一致的,其只是先计算出输入数据的梯度,然后根据损失函数的含义,来逐步更新输入数据(加或减一定比例的梯度)
1.1定向攻击
攻击模型仍为图像分类模型Alexnet,输入原始数据为熊猫照片,类别为388;定向攻击目标为松鼠猴,类别为383;
Image-Net的类别对应参考
数据预处理
#数据处理
ori_img=cv2.imread("./panda.jpg")
ori_img=cv2.resize(ori_img,(224,224))  #修改图片尺寸
#拷贝输入
input_img=ori_img.copy()
#数据标准化
mean=[0.485,0.456,0.406]
std=[0.229,0.224,0.225]
input_img=input_img/255.0
input_img=(input_img-mean)/std
#将图片形式转为(Bachsize,C,W,H)的形式
input_img=torch.from_numpy(input_img).float().permute(2,0,1).unsqueeze(0)
input_img.shape
模型加载
#导入模型
model=torchvision.models.alexnet(pretrained=True).eval()
特别注意
:在与训练模型加载的时候,一定要选择
model.eval()
模式,否则的话,有输入数据,即使不训练,它也会改变权值。这是
model
中含有
batch normalization
层所带来的的性质。
参数配置
#配置参数
input_img.requires_grad=True
#优化器
optimizer=torch.optim.Adam([input_img])
#损失函数
criterion=torch.nn.CrossEntropyLoss()
#最大迭代次数
epoches=100
#定向攻击目标
target=torch.Tensor([383]).long()
梯度迭代
#迭代梯度
for epoch in range(epoches):
  output=model(input_img)
  loss=criterion(output,target)
  label=torch.argmax(output)
  print("epoch:{} ||loss:{} ||label:{}".format(epoch,loss,label))
  if label==target:
    break
  optimizer.zero_grad()
  loss.backward()
  input_img.data=input_img.data-0.01*torch.sign(input_img.grad.data)

效果展现
#展现原始图片与对抗样本之间的差异
adv=input_img.squeeze(0).permute(1,2,0).data.numpy()
adv=((adv*std+mean)*255.0).astype(np.uint8)
adv=cv2.cvtColor(adv,cv2.COLOR_BGR2RGB)
ori_img=cv2.cvtColor(ori_img,cv2.COLOR_BGR2RGB)
diff=adv-ori_img
diff=(diff-diff.min())/(diff.max()-diff.min())

print("原始标签:{} ||  叠加扰动后标签:{}".format(388,torch.argmax(model(input_img))))
plt.figure(figsize=(8,16))
plt.subplot(131),plt.imshow(ori_img),plt.axis("off"),plt.title("ori_img")
plt.subplot(132),plt.imshow(adv),plt.axis("off"),plt.title("adv")
plt.subplot(133),plt.imshow(diff),plt.axis("off"),plt.title("diff")

1.2 非定向攻击
#非定向攻击
#迭代梯度
target=torch.Tensor([388]).long()
for epoch in range(epoches):
  output=model(input_img)
  loss=criterion(output,target)
  label=torch.argmax(output)
  print("epoch:{} ||loss:{} ||label:{}".format(epoch,loss,label))
  if label!=target:
    break
  optimizer.zero_grad()
  loss.backward()
  input_img.data=input_img.data+0.01*torch.sign(input_img.grad.data)


注意
:定向扰动与非定向扰动的区别;定向扰动的
t
a
r
g
e
t
target
t
a
r
g
e
t
为攻击目标的类别,损失函数的值是
模
型
判
断
结
果
与
t
a
g
e
t
模型判断结果与taget
模
型
判
断
结
果
与
t
a
g
e
t
之间的差距,为了使模型误判,所以损失函数的值要尽可能的小,所以输入数据变换的方向为梯度方向相反
input_img.data=input_img.data-0.01*torch.sign(input_img.grad.data)
对于非定向扰动,其本质只需模型发生误判即可,对模型预测结果的类别并不关心,损失函数的值为输入原始数据的标签与模型分类结果之间的差值,为使误判,应该让损失函数最大化,所以输入数据变化方向与梯度相同
input_img.data=input_img.data+0.01*torch.sign(input_img.grad.data)
学习率可以调整,在这里选择了0.01
2.DeepFool
在FGSM算法中,从梯度入手,进行对抗样本的生成;在每次梯度迭代的过程中,需要设置一个学习率,这个学习率也是一个超参数。而DeepFool算法解决了这个问题,它是直接从决策边界入手。
对于二分类问题:
模型
f
(
x
)
f(x)
f
(
x
)
,输入为
x
0
x_0
x
0
,则决策结果
s
i
g
n
(
f
(
x
0
)
)
sign(f(x_0))
s
i
g
n
(
f
(
x
0
)
)
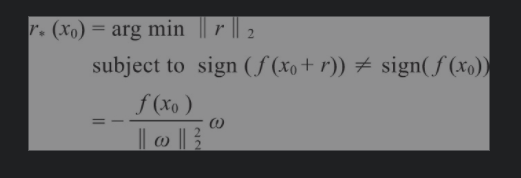
对抗样本可以看做如下的优化问题:

二分类的线性分类器大致如下图所示:

假
定
f
(
x
)
=
W
T
+
b
假定f(x)=W^T+b
假
定
f
(
x
)
=
W
T
+
b
则
点
x
0
到
f
(
x
)
的
距
离
为
:
∣
f
(
x
0
)
∣
∣
∣
w
∣
∣
2
则点x_0到f(x)的距离为:\frac{|f(x_0)|}{||w||_2}
则
点
x
0
到
f
(
x
)
的
距
离
为
:
∣
∣
w
∣
∣
2
∣
f
(
x
0
)
∣
决
策
边
界
(
直
线
f
(
x
)
)
的
法
线
向
量
e
=
W
∣
∣
W
∣
∣
决策边界(直线f(x))的法线向量e=\frac{W}{||W||}
决
策
边
界
(
直
线
f
(
x
)
)
的
法
线
向
量
e
=
∣
∣
W
∣
∣
W
所
以
每
次
迭
代
更
新
的
大
小
应
该
为
:
−
∣
f
(
x
0
)
∣
×
W
∣
∣
W
∣
∣
2
所以每次迭代更新的大小应该为:-\frac{|f(x_0)|\times W}{||W||_2}
所
以
每
次
迭
代
更
新
的
大
小
应
该
为
:
−
∣
∣
W
∣
∣
2
∣
f
(
x
0
)
∣
×
W
论文中给出的迭代算法:

疑问
:为什么在每次迭代的过程中用
梯
度
代
替
W
梯度代替W
梯
度
代
替
W
?
扩展到多分类问题
多
分
类
中
为
一
对
多
的
关
系
,
其
最
终
的
决
策
函
数
:
a
r
g
m
a
x
(
f
(
x
0
)
)
多分类中为一对多的关系,其最终的决策函数:argmax(f(x_0))
多
分
类
中
为
一
对
多
的
关
系
,
其
最
终
的
决
策
函
数
:
a
r
g
m
a
x
(
f
(
x
0
)
)
由
于
一
般
结
果
是
所
有
类
别
中
概
率
最
高
的
那
一
个
由于一般结果是所有类别中概率最高的那一个
由
于
一
般
结
果
是
所
有
类
别
中
概
率
最
高
的
那
一
个
$所以此时对抗样本的生成可以等价为优化问题:$

此
时
的
迭
代
量
的
计
算
:
此时的迭代量的计算:
此
时
的
迭
代
量
的
计
算
:

疑问,为什么此时的迭代量可以这样算?
算
法
流
程
:
算法流程:
算
法
流
程
:

依次遍历各个类别,每次计算出当前输入跨越所有类别决策边界的最小移动量,多次累加,知道最终跨出原始类别所在的区域
非定向攻击的实现
import torch
import numpy as np
import torchvision
import matplotlib.pyplot as plt
import cv2
from torch.autograd.gradcheck  import zero_gradients


#数据处理
ori_img=cv2.imread("picture/panda.jpg")
ori_img=cv2.resize(ori_img,(224,224))  #修改图片尺寸
#拷贝输入
input_img=ori_img.copy()
#数据标准化
mean=[0.485,0.456,0.406]
std=[0.229,0.224,0.225]
input_img=input_img/255.0
input_img=(input_img-mean)/std
#将图片形式转为(Bachsize,C,W,H)的形式
input_img=torch.from_numpy(input_img).float().permute(2,0,1).unsqueeze(0)

#导入模型
model=torchvision.models.alexnet(pretrained=True).eval()

#定义配置参数
for param in model.parameters():
    param.requires_grad=False
input_img.requires_grad=True
#迭代最大次数
epoches=100
#扰动限制
overshoot=0.02
#类别数,Image-Net classes=1000
classes=1000

#前向计算,得到输出
output=model(input_img)
w=np.zeros_like(input_img.data)  #用来存储梯度
r_tot=np.zeros_like(input_img.data) #用来存储叠加扰动
ori_label=torch.argmax(output)
# print(ori_label)
# print(output[0])
for epoch in range(epoches):
    scores=model(input_img)
    label=torch.argmax(scores)
    print("epoch:{} ||label={} ||score:{}".format(epoch,label,scores[0,label]))
    #非定向攻击
    if label!=ori_label:
        break
    #定义迭代量,用于存储最小迭代量
    pre=np.inf
    # 计算对原始类别的梯度
    output[0,ori_label].backward(retain_graph=True)
    ori_grad=input_img.grad.data.numpy().copy()
    #计算剩余类别对输入的梯度值
    for i in range(classes):
        if i==ori_label:
            continue
        zero_gradients(input_img)
        #计算对应类别梯度
        output[0,i].backward(retain_graph=True)
        cur_i_grad=input_img.grad.numpy().copy()
        w_i=cur_i_grad-ori_grad
        f_i=(output[0,i]-output[0,ori_label]).data.numpy()
        pre_i=abs(f_i)/np.linalg.norm(w_i.flatten())
        if pre_i<pre:
            pre=pre_i
            w=w_i
    r_i=(pre+1e-8)*w/np.linalg.norm(w.flatten())  #计算带有迭代方向的偏移量
    r_tot=np.float32(r_tot+r_i)
    input_img.data+=(1+overshoot)*torch.from_numpy(r_tot)

#展现差异
print("原始的标签:{} ||叠加扰动后的标签:{}".format(ori_label,torch.argmax(model(input_img))))
ori_img=cv2.cvtColor(ori_img,cv2.COLOR_BGR2RGB)
input_img=input_img.squeeze(0).permute(1,2,0).data.numpy()
input_img=(((input_img*std)+mean)*255.0).astype(np.uint8)
input_img=cv2.cvtColor(input_img,cv2.COLOR_BGR2RGB)
diff=(input_img-ori_img)
diff=(diff-diff.min())/(diff.max()-diff.min())+0.5
plt.subplot(141),plt.imshow(ori_img),plt.title("ori_img"),plt.axis("off")
plt.subplot(142),plt.imshow(input_img),plt.title("adv_img"),plt.axis("off")
plt.subplot(143),plt.imshow(diff),plt.title("diff"),plt.axis("off")
plt.show()


定向攻击
非定向攻击每次是从所有的的类别中找出输入数据跨越分类区域的的最小移动量,然后依次累加;而定向扰动只需找准攻击目标对应的分类边界,输入数据朝着此边界进行移动更新即可。
import torch
import numpy as np
import torchvision
import matplotlib.pyplot as plt
import cv2
from torch.autograd.gradcheck  import zero_gradients


#数据处理
ori_img=cv2.imread("picture/panda.jpg")
ori_img=cv2.resize(ori_img,(224,224))  #修改图片尺寸
#拷贝输入
input_img=ori_img.copy()
#数据标准化
mean=[0.485,0.456,0.406]
std=[0.229,0.224,0.225]
input_img=input_img/255.0
input_img=(input_img-mean)/std
#将图片形式转为(Bachsize,C,W,H)的形式
input_img=torch.from_numpy(input_img).float().permute(2,0,1).unsqueeze(0)

#导入模型
model=torchvision.models.alexnet(pretrained=True).eval()

#定义配置参数
for param in model.parameters():
    param.requires_grad=False
input_img.requires_grad=True
#迭代最大次数
epoches=1000
#扰动限制
overshoot=0.02
#类别数,Image-Net classes=1000
classes=1000
#定向攻击目标
target=torch.Tensor([383]).long()
#损失函数
criterion=torch.nn.CrossEntropyLoss()

#前向计算,得到输出
output=model(input_img)
w=np.zeros_like(input_img.data)  #用来存储梯度
r_tot=np.zeros_like(input_img.data) #用来存储叠加扰动
ori_label=torch.argmax(output)
for epoch in range(epoches):
    scores=model(input_img)
    label=torch.argmax(scores)
    loss=criterion(scores,target)
    print("epoch:{} ||label={} ||loss:{}".format(epoch,label,loss.data))
    #非定向攻击
    if label==target:
        break
    zero_gradients(input_img)
    #计算对应类别梯度
    scores[0,target].backward(retain_graph=True)
    cur_i_grad=input_img.grad.numpy().copy()
    w=cur_i_grad
    f=scores[0,target].data.numpy()
    pre=abs(f)/np.linalg.norm(w.flatten())
    r_i=(pre+1e-8)*w/np.linalg.norm(w.flatten())  #计算带有迭代方向的偏移量
    r_tot=np.float32(r_tot+r_i)
    input_img.data+=(1+overshoot)*torch.from_numpy(r_tot)
"""
此时对于攻击目标而言,类似与二分类问题
所以迭代量的计算以目标的决策边界作为分类函数,计算迭代距离
"""
#展现差异
print("原始的标签:{} ||叠加扰动后的标签:{}".format(ori_label,torch.argmax(model(input_img))))
ori_img=cv2.cvtColor(ori_img,cv2.COLOR_BGR2RGB)
input_img=input_img.squeeze(0).permute(1,2,0).data.numpy()
input_img=(((input_img*std)+mean)*255.0).astype(np.uint8)
input_img=cv2.cvtColor(input_img,cv2.COLOR_BGR2RGB)
diff=(input_img-ori_img)
diff=(diff-diff.min())/(diff.max()-diff.min())+0.5
plt.subplot(141),plt.imshow(ori_img),plt.title("ori_img"),plt.axis("off")
plt.subplot(142),plt.imshow(input_img),plt.title("adv_img"),plt.axis("off")
plt.subplot(143),plt.imshow(diff),plt.title("diff"),plt.axis("off")
plt.show()


3.JSVM算法
J
S
V
M
JSVM
J
S
V
M
算法与上述三种算法的思想都不同,其考虑的是输入图像中的单个像素值,并且提出了显著图的概念
s
a
l
i
e
n
c
y
M
a
p
saliency Map
s
a
l
i
e
n
c
y
M
a
p
,即用来表征图像内各个像素点的改变对模型预测值的影响程度,从而每次决定扰动哪个像素点
算法流程:

因为是定向攻击,且分类器的预测结果是以概率值来衡量的,概率值越大,所属类别即为最终的预测结果;由于预测结果对输入数据的梯度代表输入数据的变化对输出数据的影响程度;所以我们应当是
α
\alpha
α
尽可能大,
β
\beta
β
尽可能小,这样才会越接近攻击目标。所以我们以
−
α
×
β
-\alpha \times \beta
−
α
×
β
作为衡量一个像素点的重要程度,越大越有利于预测为攻击目标
import torch
import numpy as np
import torchvision
import matplotlib.pyplot as plt
from torch.autograd.gradcheck import zero_gradients
import cv2

#数据处理
ori_img=cv2.imread("picture/panda.jpg")
ori_img=cv2.resize(ori_img,(224,224))  #修改图片尺寸
#拷贝输入
input_img=ori_img.copy()
#数据标准化
mean=[0.485,0.456,0.406]
std=[0.229,0.224,0.225]
input_img=input_img/255.0
input_img=(input_img-mean)/std
#将图片形式转为(Bachsize,C,W,H)的形式
input_img=torch.from_numpy(input_img).float().permute(2,0,1).unsqueeze(0)
#导入模型
model=torchvision.models.alexnet(pretrained=True).eval()
ori_label=torch.argmax(model(input_img))
#配置参数
for param in model.parameters():
    param.requires_grad=False
input_img.requires_grad=True
#最大迭代次数
epoches=1000
#损失函数
criterion=torch.nn.CrossEntropyLoss()
#定向攻击目标
target=torch.Tensor([383]).long()
#定义像素点更新边界(临界值)
min=-3.0
max=3.0   #应为输入数据归一化之后还进行了标准化
#扰动系数(步长)
theta=0.3

#定义搜索(查找区域),更新后的像素值如果超越了临界值,在下一轮搜索中就不再查找
mask=np.ones_like(input_img.data.numpy())
pix_change_count=0
#更新迭代
for epoch in range(epoches):
    output=model(input_img)
    label=torch.argmax(output)
    loss=criterion(output,target)
    print("epoch:{} ||label:{} ||loss:{}".format(epoch,label,loss))
    #达到攻击目标,终止
    if label==target:
        break
    #计算梯度值(显著图)
    zero_gradients(input_img)
    output[0,target].backward()
    alpha=input_img.grad.data.numpy().copy()*mask
    beta=-np.ones_like(alpha)       #简化beta的计算,全部默认为-1;主要考虑alpha
    saliency_map=np.abs(alpha)*np.abs(beta)*np.sign(alpha*beta)
    #查找-alpha*beta最大的点等价于查找alpha*beta最小的点
    id=np.argmin(saliency_map)
    #将一维的id转化为输入图像中对应位置坐标
    pix_id=np.unravel_index(id,mask.shape)
    #确定像素扰动的方向
    pix_sign=np.sign(alpha)[pix_id]

    #进行像素值的扰动
    input_img.data[pix_id]=input_img.data[pix_id]+pix_sign*theta*(max-min)
    #判断当前像素是否越界
    if input_img.data[pix_id]<min or input_img[pix_id]>max:
        mask[pix_id]=0
        input_img.data[pix_id]=np.clip(input_img.data[pix_id],min,max)
    pix_change_count+=1


#展现差异
print("原始的标签:{} ||叠加扰动后的标签:{}".format(ori_label,torch.argmax(model(input_img))))
print("总的像素值为:{} ||共修改的像素值为:{}".format(ori_img.shape[0]
                                       *ori_img.shape[1]*ori_img.shape[2],pix_change_count))
ori_img=cv2.cvtColor(ori_img,cv2.COLOR_BGR2RGB)
input_img=input_img.squeeze(0).permute(1,2,0).data.numpy()
input_img=(((input_img*std)+mean)*255.0).astype(np.uint8)
input_img=cv2.cvtColor(input_img,cv2.COLOR_BGR2RGB)
diff=(input_img-ori_img)
diff=(diff-diff.min())/(diff.max()-diff.min())+0.5
plt.subplot(141),plt.imshow(ori_img),plt.title("ori_img"),plt.axis("off")
plt.subplot(142),plt.imshow(input_img),plt.title("adv_img"),plt.axis("off")
plt.subplot(143),plt.imshow(diff),plt.title("diff"),plt.axis("off")
plt.show()


从熊猫到松鼠猴,一共修改了930个像素点。观看扰动前后的图片效果,发现添加扰动的痕迹很明显。
几个新的函数说明:
np.unravel_index(num,shape)
将张量(矩阵中的第num个数映射成对应坐标的形式)

np.clip(tensor,lower,upper)
将张量(矩阵/标量)中的数据进行截断,限制在范围
[
l
o
w
e
r
,
u
p
p
e
r
]
[lower,upper]
[
l
o
w
e
r
,
u
p
p
e
r
]
内,小于
l
o
w
e
r
lower
l
o
w
e
r
的直接置位
l
o
w
e
r
lower
l
o
w
e
r
,大于
u
p
p
e
r
upper
u
p
p
e
r
的直接置为
u
p
p
e
r
upper
u
p
p
e
r

4.CW算法
CW算法起始也是一种基于梯度的优化算法;其的创新之处在于重新设计了损失函数与采用了一种新的像素截断方式,减小了误差。
我们知道,对于对抗样本,其的优化目标主要为两部分:
- 叠加的扰动尽可能小
- 预测的结果尽可能接近攻击目标
CW中提出的改进损失函数正是这两者的结合:

第一部分代表对抗样本与干净数据之间的差距,用
L
2
L_2
L
2
范数来衡量;第二部分为衡量预测结果与攻击目标的近似度。$Z(x^
)_t代表输出结果中为类别t的概率,max\{Z(x^
)_i:i
KaTeX parse error: Expected ‘EOF’, got ‘&’ at position 1: &̲ne;t
}
代
表
不
属
于
目
标
的
其
他
类
别
的
概
率
,
代表不属于目标的其他类别的概率,
代
表
不
属
于
目
标
的
其
他
类
别
的
概
率
,
k$是一个置信度,衡量算出对抗样本的难易程度。
另一方面,
C
W
CW
C
W
算中用
tanh
函数将数据压缩至0~1范围,避免了叠加扰动后超越边界的行为,并且输入数据可以在-inf到+inf做变换,有利于优化。
常见数据截断的方式:


#CW算法的流程
#这个CW算法中存在两个超参数C,K
#K=40时效果比较好,扰动率几乎接近100%
#C的确定,一般要通过二分查找进行
#流程
"""
初始化扰动量,损失函数
"""
#每轮迭代流程
"""
计算损失函数的第一项,对抗样本与纯净数据之间的差距(L2范数衡量)
根据模型的输出,计算损失函数第二项,使攻击目标的概率尽可能大
反向传播,更新扰动量
判断当前是否扰动成功且扰动最小才将对应扰动的对抗样本保存下来
"""

#数据处理
ori_img=cv2.imread("./panda.jpg")
ori_img=cv2.resize(ori_img,(224,224))  #修改图片尺寸
#拷贝输入
input_img=ori_img.copy()
#数据标准化
mean=[0.485,0.456,0.406]
std=[0.229,0.224,0.225]
input_img=input_img/255.0
input_img=(input_img-mean)/std
#将图片形式转为(Bachsize,C,W,H)的形式
input_img=torch.from_numpy(input_img).float().permute(2,0,1).unsqueeze(0)

#导入模型
model=torchvision.models.alexnet(pretrained=True).eval()
ori_label=torch.argmax(model(input_img))
ori_label

#定义配置参数
#CW算法中存在两个超参数,c与k
#在此次实验中,k=40,也是作者在论文中给出的最佳参数值
#调节损失函数的c值通过二分查找的方式进行确定
#由于image-Net2012图数据集进行了标准化,所以其像素值的范围不是0~1
#定义像素范围区间
boxmin=-3.0
boxmax=3.0
#定义类别数
classes=1000
#定义攻击目标
target=383
#为便于后面查找模型输出的最大值,这里将攻击目标转换成one-hot编码的形式
tlabel=torch.from_numpy(np.eye(classes)[target]).float()
#定义最大二分查找的迭代次数
binary_search_steps=10
#算出像素值的近似均值与方差,进行tanh变换后,便于将值映射回来
boxplus=(boxmin+boxmax)/2
boxmul=(boxmax-boxmin)/2
#定义初始化的参数c
confidence=1e2
#定义初始化k
k=40
#定义参数c的搜索区域
lower_bound=0
upper_bound=1e6
#用来存储最好的扰动效果
best_dis=1e10   #存储损失函数的第二项值,即接近攻击目标的衡量值,在一定程度上代表了攻击成功率
best_target=-1  #叠加扰动后,模型的输出label
best_pertubation=torch.zeros_like(input_img)
#最大迭代次数
epoches=1000

#迭代训练
for step in range(binary_search_steps):
  print("best_dis:{} ||confidence:{}".format(best_dis,confidence))
  timage=(torch.arctanh((input_img-boxplus)/boxmul)*0.9999).float() #转换形式,以便后续与扰动叠加,计算第一项损失值
  pertubation=torch.zeros_like(timage).float()
  #模型参数保持不变
  for param in model.parameters():
    param.requires_grad=False
  #扰动允许梯度更新
  pertubation.requires_grad=True
  #定义优化器,用于扰动量的更新
  optimizer=torch.optim.Adam([pertubation],lr=0.01)

  #迭代更新
  for epoch in range(epoches):
    optimizer.zero_grad()
    newImg=torch.tanh(pertubation+timage)*boxmul+boxplus
    output=model(newImg)
    #计算损失函数第一项,衡量扰动量的大小
    loss1=torch.dist(newImg,torch.tanh(timage)*boxmul+boxplus,p=2)  #L2范数

    #计算损失函数第二项,衡量攻击的成功率
    real=torch.max(output*tlabel)
    other=torch.max((1-tlabel)*output)
    loss2=other-real+k
    loss2=torch.clamp(loss2,min=0)  #将范围调制大于0
    #总的损失函数
    loss=loss1+loss2
    #反向传播
    loss.backward()
    optimizer.step()
    if epoch%100==0:
      print("损失值:loss1:{} ||loss2:{} ||loss:{}".format(loss1,loss2,loss))
    if loss2<best_dis and torch.argmax(output)==target:
      print("Attack Succes: best_dis:{} ||label:{}".format(best_dis,torch.argmax(output)))
      best_dis=loss2
      best_target=torch.argmax(output)
      best_pertubation=newImg
  confidence_old=-1
  #进行参数c的二分查找
  if best_target==target:
    upper_bound=min(confidence,upper_bound)
    confidence_old=confidence
    confidence=(upper_bound+lower_bound)/2

  else:
    lower_bound=max(confidence,lower_bound)
    confidence_old=confidence
    confidence=(lower_bound+upper_bound)/2
  print("step{} ||confidence_old{}-->confidence{}".format(step,confidence_old,confidence))

#展现差异
print("原始的标签:{} ||叠加扰动后的标签:{}".format(ori_label,torch.argmax(model(best_pertubation))))
ori_img=cv2.cvtColor(ori_img,cv2.COLOR_BGR2RGB)
img=best_pertubation.squeeze(0).permute(1,2,0).data.numpy()
img=(((img*std)+mean)*255.0).astype(np.uint8)
img=cv2.cvtColor(img,cv2.COLOR_BGR2RGB)
diff=(img-ori_img)
plt.figure(figsize=(16,8))
diff=(diff-diff.min())/(diff.max()-diff.min())+0.5
plt.subplot(141),plt.imshow(ori_img),plt.title("ori_img"),plt.axis("off")
plt.subplot(142),plt.imshow(img),plt.title("adv_img"),plt.axis("off")
plt.subplot(143),plt.imshow(diff),plt.title("diff"),plt.axis("off")
