目录
前言
程序:
https://github.com/eminbogen/7.16Pangolin
下一节:
https://blog.csdn.net/unlimitedai/article/details/96134857
手册:
http://docs.ros.org/fuerte/api/pangolin_wrapper/html/namespacepangolin.html
学过视觉SLAM14讲的同学应该记得第三章有一个小程序是pangolin编写,用于演示三维刚体运动的。大概这样:
也应该知道ORB_SLAM,其显示模块是由pangolin编写的:
我学习了三章程序,库的例程,
泡泡机器人35课
和
这个博客
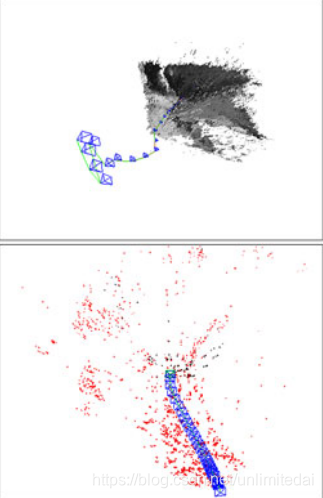
后,决定对pangolin进行一个总结。目前效果如图:
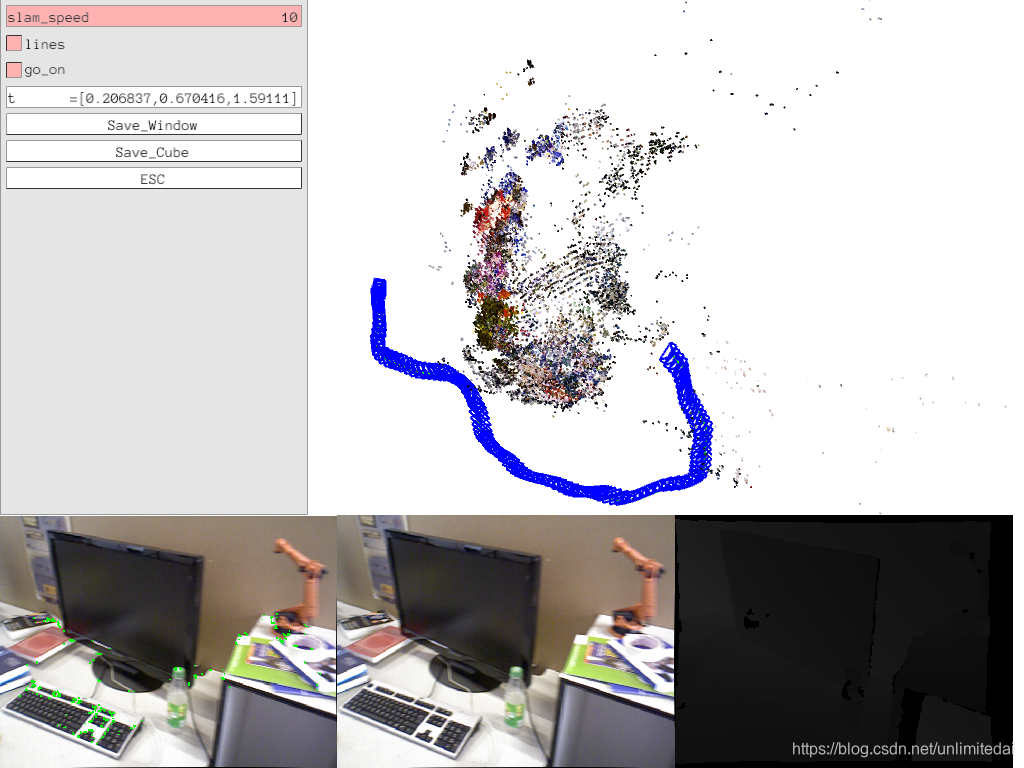
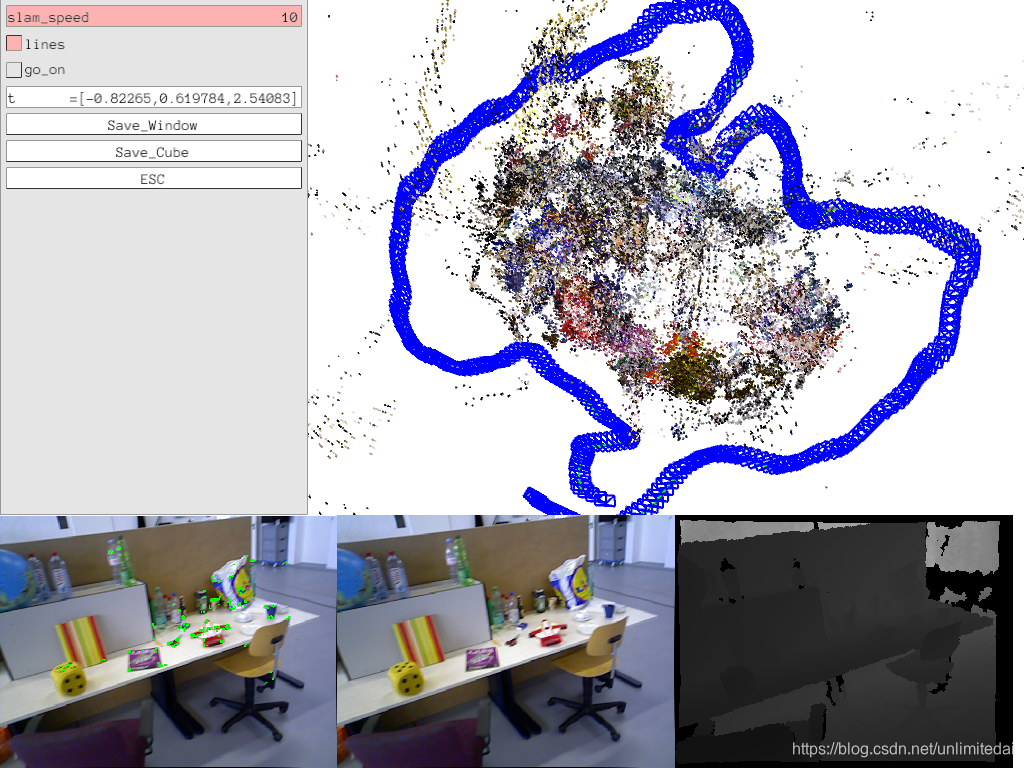
可以选择运行速度,是否显示轨迹线,是否运行,显示当前相机旋转矩阵,相机在世界坐标系下位置,保存界面,保存视角图片,显示rgb与depth图,相机位姿,退出。
1.安装pangolin
使用cmd安装
依赖:
sudo apt-get install libglew-dev
sudo apt-get install cmake
sudo apt-get install libboost-dev libboost-thread-dev libboost-filesystem-dev
主要:
git clone https://github.com/stevenlovegrove/Pangolin.git
cd Pangolin
mkdir build
cd build
cmake -DCPP11_NO_BOOST=1 ..
make -j
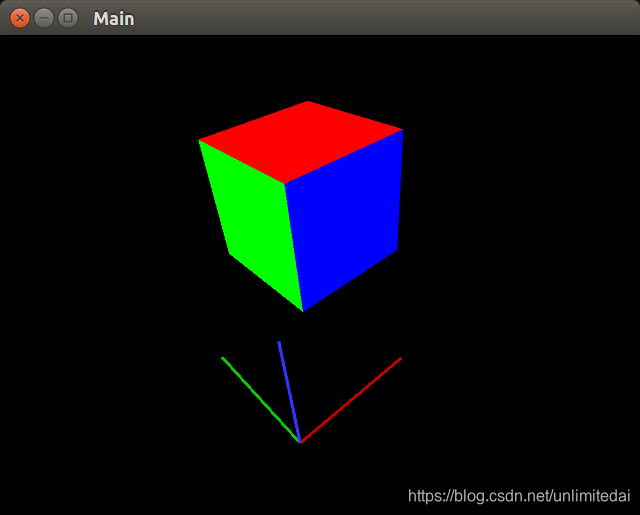
2.绘制简单图像
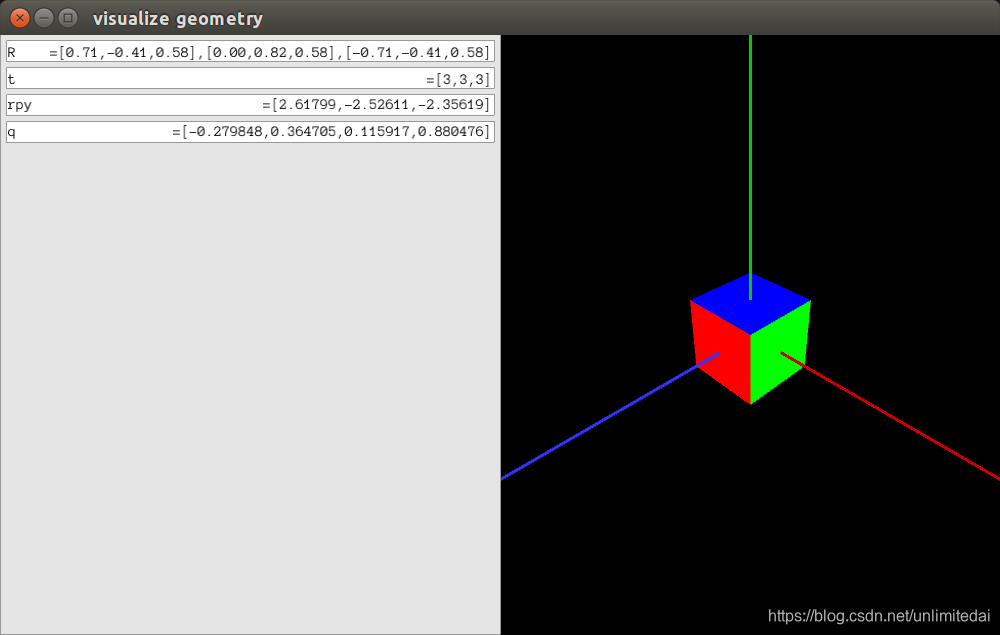
绘制简单立方体和坐标系。
#include <pangolin/pangolin.h>

int main(  )
{
    //生成一个gui界面,定义大小
    pangolin::CreateWindowAndBind("Main",640,480);
    //进行深度测试,保证某视角下像素只有一种颜色,不混杂
    glEnable(GL_DEPTH_TEST);

    //放置一个相机
    pangolin::OpenGlRenderState s_cam(
        pangolin::ProjectionMatrix(640,480,420,420,320,240,0.2,100),
        pangolin::ModelViewLookAt(-2,2,-2, 0,0,0, pangolin::AxisY)
    );

    //创建视角窗口
    pangolin::Handler3D handler(s_cam);
    pangolin::View& d_cam = pangolin::CreateDisplay()
            .SetBounds(0.0, 1.0, 0.0, 1.0, -640.0f/480.0f)
            .SetHandler(&handler);

    while( !pangolin::ShouldQuit() )
    {
        //清除颜色缓冲和深度缓冲
        glClear(GL_COLOR_BUFFER_BIT | GL_DEPTH_BUFFER_BIT);
        d_cam.Activate(s_cam);

        //绘制立方体
        pangolin::glDrawColouredCube();

	//绘制坐标系  线宽 启动 颜色 起点 终点 停止
	glLineWidth(3);
	glBegin ( GL_LINES );
	glColor3f ( 0.8f,0.f,0.f );
	glVertex3f( -1,-1,-1 );
	glVertex3f( 0,-1,-1 );
	glColor3f( 0.f,0.8f,0.f);
	glVertex3f( -1,-1,-1 );
	glVertex3f( -1,0,-1 );
	glColor3f( 0.2f,0.2f,1.f);
	glVertex3f( -1,-1,-1 );
	glVertex3f( -1,-1,0 );
	glEnd();

        //交换帧和并推进事件
        pangolin::FinishFrame();
    }

    return 0;
}
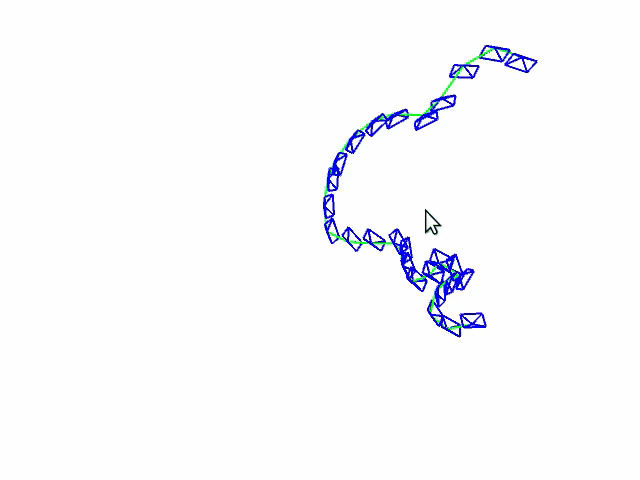
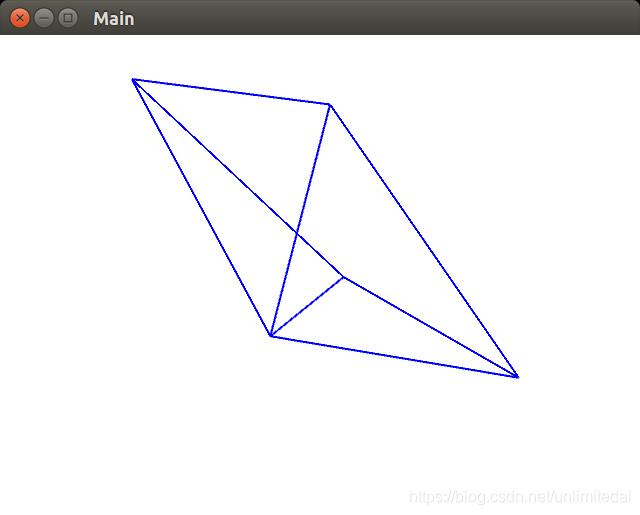
3.绘制SLAM相机位姿变化
首先,我们使用上一节的内容绘制一个相机。
#include <pangolin/pangolin.h>

int main(  )
{
    //生成一个gui界面,定义大小
    pangolin::CreateWindowAndBind("Main",640,480);
    //进行深度测试,保证某视角下像素只有一种颜色,不混杂
    glEnable(GL_DEPTH_TEST);

    //放置一个相机
    pangolin::OpenGlRenderState s_cam(
        pangolin::ProjectionMatrix(640,480,420,420,320,240,0.2,100),
        pangolin::ModelViewLookAt(-2,2,-2, 0,0,0, pangolin::AxisY)
    );

    //创建视角窗口
    pangolin::Handler3D handler(s_cam);
    pangolin::View& d_cam = pangolin::CreateDisplay()
            .SetBounds(0.0, 1.0, 0.0, 1.0, -640.0f/480.0f)
            .SetHandler(&handler);

    while( !pangolin::ShouldQuit() )
    {
        //清除颜色缓冲和深度缓冲
        glClear(GL_COLOR_BUFFER_BIT | GL_DEPTH_BUFFER_BIT);
        d_cam.Activate(s_cam);

	//背景先弄成白色的吧,我觉得白色比较好看
	glClearColor(1.0f,1.0f,1.0f,1.0f);

	//所谓相机的表示,不就是画线吗
	const float w=2;
	const float h=w*0.75;
	const float z=w*0.6;
	glLineWidth(2);
	glBegin(GL_LINES);
	glColor3f(0.0f,0.0f,1.0f);
	glVertex3f(0,0,0);		glVertex3f(w,h,z);
	glVertex3f(0,0,0);		glVertex3f(w,-h,z);
	glVertex3f(0,0,0);		glVertex3f(-w,-h,z);
	glVertex3f(0,0,0);		glVertex3f(-w,h,z);
	glVertex3f(w,h,z);		glVertex3f(w,-h,z);
	glVertex3f(-w,h,z);		glVertex3f(-w,-h,z);
	glVertex3f(-w,h,z);		glVertex3f(w,h,z);
	glVertex3f(-w,-h,z);		glVertex3f(w,-h,z);

	glEnd();

        //交换帧和并推进事件
        pangolin::FinishFrame();
    }

    return 0;
}
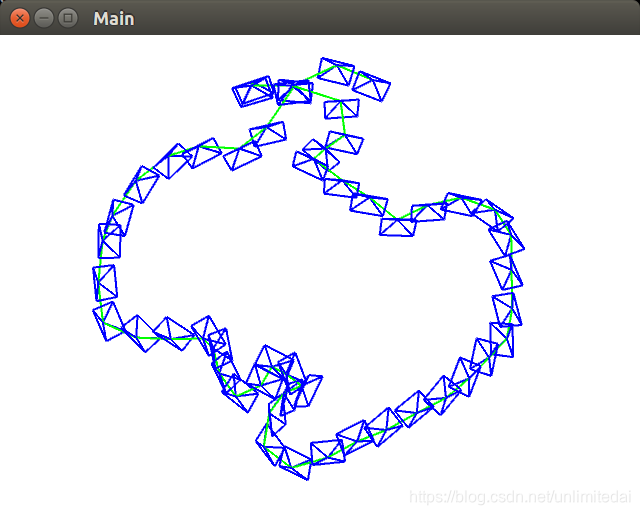
之后,我们利用
TUM数据集
进行绘制。我好像用的
这个集
,不过我在我的程序那边保存了关键的一个文件,所以不到使用图片时,用我的github下载的内容就够。
groundtruth.txt文件存储着各时刻的位姿信息。时间,x,y,z,qx , qy , qz , qw。我们要将其提取,转化为pangolin需要的变换矩阵的转置形式。如果你学习了14讲第三章,那么应该非常容易完成。

#include <iostream>
#include <iomanip>
#include <ctime>
using namespace std;

#include <Eigen/Core>
#include <Eigen/Geometry>
using namespace Eigen;

#include <pangolin/pangolin.h>

//定义一个全局变量,用于保存生成的位姿
vector<vector<float>> pose_fin;

//从groundtruth文件获取位姿信息
int get_pose(string path_to_dataset,vector<vector<float>> &pose,int index,int interval);

//生成地图
void get_map();

int main()
{
    //给予文件地址
    string path_to_dataset = "../groundtruth.txt";
    //定义暂时读取位姿信息存储的vector,读取总帧数和读取间隔
    vector<vector<float>> pose;int index=50;int interval =160;
    //取得pose
    get_pose(path_to_dataset,pose,index,interval);
    //转换原groundtruth下的数据格式(四元数)到适合pangolin的数据格式(旋转矩阵)
    for (int i=0;i<index;i++)
    {
	  //存储四元数
	  Eigen::Quaterniond quaternion(pose[i][3],pose[i][4],pose[i][5],pose[i][6]);
	  //存储旋转矩阵
	  Eigen::Matrix3d rotation_matrix;
	  //四元数转化旋转矩阵
	  rotation_matrix=quaternion.matrix();
	  //定义一个暂时的pose_temp存储12个位姿数据,9个旋转矩阵的元素,3各位置元素
	  vector<float> pose_temp;
	  //旋转矩阵元素
	  pose_temp.push_back(rotation_matrix(0,0));	pose_temp.push_back(rotation_matrix(1,0));	pose_temp.push_back(rotation_matrix(2,0));
	  pose_temp.push_back(rotation_matrix(0,1));	pose_temp.push_back(rotation_matrix(1,1));	pose_temp.push_back(rotation_matrix(2,1));
	  pose_temp.push_back(rotation_matrix(0,2));	pose_temp.push_back(rotation_matrix(1,2));	pose_temp.push_back(rotation_matrix(2,2));
	  //位置元素
	  pose_temp.push_back(pose[i][0]);			pose_temp.push_back(pose[i][1]);				pose_temp.push_back(pose[i][2]);
	  //将pose_temp存入全局变量pose用于构图,也就是每一行的pose都是一个pose_temp,12个数,最后会有index行
	  pose_fin.push_back(pose_temp);
	  //清空pose_temp内存
	  pose_temp.clear();
    }
    //清空pose内存
    pose.clear();
    //构图
    get_map();
    return 0;
}

int get_pose(string path_to_dataset,vector<vector<float>> &pose,int index,int interval)
{
    //检测文件是否存在
    ifstream fin( path_to_dataset );
    if ( !fin )
    {
        cerr<<"I cann't find txt!"<<endl;
	return 1;
    }
    //循环取值给pose,取帧数量为index
    for ( int i=0; i<index; i++ )
    {
	//定义暂时量用于读取操作,定义pose_temp用于向pose添加数据,设定选取间隔为interval
	float temp[8];vector< float>pose_temp;int interval_temp = interval;
	//循环读取文件每行数据,直到满足interval行
	while(interval_temp--) fin>>temp[0]>>temp[1]>>temp[2]>>temp[3]>>temp[4]>>temp[5]>>temp[6]>>temp[7];
	//先把7个数给pose_temp,3个位置元素,还有四元数,注意我先加入的temp[7]也就是四元数的实部
	pose_temp.push_back(temp[1]);pose_temp.push_back(temp[2]);pose_temp.push_back(temp[3]);
	pose_temp.push_back(temp[7]);pose_temp.push_back(temp[4]);pose_temp.push_back(temp[5]);pose_temp.push_back(temp[6]);
	//把pose_temp堆入pose
	pose.push_back(pose_temp);
	//清空pose_temp内存
	pose_temp.clear();
    }
    return 1;
}

void get_map()
{
    const float w=0.2;
    const float h=w*0.75;
    const float z=w*0.6;
    //生成一个gui界面,定义大小
    pangolin::CreateWindowAndBind("Main",640,480);
    //进行深度测试,保证某视角下像素只有一种颜色,不混杂
    glEnable(GL_DEPTH_TEST);

    //放置一个相机
    pangolin::OpenGlRenderState s_cam(
        pangolin::ProjectionMatrix(640,480,420,420,320,240,0.2,100),
        pangolin::ModelViewLookAt(-2,2,-2, 0,0,0, pangolin::AxisY)
    );

    //创建视角窗口
    pangolin::Handler3D handler(s_cam);
    pangolin::View& d_cam = pangolin::CreateDisplay()
            .SetBounds(0.0, 1.0, 0.0, 1.0, -640.0f/480.0f)
            .SetHandler(&handler);

    while( !pangolin::ShouldQuit() )
    {
        //清除颜色缓冲和深度缓冲
        glClear(GL_COLOR_BUFFER_BIT | GL_DEPTH_BUFFER_BIT);
        d_cam.Activate(s_cam);

	//背景先弄成白色的吧,我觉得白色比较好看
	glClearColor(1.0f,1.0f,1.0f,1.0f);

	//使用变换矩阵画图
	for(int i=0;i<pose_fin.size();i++)
	{
	    //使用位置变换矩阵
	    glPushMatrix();
	    //变换如该矩阵,注意这个变换矩阵是转置的
	    std::vector<GLfloat> Twc ={ pose_fin[i][0],pose_fin[i][1],pose_fin[i][2],0,
							      pose_fin[i][3],pose_fin[i][4],pose_fin[i][5],0,
							      pose_fin[i][6],pose_fin[i][7],pose_fin[i][8],0,
							      pose_fin[i][9],pose_fin[i][10],pose_fin[i][11],1 };

	    //变换
	    glMultMatrixf(Twc.data());
	    //每次变换后绘制相机
	    glLineWidth(2);
	    glBegin(GL_LINES);
	    glColor3f(0.0f,0.0f,1.0f);
	    glVertex3f(0,0,0);		glVertex3f(w,h,z);
	    glVertex3f(0,0,0);		glVertex3f(w,-h,z);
	    glVertex3f(0,0,0);		glVertex3f(-w,-h,z);
	    glVertex3f(0,0,0);		glVertex3f(-w,h,z);
	    glVertex3f(w,h,z);		glVertex3f(w,-h,z);
	    glVertex3f(-w,h,z);		glVertex3f(-w,-h,z);
	    glVertex3f(-w,h,z);		glVertex3f(w,h,z);
	    glVertex3f(-w,-h,z);		glVertex3f(w,-h,z);

	    glEnd();
	    glPopMatrix();
	}

	//绘制连接的绿色线
	glLineWidth(2);
        glBegin ( GL_LINES );
	glColor3f ( 0.0f,1.f,0.f );
	for(int i=0;i<pose_fin.size()-1;i++)
	{
	    glVertex3f( pose_fin[i][9],pose_fin[i][10],pose_fin[i][11]);
	    glVertex3f( pose_fin[i+1][9],pose_fin[i+1][10],pose_fin[i+1][11] );
	}
	glEnd();

        //交换帧和并推进事件
        pangolin::FinishFrame();
    }
}
4.多线程绘制相机位姿变化
想如同orb_slam那样实时演示,就需要多线程。
主要内容如下:
//多线程的库
#include <thread>

//定义线程
std::thread render_loop;
//开启线程
render_loop = std::thread(get_map);

//暂定(在获取pose_fin的循环中使用,让位姿的获取类似slam的获取一样慢)
usleep(100000);

//收束线程
render_loop.join();