利用 sklearn 实现SVM,及其人脸分类小实例
-
利用sklearn 生成数据
import numpy as np
import matplotlib.pyplot as plt
from scipy import stats


# 利用sklearn 随机生成数据
from sklearn.datasets.samples_generator import make_blobs

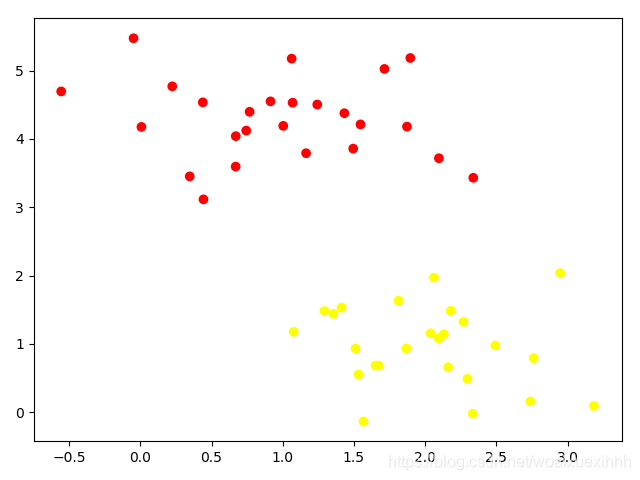
x,y = make_blobs(n_samples=50,centers=2,random_state=0,cluster_std=0.6)
plt.scatter(x[:,0],x[:,1],c=y,cmap='autumn')
plt.show()

-
随便画几条分割线
# 随便画几条分割线
x_fit = np.linspace(-1,3.5)
plt.scatter(x[:,0],x[:,1],c=y,cmap='autumn')
plt.plot([0.6], [2.1],'x',c='red',markersize=10)
for m,b in [(1,0.65),(0.5,1.6),(-0.2,2.9)]:
    plt.plot(x_fit,m*x_fit+b,'-k')
plt.xlim(-1,3.5)
plt.show()
-
绘图函数
def plot_svc_decision_function(model,ax=None,plot_support = True): "绘制二维的决定方程" if ax is None: ax = plt.gca() # 绘制一个子图对象 xlim = ax.get_xlim() ylim = ax.get_ylim() x = np.linspace(xlim[0],xlim[1],30) y = np.linspace(xlim[0],ylim[1],30) Y, X = np.meshgrid(y,x) xy = np.vstack([X.ravel(),Y.ravel()]).T P = model.decision_function(xy).reshape(X.shape) # 绘制决策边界 ax.contour(X,Y,P,colors='k',levels=[-1,0,1],alpha=0.5,linestyles=['--','-','--']) # 绘制支持向量 if plot_support: ax.scatter(model.support_vectors_[:,0],model.support_vectors_[:,1],s = 300,linewidth=1,facecolors='none') ax.set_xlim(xlim) ax.set_ylim(ylim) -
线性的支持向量机
# 训练一个基本的svm
from sklearn.svm import SVC # 支持向量机的分类器
model = SVC(kernel='linear') # 初始化一个线性的向量机
model.fit(x,y)
plt.scatter(x[:,0],x[:,1],c=y,s=50,cmap='autumn') plot_svc_decision_function(model) plt.show()
-
线性的支持向量机对圈状数据进行分类
from sklearn.datasets.samples_generator import make_circles
X,y = make_circles(100, factor=0.2, noise=0.1,shuffle=True)

clf =  SVC(kernel='linear').fit(X,y)
plt.scatter(X[:,0],X[:,1],c=y,s=50,cmap='autumn')
plot_svc_decision_function(clf,plot_support=False)
plt.show()

-
利用高斯核函数映射到高维的空间
# 加入径向基函数
clf = SVC(kernel='rbf',C=1E6)
clf.fit(X, y)
plt.scatter(X[:,0],X[:,1],c=y,s=50,cmap='autumn')
plot_svc_decision_function(clf)
plt.show()

调节参数
# 调节svm参数:soft margin问题
# 当c 趋近于无穷大的时候:意味着分类严格不能有错误
# 当C趋近于很小的时候,意味着可以有跟大的错误容忍
X, y = make_blobs(n_samples=100, centers=2,random_state=0,cluster_std=0.8)
plt.scatter(X[:,0],X[:,1],c = y,s=50,cmap='autumn')
plt.show()

# 观察C 参数的大小对结果的影响
fig, ax = plt.subplots(1,2,figsize=(16,6))
fig.subplots_adjust(left=0.0625,right=0.95,wspace=0.1)
for axi, C in zip(ax,[10.0,0.1]):
    model = SVC(kernel='linear',C=C).fit(X,y)
    axi.scatter(X[:,0],X[:,1],c = y,s=50,cmap='autumn')
    plot_svc_decision_function(model,axi)
    axi.scatter(model.support_vectors_[:,0],model.support_vectors_[:,1],s=300,lw=1,facecolors='none')
    axi.set_title('C={0:.1f}'.format(C),size=14)
fig.show()
# 距离越小,泛化能力越差


# 观察gamma值的影响,gamma越大,模型越复杂,泛化能力越差
X, y = make_blobs(n_samples=100, centers=2,random_state=0,cluster_std=1.1)
plt.scatter(X[:,0],X[:,1],c = y,s=50,cmap='autumn')
fig, ax = plt.subplots(1,2,figsize=(16,6))
fig.subplots_adjust(left=0.0625,right=0.95,wspace=0.1)
for axi, gamma in zip(ax,[10.0,0.1]):
    model = SVC(kernel='rbf',gamma=gamma).fit(X,y)
    axi.scatter(X[:,0],X[:,1],c = y,s=50,cmap='autumn')
    plot_svc_decision_function(model,axi)
    axi.scatter(model.support_vectors_[:,0],model.support_vectors_[:,1],s=300,lw=1,facecolors='none')
    axi.set_title('gamma={0:.1f}'.format(gamma),size=14)
fig.show()

人脸分类
from sklearn.datasets import fetch_lfw_people
import matplotlib.pyplot as plt
faces = fetch_lfw_people(min_faces_per_person=60) # 设置每一人的人脸最小为60个图片
print(faces.target_names)
print(faces.images.shape)

fig, ax = plt.subplots(3,5)
for i,axi in enumerate(ax.flat):
    axi.imshow(faces.images[i],cmap = 'bone')
    axi.set(xticks=[],yticks=[],xlabel=faces.target_names[faces.target[i]])
fig.show()

# 每个图像的大小是62*47
# 在这里我们把每个像素点当做是一个特征,用PCA降维

from sklearn.svm import SVC
from sklearn.decomposition import PCA
from sklearn.pipeline import make_pipeline

pca = PCA(n_components=150,whiten=True, random_state=42)
svc = SVC(kernel='rbf',class_weight='balanced')
model = make_pipeline(pca, svc)

from sklearn.model_selection import train_test_split
Xtrain, Xtest,ytrain,ytest = train_test_split(faces.data, faces.target, random_state=40)


from sklearn.model_selection import GridSearchCV
param_grid = {'svc__C': [1, 5, 10],
              'svc__gamma': [0.0001, 0.0005, 0.001]}
grid = GridSearchCV(model, param_grid)
print(Xtrain.shape, ytrain.shape)
grid.fit(Xtrain, ytrain) #建立模型
print(grid.best_params_) #输出模型的参数组合

model = grid.best_estimator_  #输出最好的模型

yfit = model.predict(Xtest)  #用当前最好的模型做预测
fig, ax = plt.subplots(4, 6)
for i, axi in enumerate(ax.flat):
    axi.imshow(Xtest[i].reshape(62, 47), cmap='bone')
    axi.set(xticks=[], yticks=[])
    axi.set_ylabel(faces.target_names[yfit[i]].split()[-1],
                   color='black' if yfit[i] == ytest[i] else 'red')
fig.suptitle('Predicted Names; Incorrect Labels in Red', size=14)
fig.show()


from sklearn.metrics import classification_report
print(classification_report(ytest, yfit,
                            target_names=faces.target_names))
我们前面讲到的都是用于实现二分类问题,但是这是观察到的是sklearn中的SVC 已经实现了多分类,使用的是onevsone 策略


其中找出的参数较好的组合是:
{‘svc__C’: 5, ‘svc__gamma’: 0.001}
得到的结果为:

附上相关评价方式:

版权声明:本文为woaixuexihhh原创文章,遵循 CC 4.0 BY-SA 版权协议,转载请附上原文出处链接和本声明。