opencv GPU加速解码
文章目录
前言
熟悉opencv的话应该知道opencv中的cv::videocapture确实好用,在没有特别多的需求时完全可以胜任.
下面的代码编译出的例子一
份
(免积分)
这样就没有必要去折腾ffmpeg的API去了.
今天说下 GPU加速版的解码部分 cv::cudacodec::VideoReader的搞起.
一、下载Video_Codec_SDK_10.0.26
保证机器安装了cuda10.2(版本看自己的需求)的SDK
保证自己有NVIDIA的显卡并支持硬解. 去NVIDIA官方找SDK Video_Codec_SDK_10.0.26 下载下来(不会找就在官方搜索里搜ffmpeg)
解压将include中的
cuviddec.h nvcuvid.h nvEncodeAPI.h
放到cuda的include文件夹
解压将lib里面的
nvcuvid.lib
放到cuda的lib\x64里面
二、cmake编译opencv源码
主要必勾选CUDA 还有就是看下 CUDA_nvcuvid库是否搜索到
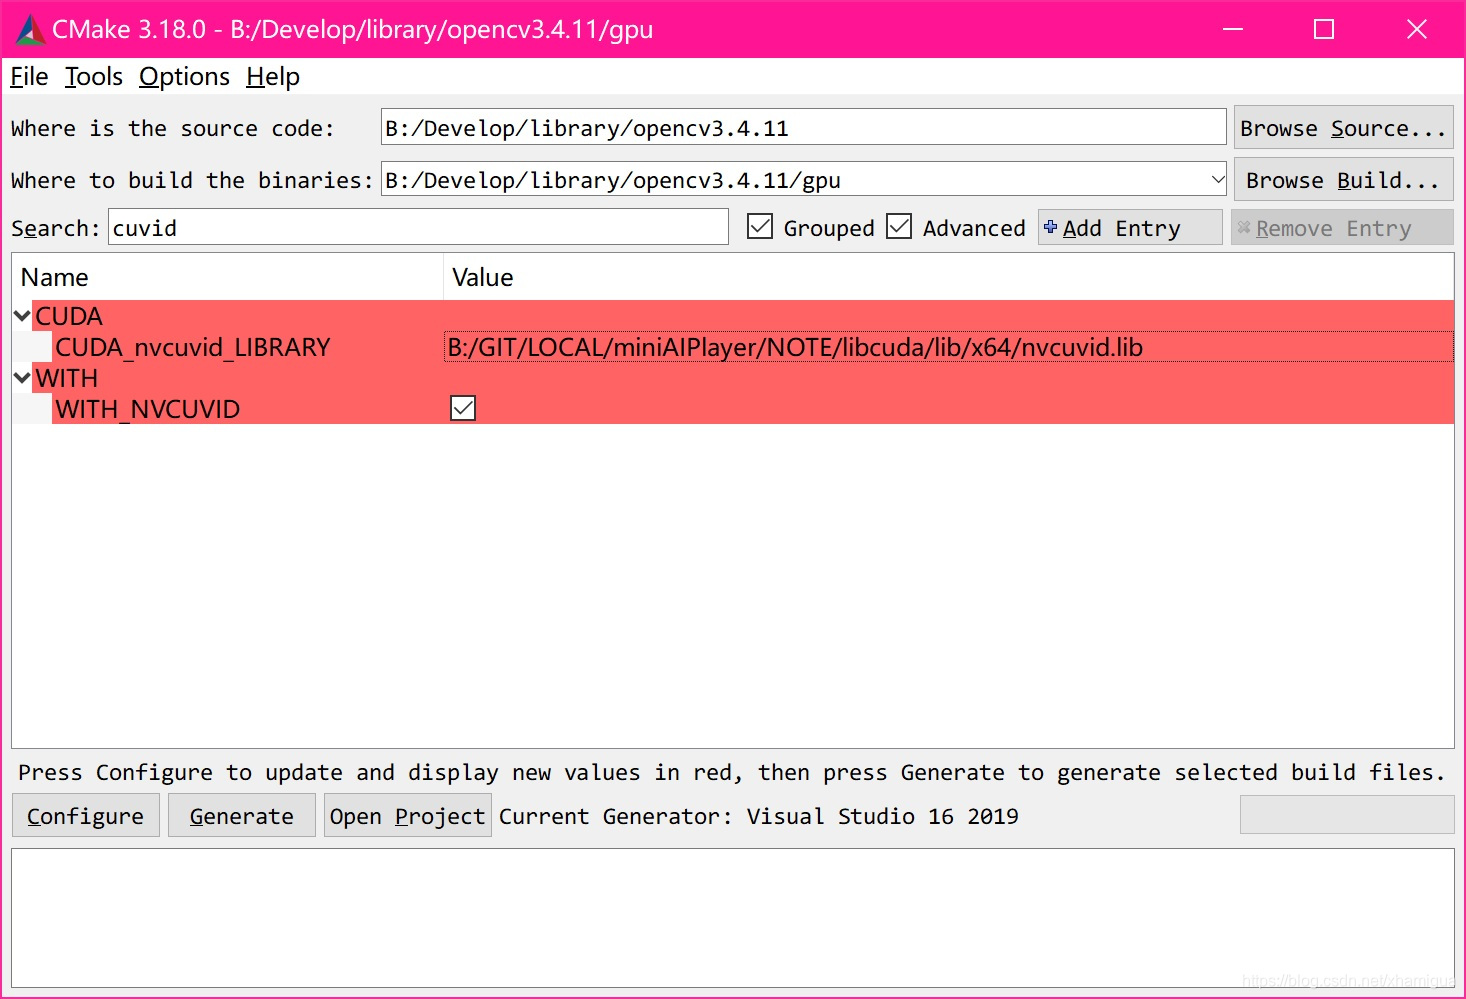
一路configure 到Cenerate 到vs2019编译出opencv_world出来.
三、对比测试
测试例子 当前的版本只支持H264的硬解
#include <iostream>
#include "opencv2/opencv_modules.hpp"
#include <string>
#include <vector>
#include <algorithm>
#include <numeric>
#include <opencv2/core.hpp>
#include <opencv2/core/opengl.hpp>
#include <opencv2/cudacodec.hpp>
#include <opencv2/highgui.hpp>

int main(int argc, const char* argv[])
{
    if (argc != 2)
        return -1;
    const std::string fname(argv[1]);

    cv::namedWindow("CPU", cv::WINDOW_NORMAL);
    //下面以opengl创建
    cv::namedWindow("GPU", cv::WINDOW_OPENGL);
    //将cuda与opengl互操作关联
    cv::cuda::setGlDevice();

    cv::Mat frame;
    cv::VideoCapture reader(fname);

    cv::cuda::GpuMat d_frame;
    cv::Ptr<cv::cudacodec::VideoReader> d_reader = cv::cudacodec::createVideoReader(fname);

    cv::TickMeter tm;
    std::vector<double> cpu_times;
    std::vector<double> gpu_times;

    int gpu_frame_count=0, cpu_frame_count=0;

    while (true)
    {
        tm.reset(); tm.start();
        if (!reader.read(frame))
            break;
        tm.stop();
        cpu_times.push_back(tm.getTimeMilli());
        cpu_frame_count++;
        cv::imshow("CPU", frame);
        if (cv::waitKey(3) > 0)
            break;
    }

    while (true)
    {
        tm.reset(); tm.start();
        if (!d_reader->nextFrame(d_frame))
            break;
        tm.stop();
        gpu_times.push_back(tm.getTimeMilli());
        gpu_frame_count++;
        cv::imshow("GPU", d_frame);
        if (cv::waitKey(3) > 0)
            break;
    }

    if (!cpu_times.empty() && !gpu_times.empty())
    {
        std::cout << std::endl << "Results:" << std::endl;

        std::sort(cpu_times.begin(), cpu_times.end());
        std::sort(gpu_times.begin(), gpu_times.end());

        double cpu_avg = std::accumulate(cpu_times.begin(), cpu_times.end(), 0.0) / cpu_times.size();
        double gpu_avg = std::accumulate(gpu_times.begin(), gpu_times.end(), 0.0) / gpu_times.size();

        std::cout << "CPU : Avg : " << cpu_avg << " ms FPS : " << 1000.0 / cpu_avg << " Frames " << cpu_frame_count << std::endl;
        std::cout << "GPU : Avg : " << gpu_avg << " ms FPS : " << 1000.0 / gpu_avg << " Frames " << gpu_frame_count << std::endl;
    }
    return 0;
}
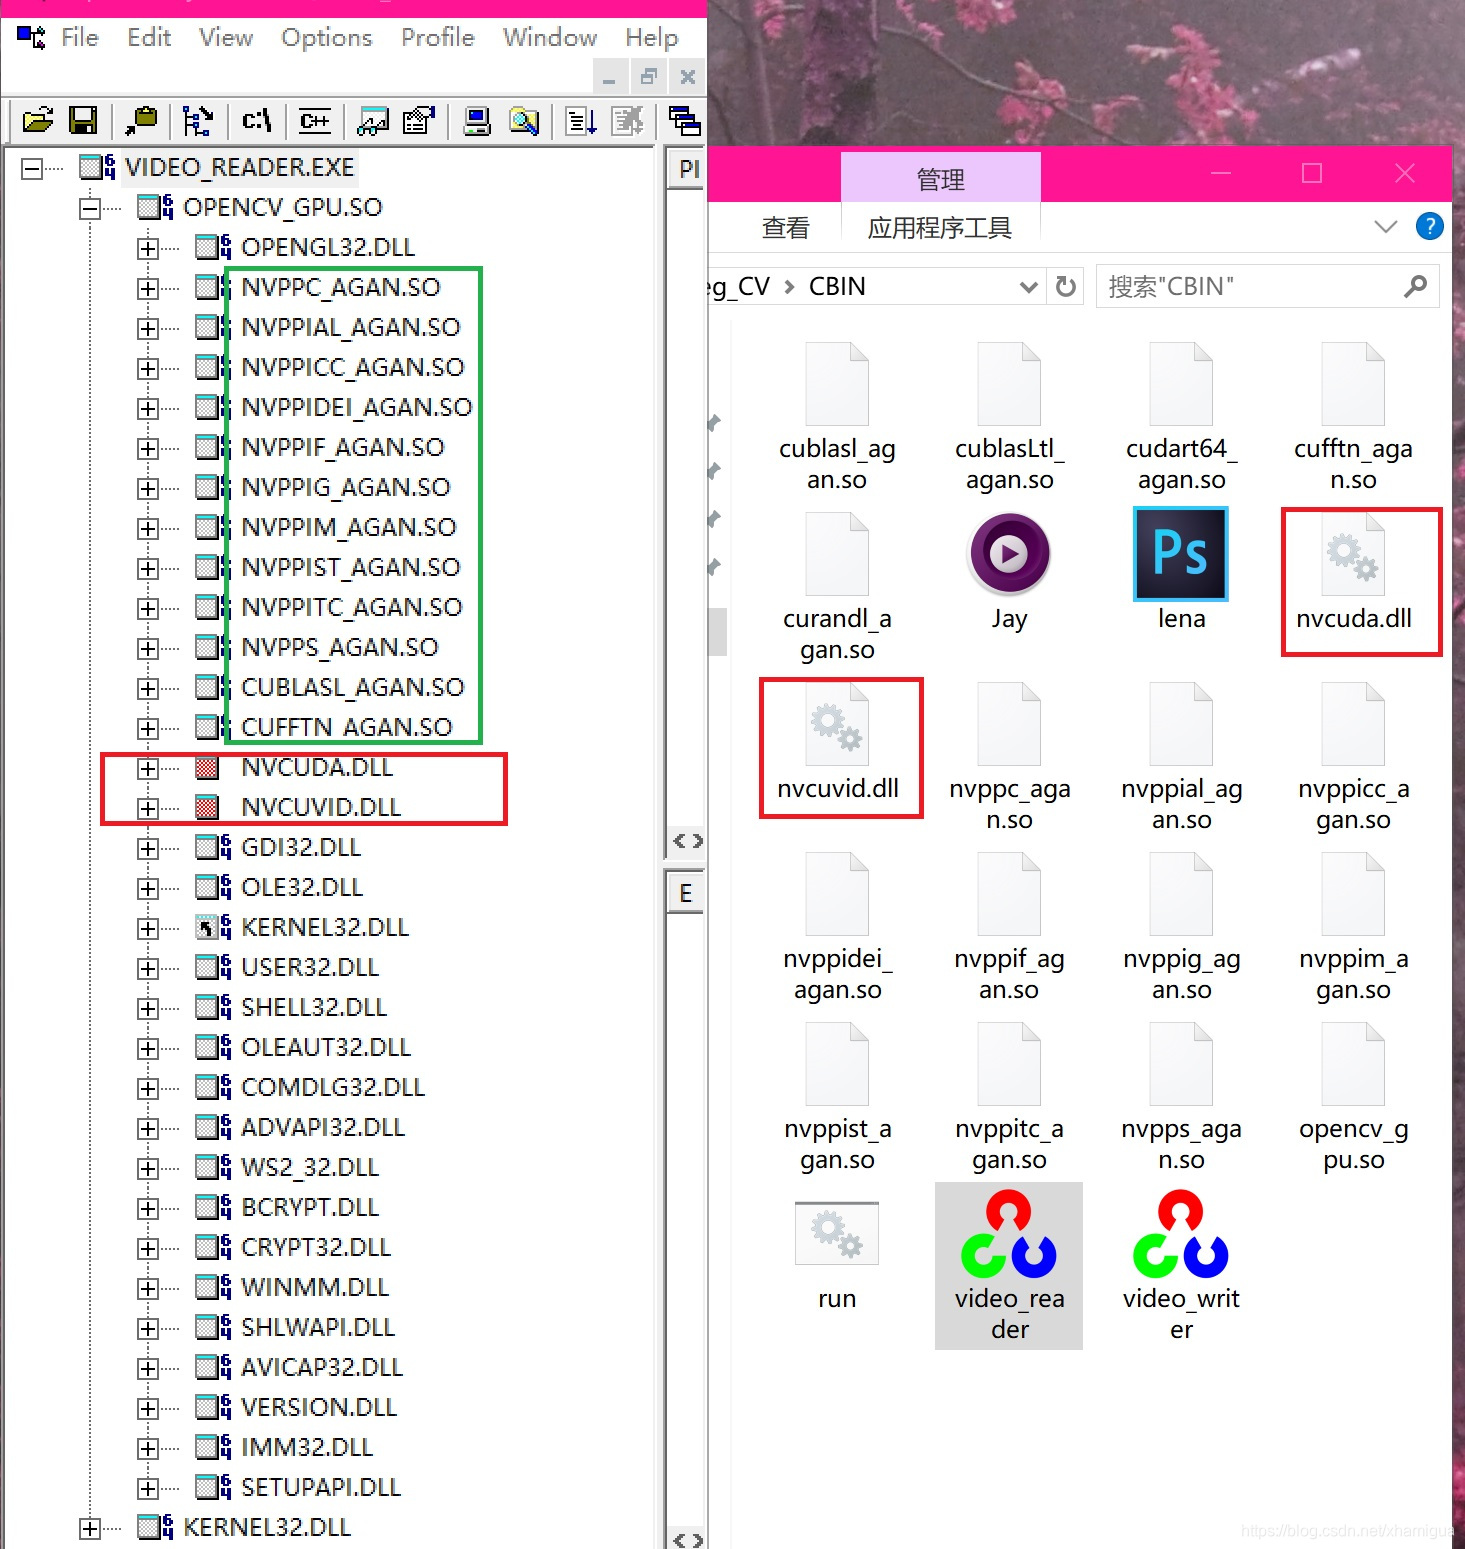
注意: 这里编译完后有个小坑 运行直接崩溃了.
在VS2019下调试跟了一下 cv::cudacodec::createVideoReader的流程怎么到cuvid的发现 是库拷错了.
程序依赖的nvcuda.dll和nvcuvid.dll必须是64位的去系统找nVidia驱动中是有的
下面可以看到依赖的样子
好了跑一下看看
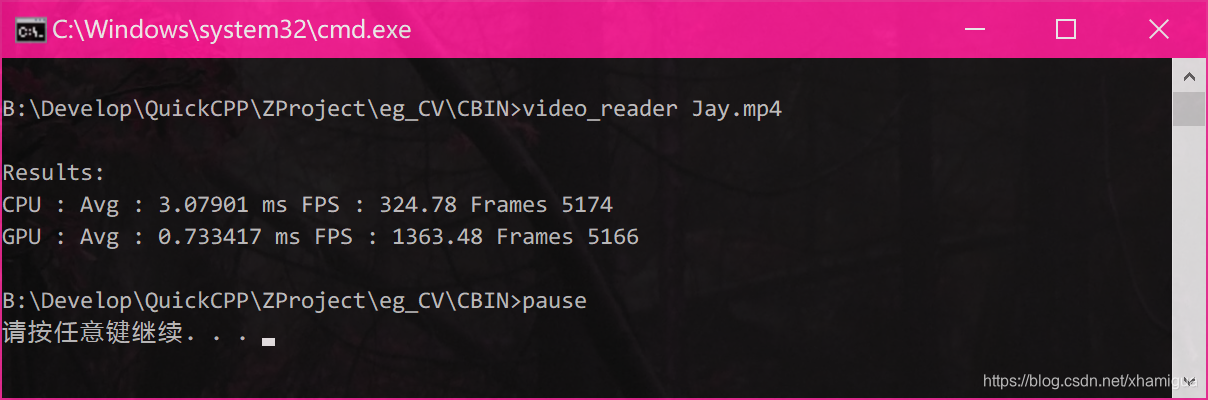
视频会先CPU解码完整放一片(电脑风扇呼呼起来) 再GPU解码放一片.
明显GPU还是快4倍多提升,不会在解码时有太多的延时了.
基本也就下面这个套路
int main(int argc, char** argv)
{
    if (argc != 2)
        return -1;

    cv::namedWindow("GPU", cv::WINDOW_OPENGL);
    cv::cuda::setGlDevice();
    cv::cuda::GpuMat d_frame;
    cv::Ptr<cv::cudacodec::VideoReader> d_reader = cv::cudacodec::createVideoReader(std::string(argv[1]));
    while (true)
    {
        if (!d_reader->nextFrame(d_frame))
            break;
        cv::imshow("GPU", d_frame);
        if (cv::waitKey(3) > 0)
            break;
    }
    return 0;
}
总结
拷到替换原来的cv::videocapture 运行很好.
搞起! 飞起来吧
!
补充一下:
很多人说图解码完后速度掉了 是因为做了download
我这里是用的opencv的创建的支持opengl 的window
cv::namedWindow(“GPU”, cv::WINDOW_OPENGL);
再用cv::cuda::setGlDevice()来做CUDA OPENGL互操作性 里面其实就是调用了CUDA的cudaGLSetGLDevice(device)做的(注意多张显卡的问题 虽然一般只有一个)
这样GPU的图就流给gl去做纹理渲染了
不过如果库依赖没有链接好 大部分问题就出来
不要download这个GpuMat ,有什么处理找cv::cuda里面的API解决 不然就卡爆了.
经过分析大部分人都卡在库的各种链接问题 如果太过折腾可以下我上面的库先试试
如果是调研测试可以直接链接马上看效果