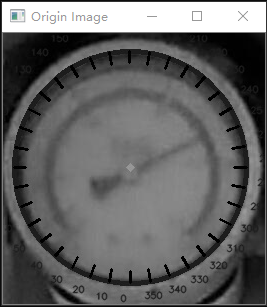
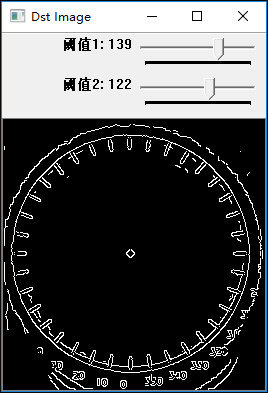
这一节是此方案设计的最核心部分,指针能否准确的定位出来是最关键的问题,在学习过程中,初步采用几种方案来尽可能的提高指针定位的精度:
1.指针定位的方案: Hough直线检测 环向模板匹配法 径向灰度求和法
2.指针细化的方法(算法将放在文章最后提供测试与使用)
对于指针定位,初步的设计思路是采用Hough直线检测的方法,而后通过直线上的点与圆的关系来将错误检测的直线进行过滤,此方案的难点在于Hough直线检测的方法经常与Canny边缘检测算子进行联合使用,而Canny算子的阈值选择以及Hough直线的长度选择都是比较动态的过程,在调节过程非常困难,本文采用可以连续调节Canny算子和Hough检测阈值的方法,来选择适合于方案的值,初步测试有较好的效果。
函数使用如下:
// HoughLine
midd_line_img = HoughLine(midd_img, midd_line_img);
OpenCV中的函数封装为:
// CannyDetect
Canny(gray_img, midd_line_img, 23, 55, 3);
// HoughLine
HoughLinesP(midd_line_img, mylines, 1, CV_PI / 180, g_nthreshold + 1, 20, 5);
采用的可以调节的Canny算子的程序及效果图如下:
#include <opencv2/opencv.hpp>
#include <opencv2/highgui/highgui.hpp>
#include <opencv2/imgproc/imgproc.hpp>

using namespace std;
using namespace cv;

// Define the Mat parameters
Mat g_srcImage, g_dstImage, g_midImage;
// Define a vector to collect all detected lines
vector<Vec4i> g_lines;
int g_nthreshold = 100;

static void showImage1(int, void*);
static void showImage2(int, void*);
int thred1 = 23;
int thred2 = 55;
// 23 55
int main()
{
	// Load origin image
	g_srcImage = imread("12.jpg", 0);
	// Show origin image
	namedWindow("Dst Image", 1);
	imshow("Origin Image", g_srcImage);
	// Create a Tracebar
	createTrackbar("threshold1", "Dst Image", &thred1, 200, showImage1);
	createTrackbar("threshold2", "Dst Image", &thred2, 200, showImage2);
	// Canny Detect and Gray am image
	Canny(g_srcImage, g_midImage, thred1, thred2, 3);
	cvtColor(g_midImage, g_dstImage, CV_GRAY2BGR);
	showImage1(thred1, 0);
	showImage2(thred2, 0);
	// Show the dst image
	imshow("Dst Image", g_dstImage);
	waitKey(0);
	return 0;
}

static void showImage1(int thred1, void*) {
	// Canny Detection
	Canny(g_srcImage, g_midImage, thred1, thred2, 3);
	imshow("Dst Image", g_midImage);
}

static void showImage2(int thred2, void*) {
	// Canny Detection
	Canny(g_srcImage, g_midImage, thred1, thred2, 3);
	imshow("Dst Image", g_midImage);
}
效果图:
原图:

适宜的阈值选择:

不适宜的阈值选择:已经将指针直线湮没

同理,HoughLine方法的总体方案如下:
Mat HoughLine(Mat midd_img, Mat midd_line_img) {

	Mat dst_img, gray_img;

	cvtColor(midd_img, gray_img, COLOR_BGR2GRAY);

	// CannyDetect
	Canny(gray_img, midd_line_img, 23, 55, 3);

	// convert cannied image to a gray one
	cvtColor(midd_line_img, dst_img, CV_GRAY2BGR);

	// define a vector to collect all possible lines
	vector<Vec4i> mylines;
	int g_nthreshold = 39;
	HoughLinesP(midd_line_img, mylines, 1, CV_PI / 180, g_nthreshold + 1, 20, 5);

	// draw every line by using for
	for (size_t i = 0; i < mylines.size(); i++)
	{
		l = mylines[i];
		if (((circle_center.x - 10) <= l[0]) && (l[0] <= (circle_center.x + 10)))
			if (((circle_center.y - 10) <= l[1]) && (l[1] <= (circle_center.y + 10)))
				if (((circle_center.x - circle_radius) <= l[2]) && (l[2] <= (circle_center.x + circle_radius)))
					if (((circle_center.y - circle_radius) <= l[3]) && (l[3] <= (circle_center.y + circle_radius)))
					{
						//cout << Point(l[0], l[1]) << " " << Point(l[2], l[3]) << " " << l[0] << " " << circle_center.x - circle_radius << " " << circle_center.x + circle_radius << endl;
						// line(midd_img, Point(l[0], l[1]), Point(l[2], l[3]), Scalar(23, 180, 55), 2, CV_AA);
						cho_l = l;
						line(midd_img, Point(circle_center.x, circle_center.y), Point(cho_l[2], cho_l[3]), Scalar(23, 180, 55), 2, CV_AA);
					}
	}

	return midd_img;
}
效果图如下:

欢迎评论文章,给予宝贵建议,工程提供在github下载学习,请关注作者,共同学习交流。
版权声明:本文为XD_Cauthy原创文章,遵循 CC 4.0 BY-SA 版权协议,转载请附上原文出处链接和本声明。