tomcat简介
tomcat服务器是一个免费的开源Web应用服务器,属于轻量级应用服务器,再中小型系统和并发访问用户较少的场合下被普遍使用,是开发和调试jsp程序的首选。对于一个初学者来说,也可以这样理解,当在一台机器上配置好Apache服务器,可以利用它相应html页面的访问请求,实际上tomcat是Apache服务器的拓展,但运行时是独立的,所以当你运行tomcat时,它实际上是作为一个与Apache独立的进程单独运行的。一般情况下,当配置正确时,Apache处理html服务,tomcat处理jsp页面和servlet。
tomcat的安装
1、安装jdk
[root@hadoop3 data]# rpm -ivh jdk-8u201-linux-x64.rpm
warning: jdk-8u201-linux-x64.rpm: Header V3 RSA/SHA256 Signature, key ID ec551f03: NOKEY
Preparing...                          ################################# [100%]
	package jdk1.8-2000:1.8.0_201-fcs.x86_64 is already installed
测试jdk
[root@hadoop3 data]# java -version
java version "1.8.0_201"
Java(TM) SE Runtime Environment (build 1.8.0_201-b09)
Java HotSpot(TM) 64-Bit Server VM (build 25.201-b09, mixed mode)
2、安装tomcat
[root@hadoop3 data]# unzip apache-tomcat-8.5.70.zip   /* 解压tomcat*/
[root@hadoop3 data]# cd apache-tomcat-8.5.70/         /*进入tomcat目录*/
[root@hadoop3 apache-tomcat-8.5.70]# ls
bin           conf             lib      logs    README.md      RUNNING.txt  webapps
BUILDING.txt  CONTRIBUTING.md  LICENSE  NOTICE  RELEASE-NOTES  temp         work
[root@hadoop3 apache-tomcat-8.5.70]# chmod ./bin/ *.sh  /*给bin目录下的二进制脚本添加可执行权限*/
[root@hadoop3 apache-tomcat-8.5.70]# ./bin/startup.sh   /*开启tomcat*/
Using CATALINA_BASE:   /data/apache-tomcat-8.5.70
Using CATALINA_HOME:   /data/apache-tomcat-8.5.70
Using CATALINA_TMPDIR: /data/apache-tomcat-8.5.70/temp
Using JRE_HOME:        /usr/java/jdk1.8.0_201-amd64
Using CLASSPATH:       /data/apache-tomcat-8.5.70/bin/bootstrap.jar:/data/apache-tomcat-8.5.70/bin/tomcat-juli.jar
Using CATALINA_OPTS:
Tomcat started.
[root@hadoop3 apache-tomcat-8.5.70]# ps ax | grep tomcat    /*查看进程,打开成功*/
 15798 pts/0    Sl     0:03 /usr/java/jdk1.8.0_201-amd64/bin/java -Djava.util.logging.config.file=/data/apache-tomcat-8.5.70/conf/logging.properties -Djava.util.logging.manager=org.apache.juli.ClassLoaderLogManager -Djdk.tls.ephemeralDHKeySize=2048 -Djava.protocol.handler.pkgs=org.apache.catalina.webresources -Dorg.apache.catalina.security.SecurityListener.UMASK=0027 -Dignore.endorsed.dirs= -classpath /data/apache-tomcat-8.5.70/bin/bootstrap.jar:/data/apache-tomcat-8.5.70/bin/tomcat-juli.jar -Dcatalina.base=/data/apache-tomcat-8.5.70 -Dcatalina.home=/data/apache-tomcat-8.5.70 -Djava.io.tmpdir=/data/apache-tomcat-8.5.70/temp org.apache.catalina.startup.Bootstrap start
[root@hadoop3 apache-tomcat-8.5.70]# netstat -antlp | grep 8080  /*8080端口已开启*/
tcp6       0      0 :::8080                 :::*                    LISTEN      15798/java
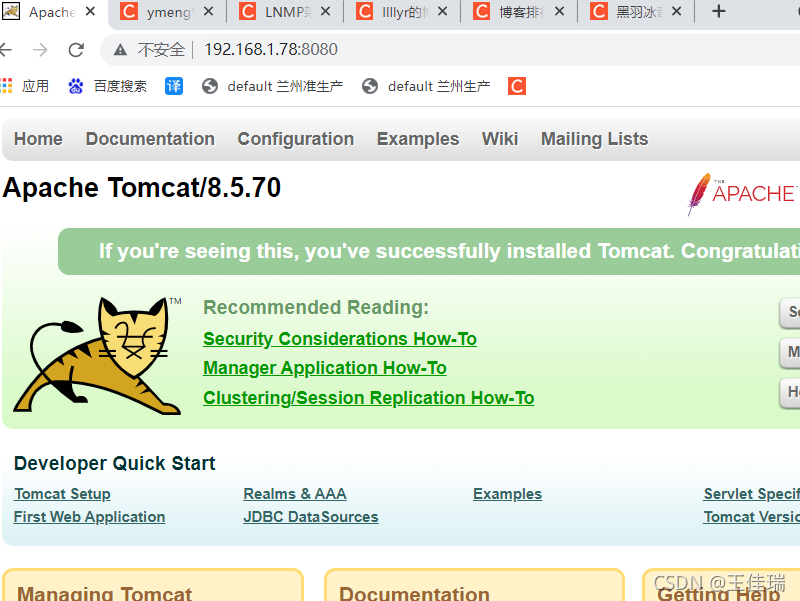
访问当前ip的8080端口可以看到tomcat的发布页面,说明启动成功,如果没有成功可以查看tomcat的日志文件logs/catalina.out

3、写一个简单的jsp页面,看能否被访问
[root@hadoop3 apache-tomcat-8.5.70]# cd webapps/  /*tomcat的发布页面在webapps的ROOT里*/
[root@hadoop3 webapps]# ls
docs  examples  host-manager  manager  ROOT
[root@hadoop3 webapps]# cd ROOT/
[root@hadoop3 ROOT]# ls
asf-logo-wide.svg  bg-middle.png  bg-upper.png  index.jsp          tomcat.css  WEB-INF
bg-button.png      bg-nav.png     favicon.ico   RELEASE-NOTES.txt  tomcat.svg
[root@hadoop3 ROOT]# vim test.jsp
[root@hadoop3 ROOT]# cat test.jsp
server2-The time is: <%=new java.util.Date() %>

nginx实现tomcat的负载均衡
4、安装nginx
[root@hadoop3 data]# tar zxf nginx-1.19.5.tar.gz   /*解压nginx*/
[root@hadoop3 data]# unzip nginx-upstream-jvm-route-master.zip /*解压session模块的补丁根据具体需求选择是否添加*/
[root@hadoop3 data]# unzip nginx_upstream_check_module-master.zip/*负载均衡模块的健康检查功能的补丁,根据需求选择是否添加*/
[root@hadoop3 data]# cd nginx-1.19.5/
[root@hadoop3 nginx-1.19.5]# ls
auto  CHANGES  CHANGES.ru  conf  configure  contrib  html  LICENSE  man  README  src
[root@hadoop3 nginx-1.19.5]# patch -p1 <../nginx_upstream_check_module-master/check_1.12.1+.patch  /*添加健康检测模块的补丁*/
patching file src/http/modules/ngx_http_upstream_hash_module.c
Hunk #2 succeeded at 241 (offset 3 lines).
Hunk #3 succeeded at 571 (offset 22 lines).
patching file src/http/modules/ngx_http_upstream_ip_hash_module.c
Hunk #2 succeeded at 211 (offset 3 lines).
patching file src/http/modules/ngx_http_upstream_least_conn_module.c
patching file src/http/ngx_http_upstream_round_robin.c
patching file src/http/ngx_http_upstream_round_robin.h

[root@hadoop3 nginx-1.19.5]# patch -p1  <../nginx-upstream-jvm-route-master/jvm_route.patch    /*添加session sticky模块的补丁*/
patching file src/http/ngx_http_upstream.c
Hunk #1 succeeded at 5751 (offset 94 lines).
Hunk #2 succeeded at 5850 (offset 94 lines).
Hunk #3 succeeded at 5868 (offset 94 lines).
Hunk #4 succeeded at 5920 (offset 94 lines).
Hunk #5 succeeded at 5953 (offset 94 lines).
Hunk #6 succeeded at 6015 (offset 94 lines).
patching file src/http/ngx_http_upstream.h
Hunk #1 succeeded at 102 (offset 1 line).
Hunk #2 succeeded at 119 (offset 1 line).
[root@hadoop3 nginx-1.19.5]# yum -y install gcc zlib zlib-devel openssl openssl-devel pcre pcre-devel  /*安装所需的依赖*/
[root@hadoop3 nginx-1.19.5]# ./configure --prefix=/usr/local/nginx --with-http_ssl_module --with-stream_ssl_preread_module  --with-http_stub_status_module  --with-http_realip_module --with-threads --with-stream  --with-stream_ssl_module --add-module=../nginx-upstream-jvm-route-master --add-module=../nginx_upstream_check_module-master
/*进入解压目录进行编译,后面添加的模块根据需要选择添加*/
[root@hadoop3 nginx-1.19.5]# make
[root@hadoop3 nginx-1.19.5]# make install
编译完成

安装完成

nignx的运行
[root@hadoop3 nginx-1.19.5]# /usr/local/nginx/sbin/nginx    /*开启nginx*/
[root@hadoop3 nginx-1.19.5]# /usr/local/nginx/sbin/nginx -s stop /*关闭nginx*/
[root@hadoop3 nginx-1.19.5]# /usr/local/nginx/sbin/nginx -t  /*检测nginx配置文件*/
nginx: the configuration file /usr/local/nginx/conf/nginx.conf syntax is ok
nginx: configuration file /usr/local/nginx/conf/nginx.conf test is successful
添加环境变量
[root@hadoop3 nginx-1.19.5]# vim ~/.bash_profile
[root@hadoop3 nginx-1.19.5]# cat ~/.bash_profile
# .bash_profile

# Get the aliases and functions
if [ -f ~/.bashrc ]; then
	. ~/.bashrc
fi

# User specific environment and startup programs

PATH=$PATH:$HOME/bin:/usr/local/nginx/sbin

export PATH


之后就可以简化nginx的启动
[root@hadoop3 nginx-1.19.5]# nginx
[root@hadoop3 nginx-1.19.5]# nginx -t
nginx: the configuration file /usr/local/nginx/conf/nginx.conf syntax is ok
nginx: configuration file /usr/local/nginx/conf/nginx.conf test is successful
[root@hadoop3 nginx-1.19.5]# nginx -s stop
5、在nginx的配置文件中添加tomcat的负载均衡
[root@hadoop3 nginx-1.19.5]# vim /usr/local/nginx/conf/nginx.conf
worker_processes  1;

events {
    worker_connections  1024;
}


http {
    include       mime.types;
    default_type  application/octet-stream;

    upstream tomcat {
        server 192.168.1.78:8081;
        server 192.168.1.78:8080;
    }
    #log_format  main  '$remote_addr - $remote_user [$time_local] "$request" '
    #                  '$status $body_bytes_sent "$http_referer" '
    #                  '"$http_user_agent" "$http_x_forwarded_for"';

    #access_log  logs/access.log  main;

    sendfile        on;
    #tcp_nopush     on;

    #keepalive_timeout  0;
    keepalive_timeout  65;
    #gzip  on;
    server {
        listen       80;
        server_name  localhost;
        #charset koi8-r;
        #access_log  logs/host.access.log  main;
        location / {
            root   html;
            index  index.html index.htm;
        }
        location ~ \.jsp$ {
            proxy_pass http://tomcat;
        }
        error_page   500 502 503 504  /50x.html;
        location = /50x.html {
            root   html;
        }
    }
}


版权声明:本文为weixin_44129721原创文章,遵循 CC 4.0 BY-SA 版权协议,转载请附上原文出处链接和本声明。