文章目录
数据结构所必备的知识,适合入门学习,作者也是一边学习一边分享,
如果觉得写的还不错的话,欢迎点一个收藏再走哦~~~
,后续会出更多有关于数据结构与算法的文章,也请大家多多关注!

队列
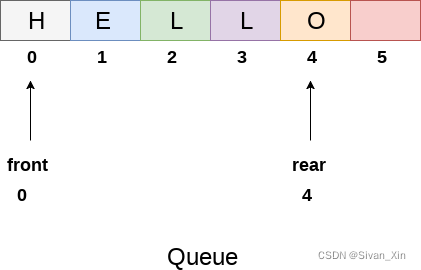
队列最显著的特点就是
先进先出
。
-
思路:
使用
front
和
rear
两个指针,front永远指向队列头的
前一个元素
,rear指向队列尾。
入队:rear后移,给数组赋值。
出队:front后移,取出该数组。
arr[front+1]
为队列头部。

代码实现
/**
 * arr[] 用数组来模拟队列。
 * maxSize 表示数组最大容量。
 * front 用于指向队列头。
 * rear 用于指向队列尾。
 */
public class ArrayQueue {
    private int []arr;
    private int maxSize;
    private int front;
    private int rear;
    public ArrayQueue(int maxSize){
        this.maxSize=maxSize;
        arr = new int[maxSize];
        front=-1;
        rear=-1;
    }
    // 判断队列是否满
    public boolean isFull(){
        return rear==maxSize-1;
    }
    //判断队列是否空
    public boolean isEmpty(){
        return rear==front;
    }
    //添加数据到队列。
    public void addQueue(int date){
        if(isFull()){
            System.out.println("False");
            return ;
        }
        rear++;
        arr[rear]=date;
    }
    //出队列
    public int getQueue(){
        if(isEmpty()){
            //由于返回int所以这里利用抛出异常。
            throw new RuntimeException("Error");
        }
        front++;
        return  arr[front];
    }
    // 显示队列的所有数据
    public void showQueue() {
        if (isEmpty()) {
            System.out.println("队列空的,没有数据~~");
            return;
        }
        for (int i = 0; i < arr.length; i++) {
            System.out.printf("arr[%d]=%d\n", i, arr[i]);
        }
    }

}
环形队列
这里可以直接参考之前写的一篇文章,里面讲的非常详细!
链接:
环形队列详解
链表
单链表不需要连续的存储空间,所以在删除和增加结点时不需要像顺序表一样需要移动全部的元素,提高运行效率。
单链表

add/addByOrder
- (add)设置辅助变量
- 循环遍历链表,找到链表的最后一个结点。
-
temp.next=node
- (addByOrder)设置辅助变量
-
循环遍历链表,
找到插入点的前一个位置
。(考虑:如果序号相同,无法插入。) -
node.next=temp.next
和
temp.next=node
(注意顺序,要让新增节点先指向。)
delete/update
- (delete)设置辅助变量。
- 遍历链表,找到需要删除的结点的前一个结点。
-
temp.next=temp.next.next
- (update)设置辅助变量。
- 遍历链表,找到需要更改的结点。
-
temp.date=node.date
代码实现
class SingleList{
    Node1 head=new Node1(0,0);
    //增加链表到最后
    public void add(Node1 node){
        Node1 temp=head;
        while(true){
            if(temp.next==null){
                break;
            }
            temp=temp.next;
        }
        temp.next=node;
    }
    //按序号增加链表
    public void addByOrder(Node1 node){
        Node1 temp=head;
        while(true){
            if(temp.next==null){
                break;
            }
            if(temp.next.no>=node.no){
                break;
            }
            temp=temp.next;
        }
        node.next=temp.next;
        temp.next=node;
    }
    //删除指定结点
    public void delNode(Node1 node){
        Node1 temp=head;
        while(true){
            if(temp.next==node){
                break;
            }
            temp=temp.next;
        }
        temp.next=temp.next.next;
    }
    //修改单链表的结点
    public void update(Node1 node,int update){
        Node1 temp=head;
        while(true){
            if(temp.no==node.no){
                break;
            }
            temp=temp.next;
        }
        temp.date=update;
    }
    //打印单链表
    public void list(){
        Node1 temp=head.next;
        if(head.next==null){
            System.out.println("Empty!");
        }
        while(temp!=null){
            System.out.println(temp.toString());
            temp=temp.next;
        }
    }
}
//创建一个类,每个类的对象就是一个结点。
class Node1{
    public int date;
    public int no;
    public Node1 next;

    public Node1(int date, int no) {
        this.date = date;
        this.no = no;
    }

    @Override
    public String toString() {
        return "Node1{" +
                "date=" + date +
                ", no=" + no +
                '}';
    }
}
双向链表
对于单向链表而言,只有一个查找方向,并且不能自我删除。
所以引入双向链表,与单向链表的主要不同点只是在于
pre指针的引入和删除操作
next:指向下一个结点。
pre:指向前一个结点。
- 操作思路:
- 遍历和修改:和单链表一样,遍历可以向前也可以向后查找。
-
添加(添加到最后):先找到最后的节点。
temp.next=newNode;
newNode.pre=temp;
2.1 添加(按序号添加):除了单链表的两个基础指向代码,还需要新增以下代码:
node.pre=temp;
node.next.pre=node;
-
删除:直接找到待删除节点(temp)。
(1)
temp.pre.next=temp.next;
//删除节点的前一个节点【指向】 删除节点的下一个节点。
(2)
注意!!
如果要删除的结点不是最后一个结点,那么执行(3)
(3)
temp.next.pre=temp.pre;
//删除节点的后一个节点向前【指向】删除节点的前一个节点。
代码实现
class DoubleLinkedlistDemo{
  private Nodes head=new Nodes(0,0);
   //默认加到链表最后。
   public void add(Nodes node){
       Nodes temp=head;
       while(true){
           if(temp.next==null){
               break;
           }
           temp=temp.next;
       }
       temp.next=node;
       node.pre=temp;
   }
   //按照no的顺序增加链表。
   public void addByOrder(Nodes node){
       Nodes temp=head;
       boolean flag=false;
       while(true){
           if(temp.next==null){
               flag=true;
               break;
           }
           if(temp.next.no>=node.no){
               break;
           }
           temp=temp.next;
       }
       if(flag){
           add(node);
           return;
       }
       //让添加进来的节点先指向。
       //单链表指向。
       node.next=temp.next;
       temp.next=node;
       //双向链表新增指向。
       node.pre=temp;
       node.next.pre=node;
   }
   //删除节点。(找到当前要删除的节点即可)
    public void del(Nodes node){
       Nodes temp=head;
       if(head.next==null){
           System.out.println("Empty!");
           return ;
       }
       while(true){
           if(temp== node){
               break;
           }
           temp=temp.next;
       }
       //绕过当前结点,指向下一个结点。
       temp.pre.next=temp.next;
       if(temp.next!=null){
           temp.next.pre=temp.pre;
       }
    }
    //打印链表,同单链表一样
    public void list(){
       Nodes temp=head;
       while(true) {
           temp=temp.next;
           System.out.println(temp);
           if(temp.next==null){
               break;
           }
       }
    }
}

class Nodes{
    public int no;
    public int date;
    public Nodes next;
    public Nodes pre;
    public Nodes(int no,int date){
        this.no=no;
        this.date=date;
    }
    @Override
    public String toString() {
        return "Nodes{" +
                "no=" + no +
                ", date=" + date +
                '}';
    }
}
环形链表(Joseph Ring)
- 思路分析:
-
创建
first
指针,永远指向第一个元素,并且自成环状。 -
建立辅助指针
cur
,通过移动辅助指针来添加节点。
2.1 具体步骤为:辅助指针指向下一个节点、后移、再指向first。
环形链表代码实现
class CircleLinkedListDemo {
    //创建first节点,永远指向第一个元素,保持不动。
    private Node first = null;
    //创建环形链表。
    public void buildCLL(int nums) {
        if (nums < 1) {
            System.out.println("无法加入小于一个的链表");
            return;
        }
        //先创建第一个结点。
        Node node1 = new Node(1);
        //让first指向第一个节点
        first = node1;
        //first指向自己,形成环状。
        first.next = first;
        //建立辅助指针,通过移动辅助指针来添加节点。
        Node cur = null;
        cur = first;
        for (int i = 2; i <= nums; i++) {
            Node node = new Node(i);
            //辅助指针指向下一个节点。
            cur.next = node;
            //辅助指针后移。
            cur = cur.next;
            //辅助指针指向第一个节点。
            cur.next = first;
             }
        }
    //用来打印环形链表
    public void list1(){
        Node temp=first;
        while(true){
            //如果到了环形链表的最后,退出循环。
            if(temp.next==first){
                break;
            }
            System.out.println(temp.toString());
            temp=temp.next;
        }
        System.out.println(temp.toString());
    }
}
class Node{
    // 这里也可以设置为私有属性,重写方法getNext和setNext即可。
    public int no;
    public Node next;
    public Node(int no){
        this.no=no;
    }

    @Override
    public String toString() {
        return "Node{" +
                "no=" + no +
                '}';
    }
}
解决Joseph问题代码实现
- 思路分析:
-
创建两个结点,
first
(遍历环形链表)和
helper
(帮助出圈)。 - first指向startNo的结点,helper则指向first的前一个结点。
-
找到需要出圈的结点后打印,并将结点出圈:
first=first.next;
helper.next=first;
    /**
     *
     * @param nums 表示环形链表节点个数。
     * @param startNo 表示从第几个节点开始数。
     * @param countNo 表示数了几下。 每数countNo下,就删除当前结点。
     */
    public void Joseph(int nums,int startNo,int countNo){
        if(startNo<1|| startNo>nums || nums<1){
            System.out.println("数据输入有误");
            return ;
        }
        // 创建一个辅助节点,初始化为指向first的前一个结点。
        Node helper=first;
        while(true){
            if(helper.next==first){
                break;
            }
            helper=helper.next;
        }
        // 在开始之前,先将first指向开始的节点。
        for(int i=0;i<startNo-1;i++){
            first=first.next;
            helper=helper.next;
        }
        // 出圈,是一个循环过程,使用while循环。
        while(true){
            // 开始寻找出圈节点,将first指向要删除的节点,helper指向删除节点的前一个节点。
            for(int j=0;j<countNo-1;j++){
                first=first.next;
                helper=helper.next;
            }
            // 当圈中只剩一个元素时,退出循环。
            if(helper==first){
                break;
            }
            System.out.println(first.toString());
            // 让first后移
            first=first.next;
            // helper指向first,就跳过了一个结点(出圈)。
            //注意:helper并没有后移。
            helper.next=first;
        }
        System.out.printf("最后一个是:%s",first.toString());
    }
栈
特点
:
先入后出,变化的一端在栈顶,栈底固定。
入栈(push):栈顶上移;
出栈(pop):栈顶下移。
Java中也提供了关于栈的类,便于直接调用。
-
数组模拟栈的思路分析
- 定义top表示栈顶指针,初始为-1;
-
入栈:
top++;
stack[top]=data;
-
出栈:拿到数据;
top--;
代码实现
/**
 * max 表示栈的最大容量
 * top 栈顶指针
 * stack[] 用数组模拟栈
 */
 class stack{
    private int max;
    private int top=-1;
    private int stack[];
    public stack(int max){
        this.max=max;
        stack=new int[max];
    }
    public boolean isFull(){
        return top==max-1;
    }
    public boolean isEmpty(){
        return top==-1;
    }
    //入栈
    public void push(int date){
        if(isFull()){
            System.out.println("False");
            return;
        }
        top++;
        stack[top]=date;
    }
    //出栈
     public int pop(){
        if(isEmpty()){
            throw new RuntimeException("Empty");
        }
        int value= stack[top];
        top--;
        return value;
     }
     //遍历
     public void list(){
        for(int i=top;i>=0;i--){
            System.out.printf("stack[%d]=%d",i, stack[i]);
        }
     }
}
栈的实际应用
栈的应用:子程序调用;递归调用;表达式转换(中缀转后缀表达式);二叉树;深度优先。
关于更多的栈的实际应用,就先不在这里展开了,会写另外一篇文章展开来讲。
最重要的来啦~~~
⭐码字不易,求个关注⭐
⭐点个收藏不迷路哦~⭐