Alibaba nacos配合sentinel、springcloud gateway进行负载和限流
1.准备nacos和sentinel环境
(1)nacos下载地址:
https://github.com/alibaba/nacos/releases/download/2.0.3/nacos-server-2.0.3.zip
(2)sentinel-dashboard下载地址:
https://github.com/alibaba/Sentinel/releases/download/1.8.1/sentinel-dashboard-1.8.1.jar
(3)nacos server启动命令:
startup.cmd -m standalone
页面访问地址:http://localhost:8848/nacos/index.html,默认账号和密码为nacos/nacos
(4)sentinel-dashboard启动命令:
java -Dserver.port=8001 -Dcsp.sentinel.dashboard.server=localhost:8001 -Dproject.name=sentinel-dashboard -Dsentinel.dashboard.auth.username=admin -Dsentinel.dashboard.auth.password=123 -jar sentinel-dashboard-1.8.1.jar
页面访问地址:http://localhost:8001,账号和密码为启动命令中设置的admin/123
2.接口提供服务方
2.1.引入依赖
<parent>
    <groupId>org.springframework.boot</groupId>
    <artifactId>spring-boot-starter-parent</artifactId>
    <version>2.3.2.RELEASE</version>
</parent>
<dependencies>
    <dependency>
        <groupId>org.springframework.boot</groupId>
        <artifactId>spring-boot-starter-web</artifactId>
    </dependency>
    <!-- 服务注册到sentinel-dashboard时用到 -->
    <dependency>
        <groupId>com.alibaba.cloud</groupId>
        <artifactId>spring-cloud-starter-alibaba-sentinel</artifactId>
        <version>2.2.6.RELEASE</version>
    </dependency>
    <!-- 服务注册到nacos时用到 -->
    <dependency>
        <groupId>com.alibaba.cloud</groupId>
        <artifactId>spring-cloud-starter-alibaba-nacos-discovery</artifactId>
        <version>2.2.6.RELEASE</version>
    </dependency>
</dependencies>
2.2.配置文件
server:
  port: 9001   #9002

spring:
  application:
    name: nacos-client
  cloud:
    sentinel:
      transport:
        dashboard: localhost:8001
      eager: true   #服务启动后,直接注册到dashboard
    nacos:
      discovery:
        server-addr: localhost:8848   #服务注册到nacos
2.3.编写controller类
@RestController
public class MainController {

    @Value("${server.port}")
    private int port;

    @GetMapping("/getTest")
    public String getTest(){
        return "test --> " + port;
    }

}
然后分别以9001和9002端口启动一个服务,作为一组服务,给网关服务提供负载对象。
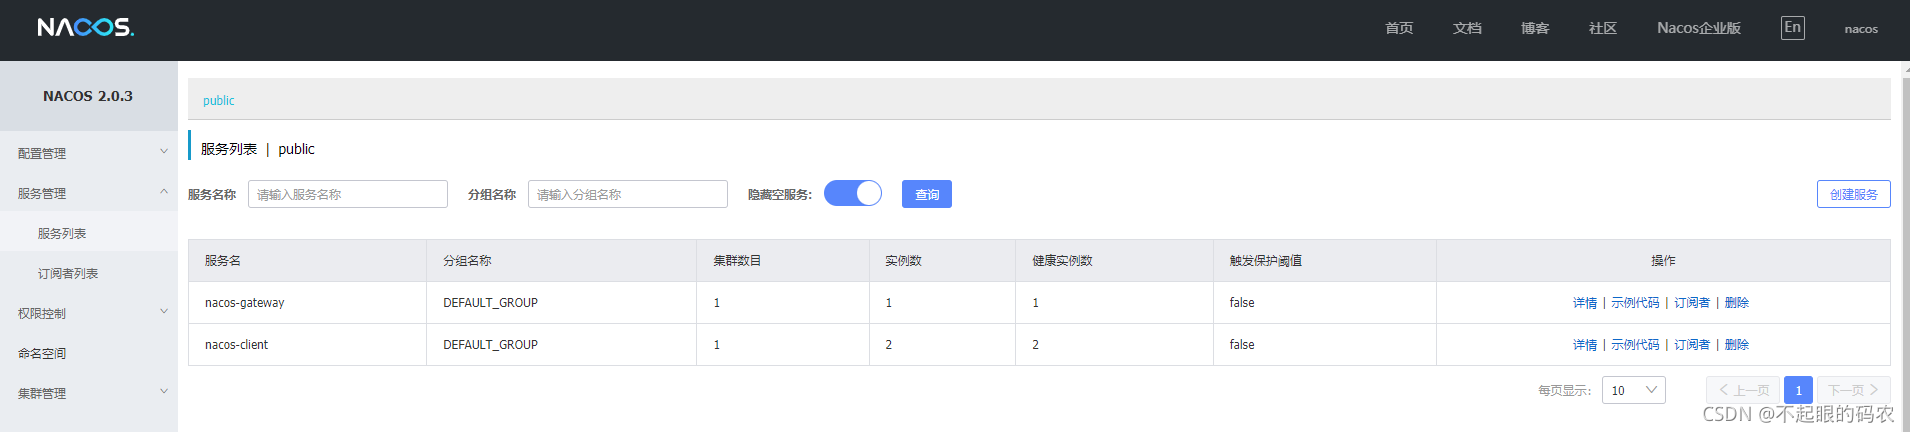
在nacos和sentinel上可以看到注册到两个服务实例:nacos-client


3.gatewany网关服务
3.1.引入依赖
<parent>
    <groupId>org.springframework.boot</groupId>
    <artifactId>spring-boot-starter-parent</artifactId>
    <version>2.3.2.RELEASE</version>
</parent>
<dependencies>
    <dependency>
        <groupId>org.springframework.cloud</groupId>
        <artifactId>spring-cloud-starter-gateway</artifactId>
    </dependency>
    <!-- 服务注册到sentinel-dashboard时用到 -->
    <dependency>
        <groupId>com.alibaba.cloud</groupId>
        <artifactId>spring-cloud-starter-alibaba-sentinel</artifactId>
        <version>2.2.6.RELEASE</version>
    </dependency>
    <!-- 服务注册到nacos时用到 -->
    <dependency>
        <groupId>com.alibaba.cloud</groupId>
        <artifactId>spring-cloud-starter-alibaba-nacos-discovery</artifactId>
        <version>2.2.6.RELEASE</version>
    </dependency>
    <!-- nacos下发配置时用到 -->
    <dependency>
        <groupId>com.alibaba.csp</groupId>
        <artifactId>sentinel-datasource-nacos</artifactId>
        <version>1.8.1</version>
    </dependency>
</dependencies>
3.2.配置文件
server:
  port: 9003

spring:
  application:
    name: nacos-gateway
  cloud:
    sentinel:
      transport:
        dashboard: localhost:8001
      eager: true   #服务启动后,直接注册到dashboard
      datasource:   #整合nacos,下发配置
        ds1:
          nacos:
            server-addr: localhost:8848
            dataId: stn1
            groupId: DEFAULT_GROUP
            ruleType: flow   #流控规则
    nacos:
      discovery:
        server-addr: localhost:8848   #服务注册到nacos
    gateway:
      discovery:
        locator:
          enabled: true   #开启从nacos拉取服务列表,并自动映射
      routes:
        - id: lbroute
          uri: lb://nacos-client   #网关负载服务配置
          predicates:
            - Path=/consumer/**   #Path谓词设置
          filters:
            - StripPrefix=1   #负载转发到后端服务请求时,去掉1个前缀(也就是:/consumer)
启动网关服务,在nacos和sentinel上可以看到注册到网关服务实例:nacos-gateway

4.测试
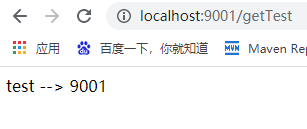
(1)在浏览器中访问接口:
http://localhost:9001/getTest
http://localhost:9002/getTest
结果如下:

(2)通过网关路由来访问接口:
http://localhost:9003/consumer/getTest
结果如下:
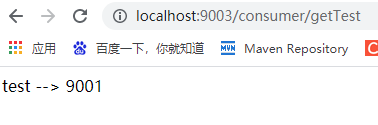
来回刷新会发现,返回的结果中端口在9001和9002之间来回切换,说明负载OK(负载默认使用的是轮询策略)。
5.通过nacos进行限流配置下发,限制网关层接口的访问
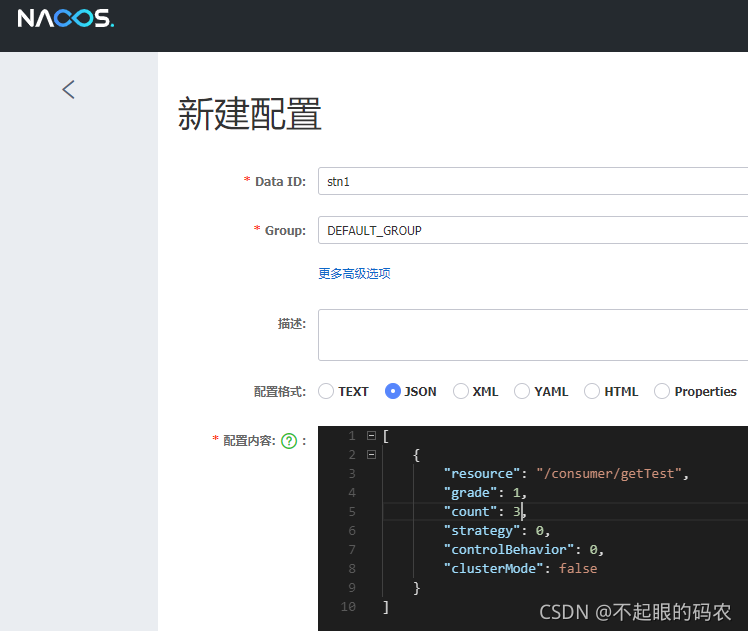
注意:这里填写的Data ID和Group必须和配置文件中配置一致,否则最终会导致限流失败。
5.1.配置内容说明
[
    {
        "resource": "/consumer/getTest",//资源名
        "grade": 1,//阈值类型:QPS
        "count": 3,//单机阈值
        "strategy": 0,//流控模式:直连
        "controlBehavior": 0,//流控效果:快速失败
        "clusterMode": false//单机模式
    }
]
在sentinel上就可以看到nacos下发的流控配置

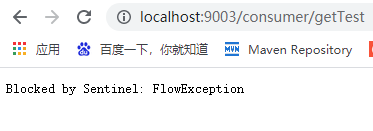
再次访问接口:
http://localhost:9003/consumer/getTest
快速刷新,如果1秒内访问超过3次请求时,接口就会自动限流,如下: