概述
有时候我们需要操作摄像头进行拍照,并保存照片。
拍照
- 启动摄像头
         //向  MediaStore.Images.Media.EXTERNAL_CONTENT_URI 插入一个数据,那么返回标识ID。
        //在完成拍照后,新的照片会以此处的photoUri命名. 其实就是指定了个文件名
        ContentValues values = new ContentValues();
        photoUri = getContentResolver().insert(
                MediaStore.Images.Media.EXTERNAL_CONTENT_URI, values);
        //准备intent,并 指定 新 照片 的文件名(photoUri)
        Intent intent = new Intent(MediaStore.ACTION_IMAGE_CAPTURE);
        intent.putExtra(android.provider.MediaStore.EXTRA_OUTPUT, photoUri);
        //启动拍照的窗体。并注册 回调处理。
        startActivityForResult(intent, REQUEST_CODE_camera);
- 处理 回调。就是当拍照完成后,我们如何处理它。我们必须在activity的onActivityResult(要重载此方法)方法里处理它。
public void HandleonActivityResult(int requestCode, int resultCode,
Intent data) {
if (requestCode == CameraHelper.REQUEST_CODE_camera) {
            ContentResolver cr = mContext.getContentResolver();
            if (photoUri == null)
                return;
            //按 刚刚指定 的那个文件名,查询数据库,获得更多的 照片信息,比如 图片的物理绝对路径
            Cursor cursor = cr.query(photoUri, null, null, null, null);
            if (cursor != null) {
                if (cursor.moveToNext()) {
                    String path = cursor.getString(1);
                    //获得图片
                    Bitmap bp = getBitMapFromPath(path);
                    imageView1.setImageBitmap(bp);

                    //写入到数据库
                    mBlobDAL.InsertImg(bp);
                }
                cursor.close();
            }
            photoUri = null;
        }
- 我们在这里需要处理图片的缩放。以为图片太大了,直接放入ImageView是无法显示的。
    /* 获得图片,并进行适当的 缩放。 图片太大的话,是无法展示的。 */
     private Bitmap getBitMapFromPath(String imageFilePath) {

        Display currentDisplay = getWindowManager().getDefaultDisplay();
        int dw = currentDisplay.getWidth();
        int dh = currentDisplay.getHeight();
        // Load up the image's dimensions not the image itself
        BitmapFactory.Options bmpFactoryOptions = new BitmapFactory.Options();
        bmpFactoryOptions.inJustDecodeBounds = true;
        Bitmap bmp = BitmapFactory.decodeFile(imageFilePath,
                bmpFactoryOptions);
        int heightRatio = (int) Math.ceil(bmpFactoryOptions.outHeight
                / (float) dh);
        int widthRatio = (int) Math.ceil(bmpFactoryOptions.outWidth
                / (float) dw);

        // If both of the ratios are greater than 1,
        // one of the sides of the image is greater than the screen
        if (heightRatio > 1 && widthRatio > 1) {
            if (heightRatio > widthRatio) {
                // Height ratio is larger, scale according to it
                bmpFactoryOptions.inSampleSize = heightRatio;
            } else {
                // Width ratio is larger, scale according to it
                bmpFactoryOptions.inSampleSize = widthRatio;
            }
        }
        // Decode it for real
        bmpFactoryOptions.inJustDecodeBounds = false;
        bmp = BitmapFactory.decodeFile(imageFilePath, bmpFactoryOptions);
        return bmp;
    }
好了。处理摄像头拍照是完了。下面我们要把图片存放在数据里。
存储
- 建表
       @Override
         publicvoid onCreate(SQLiteDatabase db) {

        String str = "CREATE TABLE [IMGS] ( [IDPK] integer PRIMARY KEY autoincrement,IMG_DATA blob )";
        db.execSQL(str);
    }
-
插入数据库。
/** 插入图 * */ public void InsertImg(Bitmap bmp) { SQLiteDatabase db = getWritableDatabase(); ContentValues cv = new ContentValues(); ByteArrayOutputStream os = new ByteArrayOutputStream(); bmp.compress(Bitmap.CompressFormat.PNG, 100, os); cv.put("IMG_DATA", os.toByteArray()); db.insert("IMGS", null, cv); } -
读取图片列表
 //读取
 public List<Bitmap> ReadImg() {
     SQLiteDatabase db = getReadableDatabase();
     Cursor cr = db.rawQuery("select * from IMGS ", null);
     List<Bitmap> lst = new ArrayList<Bitmap>();
     while (cr.moveToNext()) {
         byte[] in = cr.getBlob(cr.getColumnIndex("IMG_DATA"));
         lst.add(BitmapFactory.decodeByteArray(in, 0, in.length));
     }
     return lst;  }
最后贴上完整的代码:
package demo.cameraDemo;
import java.io.ByteArrayOutputStream;
import java.util.ArrayList;
import java.util.List;
import android.net.Uri;
import android.os.Bundle;
import android.provider.MediaStore;
import android.app.Activity;
import android.content.ContentResolver;
import android.content.ContentValues;
import android.content.Context;
import android.content.Intent;
import android.database.Cursor;
import android.database.sqlite.SQLiteDatabase;
import android.database.sqlite.SQLiteDatabase.CursorFactory;
import android.database.sqlite.SQLiteOpenHelper;
import android.graphics.Bitmap;
import android.graphics.BitmapFactory;
import android.util.Log;
import android.view.Display;
import android.view.Menu;
import android.view.View;
import android.view.View.OnClickListener;
import android.view.ViewGroup;
import android.widget.Button;
import android.widget.ImageView;
import android.widget.SlidingDrawer;
public class MainActivity extends Activity {
Button btnPaizhao;
CameraHelper mCameraHelper;
ImageView imageView1;
BlobDAL mBlobDAL;
@Override
public void onCreate(Bundle savedInstanceState) {
super.onCreate(savedInstanceState);
setContentView(R.layout.activity_main);
mBlobDAL = new BlobDAL(this);
imageView1 = (ImageView) findViewById(R.id.imageView1);
findViewById(R.id.btnReadDB).setOnClickListener(new OnClickListener() {
@Override
public void onClick(View v) {
List<Bitmap> bpArr = mBlobDAL.ReadImg();
ViewGroup gp = (ViewGroup) findViewById(R.id.div);
gp.removeAllViews();
for (int i = 0; i < bpArr.size(); i++) {
ImageView iv = new ImageView(MainActivity.this);
Bitmap bp = bpArr.get(i);
if (bp != null) {
iv.setImageBitmap(bp);
} else {
iv.setImageBitmap(null);
}
gp.addView(iv);
}
}
});
btnPaizhao = (Button) findViewById(R.id.btnPaizhao);
btnPaizhao.setOnClickListener(new OnClickListener() {
@Override
public void onClick(View arg0) {
mCameraHelper.OnOpenCamera();
}
});
mCameraHelper = new CameraHelper(this);
}
protected void onActivityResult(int requestCode, int resultCode, Intent data) {
mCameraHelper.HandleonActivityResult(requestCode, resultCode, data);
}
public class CameraHelper {
Context mContext;
public CameraHelper(Context ctx) {
mContext = ctx;
}
Uri photoUri;
public static final int REQUEST_CODE_camera = 2222;
public void OnOpenCamera() {
//向 MediaStore.Images.Media.EXTERNAL_CONTENT_URI 插入一个数据,那么返回标识ID。
//在完成拍照后,新的照片会以此处的photoUri命名. 其实就是指定了个文件名
ContentValues values = new ContentValues();
photoUri = getContentResolver().insert(
MediaStore.Images.Media.EXTERNAL_CONTENT_URI, values);
//准备intent,并 指定 新 照片 的文件名(photoUri)
Intent intent = new Intent(MediaStore.ACTION_IMAGE_CAPTURE);
intent.putExtra(android.provider.MediaStore.EXTRA_OUTPUT, photoUri);
//启动拍照的窗体。并注册 回调处理。
startActivityForResult(intent, REQUEST_CODE_camera);
}
public void HandleonActivityResult(int requestCode, int resultCode,
Intent data) {
if (requestCode == CameraHelper.REQUEST_CODE_camera) {
ContentResolver cr = mContext.getContentResolver();
if (photoUri == null)
return;
//按 刚刚指定 的那个文件名,查询数据库,获得更多的 照片信息,比如 图片的物理绝对路径
Cursor cursor = cr.query(photoUri, null, null, null, null);
if (cursor != null) {
if (cursor.moveToNext()) {
String path = cursor.getString(1);
//获得图片
Bitmap bp = getBitMapFromPath(path);
imageView1.setImageBitmap(bp);
//写入到数据库
mBlobDAL.InsertImg(bp);
}
cursor.close();
}
photoUri = null;
}
}
/* 获得图片,并进行适当的 缩放。 图片太大的话,是无法展示的。 */
private Bitmap getBitMapFromPath(String imageFilePath) {
Display currentDisplay = getWindowManager().getDefaultDisplay();
int dw = currentDisplay.getWidth();
int dh = currentDisplay.getHeight();
// Load up the image's dimensions not the image itself
BitmapFactory.Options bmpFactoryOptions = new BitmapFactory.Options();
bmpFactoryOptions.inJustDecodeBounds = true;
Bitmap bmp = BitmapFactory.decodeFile(imageFilePath,
bmpFactoryOptions);
int heightRatio = (int) Math.ceil(bmpFactoryOptions.outHeight
/ (float) dh);
int widthRatio = (int) Math.ceil(bmpFactoryOptions.outWidth
/ (float) dw);
// If both of the ratios are greater than 1,
// one of the sides of the image is greater than the screen
if (heightRatio > 1 && widthRatio > 1) {
if (heightRatio > widthRatio) {
// Height ratio is larger, scale according to it
bmpFactoryOptions.inSampleSize = heightRatio;
} else {
// Width ratio is larger, scale according to it
bmpFactoryOptions.inSampleSize = widthRatio;
}
}
// Decode it for real
bmpFactoryOptions.inJustDecodeBounds = false;
bmp = BitmapFactory.decodeFile(imageFilePath, bmpFactoryOptions);
return bmp;
}
}
/*
* 操作数据库
* */
class BlobDAL extends SQLiteOpenHelper {
public BlobDAL(Context context) {
super(context, "imgDemo.db", null, 1);
// TODO Auto-generated constructor stub
}
@Override
public void onCreate(SQLiteDatabase db) {
String str = "CREATE TABLE [IMGS] ( [IDPK] integer PRIMARY KEY autoincrement,IMG_DATA blob )";
db.execSQL(str);
}
/*
* 插入图
* */
public void InsertImg(Bitmap bmp) {
SQLiteDatabase db = getWritableDatabase();
ContentValues cv = new ContentValues();
ByteArrayOutputStream os = new ByteArrayOutputStream();
bmp.compress(Bitmap.CompressFormat.PNG, 100, os);
cv.put("IMG_DATA", os.toByteArray());
db.insert("IMGS", null, cv);
}
//读取
public List<Bitmap> ReadImg() {
SQLiteDatabase db = getReadableDatabase();
Cursor cr = db.rawQuery("select * from IMGS ", null);
List<Bitmap> lst = new ArrayList<Bitmap>();
while (cr.moveToNext()) {
byte[] in = cr.getBlob(cr.getColumnIndex("IMG_DATA"));
lst.add(BitmapFactory.decodeByteArray(in, 0, in.length));
}
return lst;
}
@Override
public void onUpgrade(SQLiteDatabase db, int oldVersion, int newVersion) {
// TODO Auto-generated method stub
}
}
@Override
public boolean onCreateOptionsMenu(Menu menu) {
getMenuInflater().inflate(R.menu.activity_main, menu);
return true;
}
}
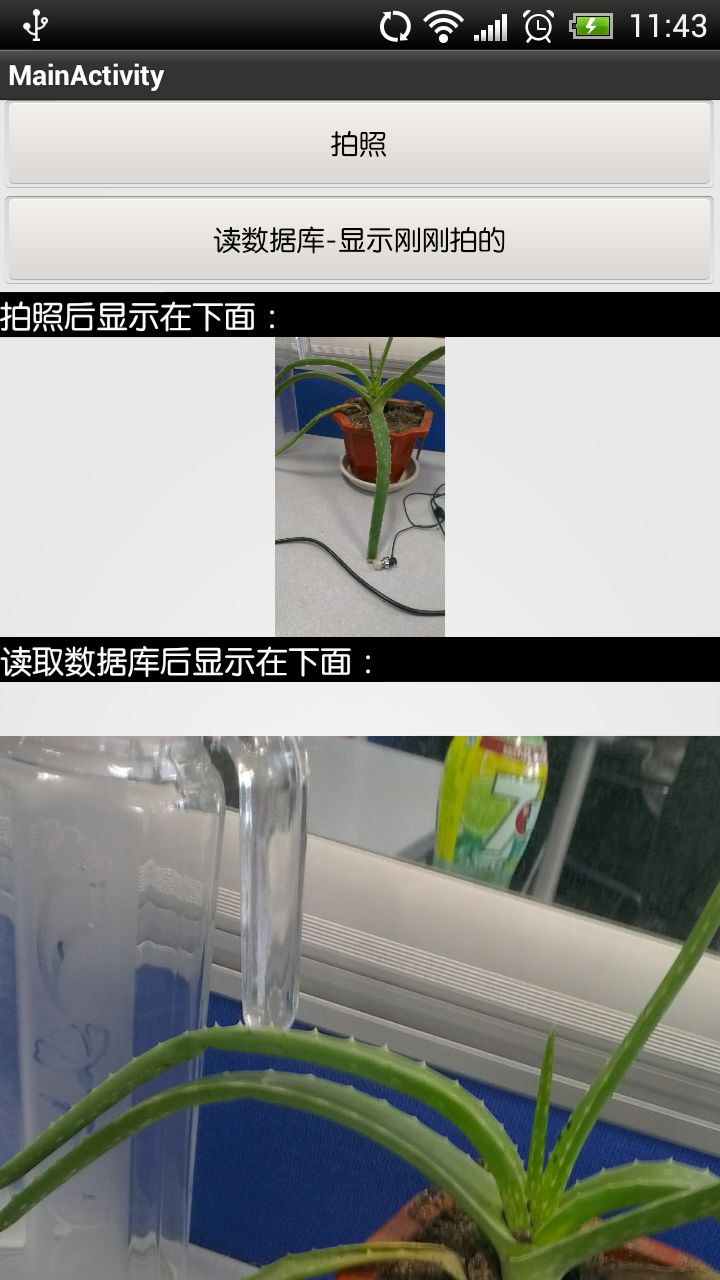
<LinearLayout xmlns:android="http://schemas.android.com/apk/res/android"
xmlns:tools="http://schemas.android.com/tools"
android:layout_width="match_parent"
android:layout_height="match_parent"
android:orientation="vertical" >
<Button
android:id="@+id/btnPaizhao"
android:layout_width="match_parent"
android:layout_height="wrap_content"
android:text="拍照" />
<Button
android:id="@+id/btnReadDB"
android:layout_width="match_parent"
android:layout_height="wrap_content"
android:text="读数据库-显示刚刚拍的" />
<View
android:layout_width="fill_parent"
android:layout_height="1dp"
android:background="#000000" >
</View>
<TextView
android:layout_width="fill_parent"
android:layout_height="wrap_content"
android:text="拍照后显示在下面:"
android:textSize="16sp"
android:textColor="#FFFFFF"
android:background="#000000" />
<ImageView
android:id="@+id/imageView1"
android:layout_width="fill_parent"
android:layout_height="150dp"
android:src="@drawable/ic_action_search" />
<View
android:layout_width="fill_parent"
android:layout_height="1dp"
android:background="#000000" >
</View>
<TextView
android:layout_width="fill_parent"
android:layout_height="wrap_content"
android:text="读取数据库后显示在下面:"
android:textSize="16sp"
android:textColor="#FFFFFF"
android:background="#000000" />
<ScrollView
android:id="@+id/scrollView1"
android:layout_width="match_parent"
android:layout_height="match_parent" >
<LinearLayout
android:layout_width="match_parent"
android:layout_height="match_parent" >
<LinearLayout
android:id="@+id/div"
android:layout_width="match_parent"
android:layout_height="wrap_content"
android:orientation="vertical" >
</LinearLayout>
</LinearLayout>
</ScrollView>
</LinearLayout>
版权声明:本文为vir56k原创文章,遵循 CC 4.0 BY-SA 版权协议,转载请附上原文出处链接和本声明。