Anaconda + PyTorch + Cuda 环境配置
本机配置
GPU NVIDIA GeForce GTX1060 Max-Q
系统 Window10
SSD论文:
SSD: Single Shot MultiBox Detector
ssd-pytorch代码
Anaconda安装
镜像网站的添加
常用清华镜像源:
https://mirrors.tuna.tsinghua.edu.cn/help/anaconda/
- 添加镜像源
conda config --add channels url地址
conda config --add channels https://mirrors.tuna.tsinghua.edu.cn/anaconda/pkgs/main/
conda config --add channels https://mirrors.tuna.tsinghua.edu.cn/anaconda/pkgs/r/
conda config --add channels https://mirrors.tuna.tsinghua.edu.cn/anaconda/pkgs/msys2/
- 删除镜像源
conda config --remove channels url地址
conda config --remove-key channels #删除全部由用户添加的地址
- 显示安装包下载路径
conda config --set show_channel_urls yes
- 显示配置
conda config --show  #显示配置文件
conda config --show-sources #仅显示用户配置路径
创建虚拟环境
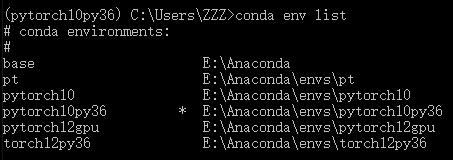
- 显示虚拟环境列表
conda env list
- 创建虚拟环境
conda create --name torch12py36 python=3.6.3
# 指定虚拟环境名称以及python环境
Anaconda自动整理下载相关依赖包
可能出现下载失败的情况,一般是网络原因
解决方案:
1.可以尝试将镜像源网站https改为http
2.选用其他镜像网站
3. 科学上网
4. 使用离线安装包
- 激活虚拟环境
conda activate torch12py36

配置神经网络所需环境
-
使用GPU进行神经网络的训练需要安装cuda
查看显卡驱动程序可支持的cuda版本
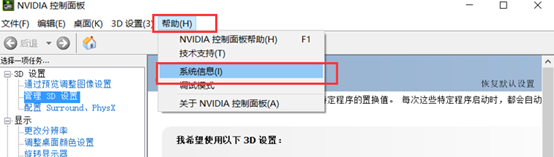

根据驱动版本选择cuda版本

驱动版本过低可在NVIDIA官网选择对应显卡版本驱动更新程序进行更新
NVIDIA官方驱动下载
-
cuda和cudnn安装可参考:
https://blog.csdn.net/qq_28368377/article/details/109563939 -
PyTorch深度学习框架
可参考
PyTorch官网
pytorch=1.2 cuda=10.0 安装命令如下
conda install pytorch==1.2.0 torchvision=0.4.0 cudatoolkit=10.0 -c pytorch
# -c用于指定下载路径 此命令为从官方网站下载
# 删除 -c pytorch 使用镜像源下载
conda install pytorch==1.2.0 torchvision=0.4.0 cudatoolkit=10.0
- 根据网络需要下载其他包(我使用的SSD需要下载以下两个)
pip install opencv-python
pip install matplotlib
PyCharm项目运行环境配置


深度学习所需数据集
VOCPerson数据集下载主页
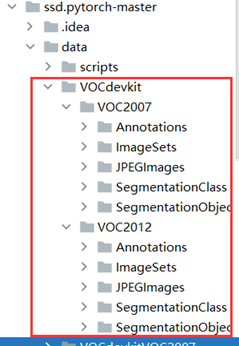
解压路径(SSD):