文件结构
.
├── coco_exps
├── configs         #configs主要修改的部分在这里,训练config也是从这里继承的
│   ├── albu_example
│   ├── atss
│   ├── _base_          #最根本的继承
│   │   ├── datasets  #存在着不同数据集的训练方法,包含train_pipeline(augmentation), test_pipeline(TTA), data(batch_size, data root)等信息
│   │   ├── models #保存着基础模型,需要在这里修改num_classes来适配自己的任务
│   │   └── schedules #保存着lr_schedule:1x, 2x, 20e,每x意味着12个epochs
│   ├── carafe
│   ├── cascade_rcnn
│   ├── cityscapes
│   ├── cornernet
│   ├── dcn
│   ├── deepfashion
│   ├── detectors
│   ├── double_heads
│   ├── dynamic_rcnn
│   ├── empirical_attention
│   ├── faster_rcnn
│   ├── fast_rcnn
│   ├── fcos
│   ├── foveabox
│   ├── fp16
│   ├── free_anchor
│   ├── fsaf
│   ├── gcnet
│   ├── gfl
│   ├── ghm
│   ├── gn
│   ├── gn+ws
│   ├── grid_rcnn
│   ├── groie
│   ├── guided_anchoring
│   ├── hrnet
│   ├── htc
│   ├── instaboost
│   ├── legacy_1.x
│   ├── libra_rcnn
│   ├── lvis
│   ├── mask_rcnn
│   ├── ms_rcnn
│   ├── nas_fcos
│   ├── nas_fpn
│   ├── pafpn
│   ├── pascal_voc
│   ├── pisa
│   ├── point_rend
│   ├── regnet
│   ├── reppoints
│   ├── res2net
│   ├── retinanet
│   ├── rpn
│   ├── scratch
│   ├── ssd
│   └── wider_face
├── data
│   └── coco        #把整理好的coco数据集放在这里
│       ├── annotations
│       ├── test2017
│       ├── train2017
│       └── val2017
├── mmdet            #这里存放着mmdet的一些内部构件
│   ├── datasets        #需要在这里的coco.py更改CLASSES,相当于Detectron2注册数据集
│   │   ├── pipelines
│   │   │   └── __pycache__
│   │   ├── __pycache__
│   │   └── samplers
│   │       └── __pycache__
│   ├── core
│   │   ├── evaluation #在这里修改evaluation相关的config。如在coco_classes中修改return的classes_names
1、准备数据集
Pascal VOC或mirror和COCO等公共数据集可以在官方网站或mirror上获得。注意:在检测任务中,Pascal VOC 2012是Pascal VOC 2007的扩展,没有重叠,我们通常一起使用。建议下载并提取项目目录外的数据集,并将数据集根符号链接到$MMDETECTION/data,如下所示。如果您的文件夹结构不同,可能需要在配置文件中更改相应的路径。更多使用请参考dataset-download
mmdetection
├── mmdet
├── tools
├── configs
├── data
│ ├── coco
│ │ ├── annotations
│ │ ├── train2017
│ │ ├── val2017
│ │ ├── test2017
│ ├── cityscapes
│ │ ├── annotations
│ │ ├── leftImg8bit
│ │ │ ├── train
│ │ │ ├── val
│ │ ├── gtFine
│ │ │ ├── train
│ │ │ ├── val
│ ├── VOCdevkit
│ │ ├── VOC2007
│ │ ├── VOC2012
有些型号需要额外的coco数据集,如HTC, detector和SCNet,你可以下载解压,然后移动到coco文件夹。目录应该是这样的。
mmdetection
├── data
│ ├── coco
│ │ ├── annotations
│ │ ├── train2017
│ │ ├── val2017
│ │ ├── test2017
│ │ ├── stuffthingmaps
PanopticFPN等Panoptic分割模型需要额外的COCO Panoptic数据集,您可以下载并解压,然后移动到COCO注释文件夹。目录应该是这样的。
mmdetection
├── data
│ ├── coco
│ │ ├── annotations
│ │ │ ├── panoptic_train2017.json
│ │ │ ├── panoptic_train2017
│ │ │ ├── panoptic_val2017.json
│ │ │ ├── panoptic_val2017
│ │ ├── train2017
│ │ ├── val2017
│ │ ├── test2017
1、数据下载
1、数据下载的命令行
tools/misc/download_dataset.py supports downloading datasets such as COCO, VOC, and LVIS.

python tools/misc/download_dataset.py --dataset-name coco2017
python tools/misc/download_dataset.py --dataset-name voc2007
python tools/misc/download_dataset.py --dataset-name lvis
2、数据下载的配置参数信息
def parse_args():
    parser = argparse.ArgumentParser(
        description='Download datasets for training')
    parser.add_argument(
        '--dataset-name', type=str, help='dataset name', default='coco2017')#下载数据的名称
    parser.add_argument(
        '--save-dir',
        type=str,
        help='the dir to save dataset',
        default='data/coco')#数据的保存路径
    parser.add_argument(
        '--unzip',
        action='store_true',
        help='whether unzip dataset or not, zipped files will be saved')
    parser.add_argument(
        '--delete',
        action='store_true',
        help='delete the download zipped files')
    parser.add_argument(
        '--threads', type=int, help='number of threading', default=4)
    args = parser.parse_args()
    return args
2、 数据转换
tools/data_converters/ contains tools to convert the Cityscapes dataset and Pascal VOC dataset to the COCO format.
tools/data_converters/包含将Cityscapes数据集和Pascal VOC数据集转换为COCO格式的工具。
python tools/dataset_converters/cityscapes.py ${CITYSCAPES_PATH} [-h] [--img-dir ${IMG_DIR}] [--gt-dir ${GT_DIR}] [-o ${OUT_DIR}] [--nproc ${NPROC}]

python tools/dataset_converters/pascal_voc.py ${DEVKIT_PATH} [-h] [-o ${OUT_DIR}]
3、准备自己的VOC数据集
mmdetection 支持VOC数据集,还有COCO数据集格式,还可以自定义数据格式,现在我们采用VOC的数据格式,mm_det容器已经映射宿主目录了,在宿主目录/train_data,新建目录存放数据集,可在容器内/mmdetection/data里在操作。
新建目录结构如下
./data
└── VOCdevkit
    └── VOC2007
        ├── Annotations  # 标注的VOC格式的xml标签文件
        ├── JPEGImages   # 数据集图片
        ├── ImageSet
        │     └── Main
		│ 	     ├── test.txt   # 划分的测试集
		│ 	     ├── train.txt   # 划分的训练集
		│        ├── trainval.txt
		│        └── val.txt   # 划分的验证集
        ├── cal_txt_data_num.py  # 用于统计text.txt、train.txt等数据集的个数
        └── split_dataset.py  # 数据集划分脚本
Annotations 目录存放.xml文件,JEPGImages 存放训练图片。
所有的数据标签存放在:./data/VOCdevkit/VOC2007/Annotations
所有的图片数据存放在:./data/VOCdevkit/VOC2007/JPEGImage
1、数据集的划分
使用:split_dataset.py脚本
import os
import random

trainval_percent = 0.8
train_percent = 0.8
xmlfilepath = 'Annotations'
txtsavepath = 'ImageSets\Main'
total_xml = os.listdir(xmlfilepath)

num = len(total_xml)
list = range(num)
tv = int(num * trainval_percent)
tr = int(tv * train_percent)
trainval = random.sample(list, tv)
train = random.sample(trainval, tr)

ftrainval = open('ImageSets/Main/trainval.txt', 'w')
ftest = open('ImageSets/Main/test.txt', 'w')
ftrain = open('ImageSets/Main/train.txt', 'w')
fval = open('ImageSets/Main/val.txt', 'w')

for i in list:
    name = total_xml[i][:-4] + '\n'
    if i in trainval:
        ftrainval.write(name)
        if i in train:
            ftrain.write(name)
        else:
            fval.write(name)
    else:
        ftest.write(name)

ftrainval.close()
ftrain.close()
fval.close()
ftest.close()
执行完该脚本后,训练集占80%,测试集占20%,会在./data/VOCdevkit/VOC2007/ImageSets/Main目录下,生成四个txt文件:
train.txt
trainval.txt
test.txt
val.txt
每个txt文件中存储的都是图片的名字(不含图片名字的后缀.jpg),例如:trian.txt中的内容如下:
000005
000007
000016
000019
000020
000021
000024
000046
000052
当然你也可以把数据放到其他目录,然后使用软连接的形式连接到./mmdetection/data目录下():
ln -s /HDD/VOCdevkit ./data # 就是把实体目录VOCdevkit做一个链接放到 ./data目录下
2、统计划分数据集数据的个数
使用:cal_txt_data_num.py脚本
import sys
import os

# 计算txt中有多少个数据,即有多上行

names_txt = os.listdir('./ImageSets/Main')
#print(names_txt)
for name_txt in names_txt:
    with open(os.path.join('./ImageSets/Main', name_txt)) as f:
        lines = f.readlines()
        print(('文件 %s'%name_txt).ljust(35) + ("共有数据:%d个"%len(lines)).ljust(50))
执行结果,如下(显示了我数据集的划分情况):
文件 test.txt                        共有数据:1003个
文件 val.txt                         共有数据:802个
文件 train.txt                       共有数据:3206个
文件 trainval.txt                    共有数据:4008个
4、准备自己的COCO数据集
参考博客:
深度学习目标检测数据VisDrone2019(to yolo / voc / coco)—MMDetection数据篇
2、下载预训练模型权重文件
1、
swin transform detection的预训练模型下载地址
2、其他预训练模型下载地址
在官网上根据你想选的网络和版本,下载其中一个model. 在mmdetection文件夹下新建一个“checkpoints”文件夹将下载好的model放到里面.
案例:
首先先来改mmdetection/configs/你下载的那个预训练模型的名字.py(比如我下载的是faster_rcnn_r50_fpn_1x_20181010-3d1b3351.pth,对应的我修改的配置文件就是faster_rcnn_r50_fpn_1x.py
3、配置修改工程(一)
1、修改coco格式(visdrone)数据集的配置文件
1. 准备coco数据集中的(数据集准备部分)
2. 修改changemaskrcnn.py中num_class并运行,将num_class改成自己的数据集的种类数目

3. 修改configs\_base_\models\mask_rcnn_swin_fpn.py中num_classes
4. 修改configs\_base_\default_runtime.py中interval,load_from
5. 修改configs\swin\mask_rcnn_swin_tiny_patch4_window7_mstrain_480-800_adamw_3x_coco.py中的max_epochs、lr
6. 修改configs\_base_\datasets\coco_instance.py中samples_per_gpu和workers_per_gpu
7. 修改mmdet\datasets\coco.py中CLASSES
8. python tools/train.py configs/swin/mask_rcnn_swin_tiny_patch4_window7_mstrain_480-800_adamw_3x_coco.py
1、设置修改类别数(模型架构配置文件mask_rcnn_swin_fpn.py)
设置类别数在(configs/
base
/models/mask_rcnn_swin_fpn.py)文件中。
修改 configs/
base
/models/mask_rcnn_swin_fpn.py 中 num_classes 为自己数据集的类别(有两处需要修改)。两处大概在第54行和73行,修改为自己数据集的类别数量,示例如下。
# model settings
model = dict(
    type='MaskRCNN',
    pretrained=None,
    backbone=dict(
        type='SwinTransformer',
        embed_dim=96,
        depths=[2, 2, 6, 2],
        num_heads=[3, 6, 12, 24],
        window_size=7,
        mlp_ratio=4.,
        qkv_bias=True,
        qk_scale=None,
        drop_rate=0.,
        attn_drop_rate=0.,
        drop_path_rate=0.2,
        ape=False,
        patch_norm=True,
        out_indices=(0, 1, 2, 3),
        use_checkpoint=False),
    neck=dict(
        type='FPN',
        in_channels=[96, 192, 384, 768],
        out_channels=256,
        num_outs=5),
    rpn_head=dict(
        type='RPNHead',
        in_channels=256,
        feat_channels=256,
        anchor_generator=dict(
            type='AnchorGenerator',
            scales=[8],
            ratios=[0.5, 1.0, 2.0],
            strides=[4, 8, 16, 32, 64]),
        bbox_coder=dict(
            type='DeltaXYWHBBoxCoder',
            target_means=[.0, .0, .0, .0],
            target_stds=[1.0, 1.0, 1.0, 1.0]),
        loss_cls=dict(
            type='CrossEntropyLoss', use_sigmoid=True, loss_weight=1.0),
        loss_bbox=dict(type='L1Loss', loss_weight=1.0)),
    roi_head=dict(
        type='StandardRoIHead',
        bbox_roi_extractor=dict(
            type='SingleRoIExtractor',
            roi_layer=dict(type='RoIAlign', output_size=7, sampling_ratio=0),
            out_channels=256,
            featmap_strides=[4, 8, 16, 32]),
        bbox_head=dict(
            type='Shared2FCBBoxHead',
            in_channels=256,
            fc_out_channels=1024,
            roi_feat_size=7,
            num_classes=80,  #修改为自己的类别,注意这里不需要加BG类(+1)
            bbox_coder=dict(
                type='DeltaXYWHBBoxCoder',
                target_means=[0., 0., 0., 0.],
                target_stds=[0.1, 0.1, 0.2, 0.2]),
            reg_class_agnostic=False,
            loss_cls=dict(
                type='CrossEntropyLoss', use_sigmoid=False, loss_weight=1.0),
            loss_bbox=dict(type='L1Loss', loss_weight=1.0)),
        mask_roi_extractor=dict(
            type='SingleRoIExtractor',
            roi_layer=dict(type='RoIAlign', output_size=14, sampling_ratio=0),
            out_channels=256,
            featmap_strides=[4, 8, 16, 32]),
        mask_head=dict(
            type='FCNMaskHead',
            num_convs=4,
            in_channels=256,
            conv_out_channels=256,
            num_classes=80,  #修改为自己的类别,注意这里不需要加BG类(+1)
            loss_mask=dict(
                type='CrossEntropyLoss', use_mask=True, loss_weight=1.0))),
    # model training and testing settings
    train_cfg=dict(
        rpn=dict(
            assigner=dict(
                type='MaxIoUAssigner',
                pos_iou_thr=0.7,
                neg_iou_thr=0.3,
                min_pos_iou=0.3,
                match_low_quality=True,
                ignore_iof_thr=-1),
            sampler=dict(
                type='RandomSampler',
                num=256,
                pos_fraction=0.5,
                neg_pos_ub=-1,
                add_gt_as_proposals=False),
            allowed_border=-1,
            pos_weight=-1,
            debug=False),
        rpn_proposal=dict(
            nms_pre=2000,
            max_per_img=1000,
            nms=dict(type='nms', iou_threshold=0.7),
            min_bbox_size=0),
        rcnn=dict(
            assigner=dict(
                type='MaxIoUAssigner',
                pos_iou_thr=0.5,
                neg_iou_thr=0.5,
                min_pos_iou=0.5,
                match_low_quality=True,
                ignore_iof_thr=-1),
            sampler=dict(
                type='RandomSampler',
                num=512,
                pos_fraction=0.25,
                neg_pos_ub=-1,
                add_gt_as_proposals=True),
            mask_size=28,
            pos_weight=-1,
            debug=False)),
    test_cfg=dict(
        rpn=dict(
            nms_pre=1000,
            max_per_img=1000,
            nms=dict(type='nms', iou_threshold=0.7),
            min_bbox_size=0),
        rcnn=dict(
            score_thr=0.05,
            nms=dict(type='nms', iou_threshold=0.5),
            max_per_img=100,
            mask_thr_binary=0.5)))
由于visdrone数据类别共有11类,标签从0到11分别为’ignored regions’,‘pedestrian’,‘people’,‘bicycle’,‘car’,‘van’,
‘truck’,‘tricycle’,‘awning-tricycle’,‘bus’,‘motor’,‘others’。
(“行人”,“人”,“自行车”,“小气车”、“客货车”,
“卡车”,“三轮车”、“遮阳三轮车”、“公共汽车”,“摩托车”)
本次在数据转化过程中我们只想检测这十个类, 0和11没有加入转化
PREDEF_CLASSE = { 'pedestrian': 1, 'people': 2,
    'bicycle': 3, 'car': 4, 'van': 5, 'truck': 6, 'tricycle': 7,
    'awning-tricycle': 8, 'bus': 9, 'motor': 10}
整体修改信息如下:
# model settings
model = dict(
    type='MaskRCNN',
    pretrained=None,
    backbone=dict(
        type='SwinTransformer',
        embed_dim=96,
        depths=[2, 2, 6, 2],
        num_heads=[3, 6, 12, 24],
        window_size=7,
        mlp_ratio=4.,
        qkv_bias=True,
        qk_scale=None,
        drop_rate=0.,
        attn_drop_rate=0.,
        drop_path_rate=0.2,
        ape=False,
        patch_norm=True,
        out_indices=(0, 1, 2, 3),
        use_checkpoint=False),
    neck=dict(
        type='FPN',
        in_channels=[96, 192, 384, 768],
        out_channels=256,
        num_outs=5),
    rpn_head=dict(
        type='RPNHead',
        in_channels=256,
        feat_channels=256,
        anchor_generator=dict(
            type='AnchorGenerator',
            scales=[8],
            ratios=[0.5, 1.0, 2.0],
            strides=[4, 8, 16, 32, 64]),
        bbox_coder=dict(
            type='DeltaXYWHBBoxCoder',
            target_means=[.0, .0, .0, .0],
            target_stds=[1.0, 1.0, 1.0, 1.0]),
        loss_cls=dict(
            type='CrossEntropyLoss', use_sigmoid=True, loss_weight=1.0),
        loss_bbox=dict(type='L1Loss', loss_weight=1.0)),
    roi_head=dict(
        type='StandardRoIHead',
        bbox_roi_extractor=dict(
            type='SingleRoIExtractor',
            roi_layer=dict(type='RoIAlign', output_size=7, sampling_ratio=0),
            out_channels=256,
            featmap_strides=[4, 8, 16, 32]),
        bbox_head=dict(
            type='Shared2FCBBoxHead',
            in_channels=256,
            fc_out_channels=1024,
            roi_feat_size=7,
            num_classes=10,#修改后的
            bbox_coder=dict(
                type='DeltaXYWHBBoxCoder',
                target_means=[0., 0., 0., 0.],
                target_stds=[0.1, 0.1, 0.2, 0.2]),
            reg_class_agnostic=False,
            loss_cls=dict(
                type='CrossEntropyLoss', use_sigmoid=False, loss_weight=1.0),
            loss_bbox=dict(type='L1Loss', loss_weight=1.0)),
        mask_roi_extractor=dict(
            type='SingleRoIExtractor',
            roi_layer=dict(type='RoIAlign', output_size=14, sampling_ratio=0),
            out_channels=256,
            featmap_strides=[4, 8, 16, 32]),
        mask_head=dict(
            type='FCNMaskHead',
            num_convs=4,
            in_channels=256,
            conv_out_channels=256,
            num_classes=10,#修改后的
            loss_mask=dict(
                type='CrossEntropyLoss', use_mask=True, loss_weight=1.0))),
    # model training and testing settings
    train_cfg=dict(
        rpn=dict(
            assigner=dict(
                type='MaxIoUAssigner',
                pos_iou_thr=0.7,
                neg_iou_thr=0.3,
                min_pos_iou=0.3,
                match_low_quality=True,
                ignore_iof_thr=-1),
            sampler=dict(
                type='RandomSampler',
                num=256,
                pos_fraction=0.5,
                neg_pos_ub=-1,
                add_gt_as_proposals=False),
            allowed_border=-1,
            pos_weight=-1,
            debug=False),
        rpn_proposal=dict(
            nms_pre=2000,
            max_per_img=1000,
            nms=dict(type='nms', iou_threshold=0.7),
            min_bbox_size=0),
        rcnn=dict(
            assigner=dict(
                type='MaxIoUAssigner',
                pos_iou_thr=0.5,
                neg_iou_thr=0.5,
                min_pos_iou=0.5,
                match_low_quality=True,
                ignore_iof_thr=-1),
            sampler=dict(
                type='RandomSampler',
                num=512,
                pos_fraction=0.25,
                neg_pos_ub=-1,
                add_gt_as_proposals=True),
            mask_size=28,
            pos_weight=-1,
            debug=False)),
    test_cfg=dict(
        rpn=dict(
            nms_pre=1000,
            max_per_img=1000,
            nms=dict(type='nms', iou_threshold=0.7),
            min_bbox_size=0),
        rcnn=dict(
            score_thr=0.05,
            nms=dict(type='nms', iou_threshold=0.5),
            max_per_img=100,
            mask_thr_binary=0.5)))
注意:
MMDetection 2.0 后的版本,类别个数不需要加 1。
2、修改运行信息配置(configs/-base-/default_runtime.py)
修改配置信息(间隔和加载预训练模型configs/base/default_runtime.py)
修改 configs/base/default_runtime.py 中的 interval,loadfrom
1、第1行interval=1,表示多少个 epoch 验证一次模型,然后保存一次权重信息。
2、第4行interval=50,表示每50个batch打印一次日志信息
3、loadfrom:表示加载哪一个训练好的权重,可以直接写绝对路径如:
load_from = r"E:\workspace\Python\Pytorch\Swin-Transformer-Object-Detection\mask_rcnn_swin_tiny_patch4_window7.pth"
如果要开启Tensorboard进行可视化,查看训练效果,打开注释信息
参考博客
在config文件修改如下

log_config = dict(
    interval=50,
    hooks=[
        dict(type='TextLoggerHook'),
        dict(type='TensorboardLoggerHook') #生成Tensorboard 日志
    ])
整体修改信息如下:
checkpoint_config = dict(interval=1) #表示每一个epoch保存一次权重信息
# yapf:disable
log_config = dict(
    interval=50, #表示每50次评估打印一次日志信息
    hooks=[
        dict(type='TextLoggerHook'),
        dict(type='TensorboardLoggerHook')#解掉注释就能看到Tensorboard了
    ])
# yapf:enable
custom_hooks = [dict(type='NumClassCheckHook')]

dist_params = dict(backend='nccl')
log_level = 'INFO'
load_from = './weights/mask_rcnn_swin_tiny_patch4_window7.pth'  #加载的预训练模型
resume_from = None
workflow = [('train', 1)]
3、修改基础配置(configs/swin/mask_rcnn_swin_tiny_patch4_window7_mstrain_480-800_adamw_3x_coco.py)
./configs/
base
的目录结构:
_base_
├─ datasets
├─ models
├─ schedules
└─ default_runtime.py
可以看出,包含四类配置:
datasets:定义数据集
models:定义模型架构
schedules:定义训练计划
default_runtime.py:定义运行信息
打开 ./configs/swin/mask_rcnn_swin_tiny_patch4_window7_mstrain_480-800_adamw_3x_coco.py:
_base_ = [
    '../_base_/models/mask_rcnn_swin_fpn.py',
    '../_base_/datasets/coco_instance.py',
    '../_base_/schedules/schedule_1x.py', '../_base_/default_runtime.py'
]
修改数据集配置的路径:
_base_ = [
    '../_base_/models/mask_rcnn_swin_fpn.py',
    '../_base_/datasets/coco_detection.py', #做目标检测,修改为coco_detection.py
    '../_base_/schedules/schedule_1x.py', '../_base_/default_runtime.py'
]
4、 修改数据集配置信息(configs/swin/mask_rcnn_swin_tiny_patch4_window7_mstrain_480-800_adamw_3x_coco.py、…/
base
/datasets/coco_detection.py)
1、修改训练数据的尺寸大小,在configs/swin/mask_rcnn_swin_tiny_patch4_window7_mstrain_480-800_adamw_3x_coco.py文件中和configs/base/datasets/coco_detection.py文件中
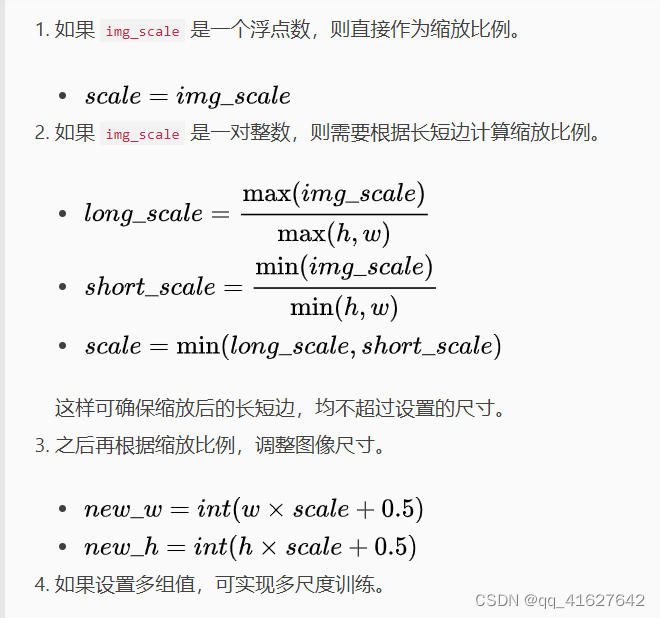
修改所有的 img_scale 为 :img_scale = [(224, 224)] 或者 img_scale = [(256, 256)] 或者 480,512等。
mask_rcnn_swin_tiny_patch4_window7_mstrain_480-800_adamw_3x_coco.py的图像缩放尺寸
# augmentation strategy originates from DETR / Sparse RCNN
train_pipeline = [
    dict(type='LoadImageFromFile'),
    dict(type='LoadAnnotations', with_bbox=True, with_mask=True),
    dict(type='RandomFlip', flip_ratio=0.5),
    dict(type='AutoAugment',
         policies=[
             [
                 dict(type='Resize',
                      #这里可以根据自己的硬件设置进行修改
                      img_scale=[(480, 1333), (512, 1333), (544, 1333), (576, 1333),
                                 (608, 1333), (640, 1333), (672, 1333), (704, 1333),
                                 (736, 1333), (768, 1333), (800, 1333)],
                      multiscale_mode='value',
                      keep_ratio=True)
             ],
             [
                 dict(type='Resize',
                      #这里可以根据自己的硬件设置进行修改
                      img_scale=[(400, 1333), (500, 1333), (600, 1333)],
                      multiscale_mode='value',
                      keep_ratio=True),
                 dict(type='RandomCrop',
                      crop_type='absolute_range',
                      crop_size=(384, 600),
                      allow_negative_crop=True),
                 dict(type='Resize',
                      #这里可以根据自己的硬件设置进行修改
                      img_scale=[(480, 1333), (512, 1333), (544, 1333),
                                 (576, 1333), (608, 1333), (640, 1333),
                                 (672, 1333), (704, 1333), (736, 1333),
                                 (768, 1333), (800, 1333)],
                      multiscale_mode='value',
                      override=True,
                      keep_ratio=True)
             ]
         ]),
    dict(type='Normalize', **img_norm_cfg),
    dict(type='Pad', size_divisor=32),
    dict(type='DefaultFormatBundle'),
    dict(type='Collect', keys=['img', 'gt_bboxes', 'gt_labels', 'gt_masks']),
]
coco_detection.py的图像缩放尺寸
train_pipeline = [
    dict(type='LoadImageFromFile'),
    dict(type='LoadAnnotations', with_bbox=True),
    dict(type='Resize', img_scale=(1333, 800), keep_ratio=True),#这里可以根据自己的硬件设置进行修改
    dict(type='RandomFlip', flip_ratio=0.5),
    dict(type='Normalize', **img_norm_cfg),
    dict(type='Pad', size_divisor=32),
    dict(type='DefaultFormatBundle'),
    dict(type='Collect', keys=['img', 'gt_bboxes', 'gt_labels']),
]
test_pipeline = [
    dict(type='LoadImageFromFile'),
    dict(
        type='MultiScaleFlipAug',
        img_scale=(1333, 800),#这里可以根据自己的硬件设置进行修改
        flip=False,
        transforms=[
            dict(type='Resize', keep_ratio=True),
            dict(type='RandomFlip'),
            dict(type='Normalize', **img_norm_cfg),
            dict(type='Pad', size_divisor=32),
            dict(type='ImageToTensor', keys=['img']),
            dict(type='Collect', keys=['img']),
        ])
]
2、修改训练的最大批次max_epochs,由于本次我们选择的是mask_rcnn_swin_tiny_patch4_window7_mstrain_480-800_adamw_3x_coco.py,3x代表3个12epoch,1个x代表12个epoch。
data = dict(train=dict(pipeline=train_pipeline))

optimizer = dict(_delete_=True, type='AdamW', lr=0.0001, betas=(0.9, 0.999), weight_decay=0.05,
                 paramwise_cfg=dict(custom_keys={'absolute_pos_embed': dict(decay_mult=0.),
                                                 'relative_position_bias_table': dict(decay_mult=0.),
                                                 'norm': dict(decay_mult=0.)}))
lr_config = dict(step=[27, 33])
runner = dict(type='EpochBasedRunnerAmp', max_epochs=36) #训练的epoch可以根据需要修改

# do not use mmdet version fp16
fp16 = None
optimizer_config = dict(
    type="DistOptimizerHook",
    update_interval=1,
    grad_clip=None,
    coalesce=True,
    bucket_size_mb=-1,
    use_fp16=True,
)
5、修改数据路径、batch_size、线程等信息(configs/base/datasets/coco_detection.py)
1、修改数据集的路径 data_root、ann_file、img_prefix
路径/configs/base/datasets/coco_detection.py文件的最上面指定了数据集的路径,因此在项目下新建 data/coco目录,下面四个子目录 annotations和test2017,train2017,val2017。
路径/configs/base/datasets/coco_detection.py,第2行的data_root数据集根目录路径,第8行的img_scale可以根据需要修改,下面train、test、val数据集的具体路径ann_file根据自己数据集修改
第31行的samples_per_gpu表示batch size大小,太大会内存溢出
第32行的workers_per_gpu表示每个GPU对应线程数,2、4、6、8按需修改
修改 batch size 和 线程数:根据自己的显存和CPU来设置
dataset_type = 'CocoDataset'
data_root = 'data/coco/' #数据的根目录,可以修改为自己的数据根目录 dataset_type = 'VOCDataset' data_root = 'data/VOCdevkit/MyDataset/'
img_norm_cfg = dict(
    mean=[123.675, 116.28, 103.53], std=[58.395, 57.12, 57.375], to_rgb=True)
train_pipeline = [
    dict(type='LoadImageFromFile'),
    dict(type='LoadAnnotations', with_bbox=True, with_mask=True),
    dict(type='Resize', img_scale=(1333, 800), keep_ratio=True), #img_scale修改
    dict(type='RandomFlip', flip_ratio=0.5),
    dict(type='Normalize', **img_norm_cfg),
    dict(type='Pad', size_divisor=32),
    dict(type='DefaultFormatBundle'),
    dict(type='Collect', keys=['img', 'gt_bboxes', 'gt_labels', 'gt_masks']),
]
test_pipeline = [
    dict(type='LoadImageFromFile'),
    dict(
        type='MultiScaleFlipAug',
        img_scale=(1333, 800), #img_scale修改
        flip=False,
        transforms=[
            dict(type='Resize', keep_ratio=True),
            dict(type='RandomFlip'),
            dict(type='Normalize', **img_norm_cfg),
            dict(type='Pad', size_divisor=32),
            dict(type='ImageToTensor', keys=['img']),
            dict(type='Collect', keys=['img']),
        ])
]
data = dict(
    samples_per_gpu=2, #batch size大小
    workers_per_gpu=2, #每个GPU对应线程数
    train=dict(
        type=dataset_type,
        ann_file=data_root + 'annotations/instances_train2017.json',#数据路径按照自己的修改
        img_prefix=data_root + 'train2017/',#数据路径按照自己的修改
        pipeline=train_pipeline),
    val=dict(
        type=dataset_type,
        ann_file=data_root + 'annotations/instances_val2017.json',#数据路径按照自己的修改
        img_prefix=data_root + 'val2017/',#数据路径按照自己的修改
        pipeline=test_pipeline),
    test=dict(
        type=dataset_type,
        ann_file=data_root + 'annotations/instances_val2017.json',#数据路径按照自己的修改
        img_prefix=data_root + 'val2017/',#数据路径按照自己的修改
        pipeline=test_pipeline))
evaluation = dict(metric=['bbox', 'segm'])
2、增加图像增强和模型评估的次数
configs/
base
/datasets/coco_detection.py 在train pipeline修改Data Augmentation
数据增强参考博客
dataset_type = 'CocoDataset'
data_root = 'data/coco/'
img_norm_cfg = dict(
    mean=[123.675, 116.28, 103.53], std=[58.395, 57.12, 57.375], to_rgb=True)
# 在这里加albumentation的aug
albu_train_transforms = [
    dict(
        type='ShiftScaleRotate',
        shift_limit=0.0625,
        scale_limit=0.0,
        rotate_limit=0,
        interpolation=1,
        p=0.5),
    dict(
        type='RandomBrightnessContrast',
        brightness_limit=[0.1, 0.3],
        contrast_limit=[0.1, 0.3],
        p=0.2),
    dict(
        type='OneOf',
        transforms=[
            dict(
                type='RGBShift',
                r_shift_limit=10,
                g_shift_limit=10,
                b_shift_limit=10,
                p=1.0),
            dict(
                type='HueSaturationValue',
                hue_shift_limit=20,
                sat_shift_limit=30,
                val_shift_limit=20,
                p=1.0)
        ],
        p=0.1),
    dict(type='JpegCompression', quality_lower=85, quality_upper=95, p=0.2),
    dict(type='ChannelShuffle', p=0.1),
    dict(
        type='OneOf',
        transforms=[
            dict(type='Blur', blur_limit=3, p=1.0),
            dict(type='MedianBlur', blur_limit=3, p=1.0)
        ],
        p=0.1),
]
train_pipeline = [
    dict(type='LoadImageFromFile'),
    dict(type='LoadAnnotations', with_bbox=True, with_mask=True),
    #据说这里改img_scale即可多尺度训练,但是实际运行报错。
    dict(type='Resize', img_scale=(1333, 800), keep_ratio=True),
    dict(type='Pad', size_divisor=32),
    dict(
        type='Albu',
        transforms=albu_train_transforms,
        bbox_params=dict(
            type='BboxParams',
            format='pascal_voc',
            label_fields=['gt_labels'],
            min_visibility=0.0,
            filter_lost_elements=True),
        keymap={
            'img': 'image',
            'gt_masks': 'masks',
            'gt_bboxes': 'bboxes'
        },
]
# 测试的pipeline
test_pipeline = [
    dict(type='LoadImageFromFile'),
    dict(
        type='MultiScaleFlipAug',
        # 多尺度测试 TTA在这里修改,注意有些模型不支持多尺度TTA,比如cascade_mask_rcnn,若不支持会提示
        # Unimplemented Error
        img_scale=(1333, 800),
        flip=False,
        transforms=[
            dict(type='Resize', keep_ratio=True),
            dict(type='RandomFlip'),
            dict(type='Normalize', **img_norm_cfg),
            dict(type='Pad', size_divisor=32),
            dict(type='ImageToTensor', keys=['img']),
            dict(type='Collect', keys=['img']),
        ])
]
# 包含batch_size, workers和路径。
# 路径如果按照上面的设置好就不需要更改
data = dict(
    samples_per_gpu=2,
    workers_per_gpu=2,
    train=dict(
        type=dataset_type,
        ann_file=data_root + 'annotations/instances_train2017.json',
        img_prefix=data_root + 'train2017/',
        pipeline=train_pipeline),
    val=dict(
        type=dataset_type,
        ann_file=data_root + 'annotations/instances_val2017.json',
        img_prefix=data_root + 'val2017/',
        pipeline=test_pipeline),
    test=dict(
        type=dataset_type,
        ann_file=data_root + 'annotations/instances_val2017.json',
        img_prefix=data_root + 'val2017/',
        pipeline=test_pipeline))
evaluation = dict(interval=1, metric='bbox')#这里表示评估间隔为1个epoch,并且以bbox作为评估指标
6、修改学习率(mask_rcnn_swin_tiny_patch4_window7_mstrain_480-800_adamw_3x_coco.py、mmdetection/configs/
base
/schedules/ schedule_1x.py)
这里是调整学习率的schedule的位置,可以设置warmup schedule和衰减策略。 1x, 2x分别对应12epochs和24epochs,20e对应20epochs,这里注意配置都是默认8块gpu的训练,如果用一块gpu训练,需要在lr/8。
# optimizer
optimizer = dict(type='SGD', lr=0.02/8, momentum=0.9, weight_decay=0.0001)#这里修改
optimizer_config = dict(grad_clip=None)
# learning policy
lr_config = dict(
    policy='step',
    warmup='linear',
    warmup_iters=500,
    warmup_ratio=0.001,
    step=[16, 19])
total_epochs = 36  #这里修改
这里是引用配置文件中默认的学习速率为8gpu和每张gpu 2张img (batch size = 8*2 = 16)。
根据线性缩放规则,如果你使用不同的GPU或每个GPU的图像,则需要按批大小设置成比例的学习率。
例如,对于4个GPU,每张gpu 2张img, batch_size=8, lr = 0.01 * 8 / 16;

step按照比例改
① step=[8 11] epoch=12
② step=[16 22] epoch=24
③ step=[67 92] epoch=100
step=[27,33] epoch=36
step=[16,19] epoch=20
7、修该类别名称CLASSES
one:路径/mmdet/datasets/coco.py的第23行CLASSES
two:路径/mmdet/core/evaluation/class_names.py的第67行coco_classes,这里把coco_classes改成自己对应的class名称,不然在evaluation的时候返回的名称不对应。
修改为自己数据集的类别
CLASSES中填写自己的分类:CLASSES = ('person', 'bicycle', 'car')
one:
@DATASETS.register_module()
class CocoDataset(CustomDataset):
CLASSES = ('person', 'bicycle', 'car', 'motorcycle', 'airplane', 'bus',
'train', 'truck', 'boat', 'traffic light', 'fire hydrant',
'stop sign', 'parking meter', 'bench', 'bird', 'cat', 'dog',
'horse', 'sheep', 'cow', 'elephant', 'bear', 'zebra', 'giraffe',
'backpack', 'umbrella', 'handbag', 'tie', 'suitcase', 'frisbee',
'skis', 'snowboard', 'sports ball', 'kite', 'baseball bat',
'baseball glove', 'skateboard', 'surfboard', 'tennis racket',
'bottle', 'wine glass', 'cup', 'fork', 'knife', 'spoon', 'bowl',
'banana', 'apple', 'sandwich', 'orange', 'broccoli', 'carrot',
'hot dog', 'pizza', 'donut', 'cake', 'chair', 'couch',
'potted plant', 'bed', 'dining table', 'toilet', 'tv', 'laptop',
'mouse', 'remote', 'keyboard', 'cell phone', 'microwave',
'oven', 'toaster', 'sink', 'refrigerator', 'book', 'clock',
'vase', 'scissors', 'teddy bear', 'hair drier', 'toothbrush')#修改为自己的类别数
#two
def coco_classes():
return [
'person', 'bicycle', 'car', 'motorcycle', 'airplane', 'bus', 'train',
'truck', 'boat', 'traffic_light', 'fire_hydrant', 'stop_sign',
'parking_meter', 'bench', 'bird', 'cat', 'dog', 'horse', 'sheep',
'cow', 'elephant', 'bear', 'zebra', 'giraffe', 'backpack', 'umbrella',
'handbag', 'tie', 'suitcase', 'frisbee', 'skis', 'snowboard',
'sports_ball', 'kite', 'baseball_bat', 'baseball_glove', 'skateboard',
'surfboard', 'tennis_racket', 'bottle', 'wine_glass', 'cup', 'fork',
'knife', 'spoon', 'bowl', 'banana', 'apple', 'sandwich', 'orange',
'broccoli', 'carrot', 'hot_dog', 'pizza', 'donut', 'cake', 'chair',
'couch', 'potted_plant', 'bed', 'dining_table', 'toilet', 'tv',
'laptop', 'mouse', 'remote', 'keyboard', 'cell_phone', 'microwave',
'oven', 'toaster', 'sink', 'refrigerator', 'book', 'clock', 'vase',
'scissors', 'teddy_bear', 'hair_drier', 'toothbrush'
] #修改为自己的数据集名称
注意:
如果只有一个类别,需要加上一个逗号,否则将会报错,例如只有一个类别,如下:
def voc_classes():
    return ['aeroplane', ]
8、保存最优的checkpoint文件
需要的操作就是在配置文件中进行如下修改:
evaluation = dict(interval=1, metric='bbox', save_best='auto')
save_best用于指定对应的键,‘auto’是指保留第一个键对应最大值的checkpoint文件,即’bbox_mAP’(对应coco评价指标的第一行),也可以指定save_best=‘bbox_mAP_50’(coco评价指标的第二行)保留最大checkpoint文件。
保存的checkpoint文件路径在work_dir中,命名格式如下:

这样在训练过程中会自动保存自己指定指标最高的checkpoint文件。
You can set save_best=True in the checkpoint_config when you fine-tune your model.
/mmdetection-master/configs/
base
/datasets/coco_detection.py
evaluation = dict(interval=1, metric='bbox',save_best='bbox_mAP')
9、mmdetection多类目标训练查看单类准确率(AP)
通常我们在mmdetection平台上就训练一类目标,训练过程中每跑完一个epoch就可以查看到该目标的0.5,0.75等阈值下的准确率,还有一个整体的mAP。但是,当你跑多类目标时,多个目标一起训练怎么看单类的准确率?mmdetection默认的设置是多类目标一起训练时,打印整体的准确率,如果要在训练和测试的时候查看单类的准确率,可以如下操作
在mmdetection/mmdet/datasets/coco.py中找到如下代码
def evaluate(self,
                 results,
                 metric='bbox',
                 logger=None,
                 jsonfile_prefix=None,
                 classwise=False,
                 proposal_nums=(100, 300, 1000),
                 iou_thrs=None,
                 metric_items=None):
修改classwise=False为classwise=True,打印结果变化如下:
默认的打印结果:

修改后如下,增加了单类的AP,即准确率
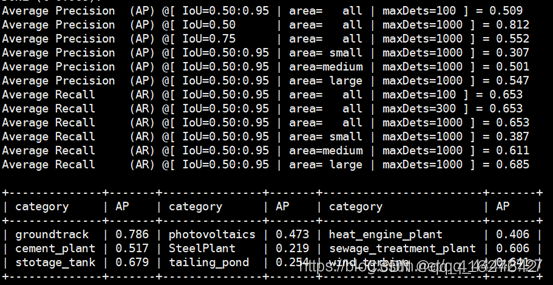
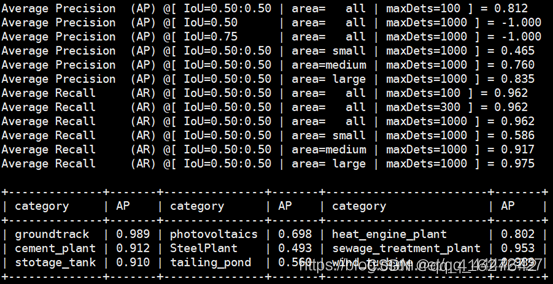
但是,上图中的单类准确率并不是很好的评价指标,它是AP在各个阶段取的一个平均值,在0.5到0.95这个区间内取的综合评估结果,我们需要进一步限定在某个阈值下比较有意义,比如阈值设在0.5时的准确率,这时只统计0.5阈值下的结果,代码如下:
def evaluate(self,
                 results,
                 metric='bbox',
                 logger=None,
                 jsonfile_prefix=None,
                 classwise=True,
                 proposal_nums=(100, 300, 1000),
                 iou_thrs=[0.5],
                 metric_items=None):
打印结果如下:
如果在训练的时候没有修改如上代码,可以不用重新训练,使用训练出来的模型进行测试也可得到如上结果,测试命令如下
python3 tools/test.py ./config/retinanet/retinanet_r50_fpn_1x_coco.py ./work_dirs/retinanet_r50_fpn_1x_coco/epoch_12.pth --out ./result/result.pkl --eval bbox
4、创建自定义配置(二)
1、打开 configs 目录:
2、新建自定义配置目录:
mkdir myconfig
3、在 ./myconfig 目录下,新建 faster_rcnn_r50_fpn_1x_mydataset.py:
4、将3配置工程修改中的上面步骤 修改的配置写在一个文件中。
# The new config inherits the base configs to highlight the necessary modification
#新配置继承了基本配置,以突出显示必要的修改。模型的具体设置继承了cascade_mask_rcnn_r50_fpn.py,数据的基本设置继承了cityscapes_instance.py,运行的一些设置继承了default_runtime.py
_base_ = [
    '../_base_/models/cascade_mask_rcnn_r50_fpn.py',
    '../_base_/datasets/cityscapes_instance.py', '../_base_/default_runtime.py'
]

model = dict(
    # set None to avoid loading ImageNet pretrained backbone,
    #设置None以避免加载ImageNet预训练骨干
    # instead here we set `load_from` to load from COCO pretrained detectors.
    #这里我们将' load_from '设置为从COCO预训练的检测器加载。
    backbone=dict(init_cfg=None),
    # replace neck from defaultly `FPN` to our new implemented module `AugFPN`
    neck=dict(
        type='AugFPN',#这里修改为我们的neck
        in_channels=[256, 512, 1024, 2048],
        out_channels=256,
        num_outs=5),
    # We also need to change the num_classes in head from 80 to 8, to match the
    # cityscapes dataset's annotation. This modification involves `bbox_head` and `mask_head`.
    #我们还需要将head中的num_classes从80更改为8,以匹配cityscape数据集的注释。这个修改涉及到' bbox_head '和' mask_head '
    roi_head=dict(
        bbox_head=[
            dict(
                type='Shared2FCBBoxHead',
                in_channels=256,
                fc_out_channels=1024,
                roi_feat_size=7,
                # change the number of classes from defaultly COCO to cityscapes
                num_classes=8,
                bbox_coder=dict(
                    type='DeltaXYWHBBoxCoder',
                    target_means=[0., 0., 0., 0.],
                    target_stds=[0.1, 0.1, 0.2, 0.2]),
                reg_class_agnostic=True,
                loss_cls=dict(
                    type='CrossEntropyLoss',
                    use_sigmoid=False,
                    loss_weight=1.0),
                loss_bbox=dict(type='SmoothL1Loss', beta=1.0,
                               loss_weight=1.0)),
            dict(
                type='Shared2FCBBoxHead',
                in_channels=256,
                fc_out_channels=1024,
                roi_feat_size=7,
                # change the number of classes from defaultly COCO to cityscapes
                num_classes=8,
                bbox_coder=dict(
                    type='DeltaXYWHBBoxCoder',
                    target_means=[0., 0., 0., 0.],
                    target_stds=[0.05, 0.05, 0.1, 0.1]),
                reg_class_agnostic=True,
                loss_cls=dict(
                    type='CrossEntropyLoss',
                    use_sigmoid=False,
                    loss_weight=1.0),
                loss_bbox=dict(type='SmoothL1Loss', beta=1.0,
                               loss_weight=1.0)),
            dict(
                type='Shared2FCBBoxHead',
                in_channels=256,
                fc_out_channels=1024,
                roi_feat_size=7,
                # change the number of classes from defaultly COCO to cityscapes
                num_classes=8,
                bbox_coder=dict(
                    type='DeltaXYWHBBoxCoder',
                    target_means=[0., 0., 0., 0.],
                    target_stds=[0.033, 0.033, 0.067, 0.067]),
                reg_class_agnostic=True,
                loss_cls=dict(
                    type='CrossEntropyLoss',
                    use_sigmoid=False,
                    loss_weight=1.0),
                loss_bbox=dict(type='SmoothL1Loss', beta=1.0, loss_weight=1.0))
        ],
        mask_head=dict(
            type='FCNMaskHead',
            num_convs=4,
            in_channels=256,
            conv_out_channels=256,
            # change the number of classes from defaultly COCO to cityscapes
            num_classes=8,
            loss_mask=dict(
                type='CrossEntropyLoss', use_mask=True, loss_weight=1.0))))

# over-write `train_pipeline` for new added `AutoAugment` training setting
# 覆盖' train_pipeline '为新添加的' AutoAugment '培训设置
img_norm_cfg = dict(
    mean=[123.675, 116.28, 103.53], std=[58.395, 57.12, 57.375], to_rgb=True)
train_pipeline = [
    dict(type='LoadImageFromFile'),
    dict(type='LoadAnnotations', with_bbox=True, with_mask=True),
    dict(
        type='AutoAugment',
        policies=[
            [dict(
                 type='Rotate',#新增加了旋转的增强操作
                 level=5,
                 img_fill_val=(124, 116, 104),
                 prob=0.5,
                 scale=1)
            ],
            [dict(type='Rotate', level=7, img_fill_val=(124, 116, 104)),
             dict(
                 type='Translate',#新增加了变换的增强操作
                 level=5,
                 prob=0.5,
                 img_fill_val=(124, 116, 104))
            ],
        ]),
    dict(
        type='Resize', img_scale=[(2048, 800), (2048, 1024)], keep_ratio=True),
    dict(type='RandomFlip', flip_ratio=0.5),
    dict(type='Normalize', **img_norm_cfg),
    dict(type='Pad', size_divisor=32),
    dict(type='DefaultFormatBundle'),
    dict(type='Collect', keys=['img', 'gt_bboxes', 'gt_labels', 'gt_masks']),
]

# set batch_size per gpu, and set new training pipeline
#设置每个gpu的batch_size,并设置新的训练管道
data = dict(
    samples_per_gpu=1,
    workers_per_gpu=3,
    # over-write `pipeline` with new training pipeline setting
    train=dict(dataset=dict(pipeline=train_pipeline)))

# Set optimizer,设置优化器
optimizer = dict(type='SGD', lr=0.01, momentum=0.9, weight_decay=0.0001)
optimizer_config = dict(grad_clip=None)
# Set customized learning policy,设置自定义学习策略
lr_config = dict(
    policy='step',
    warmup='linear',
    warmup_iters=500,
    warmup_ratio=0.001,
    step=[8])
runner = dict(type='EpochBasedRunner', max_epochs=10)

# We can use the COCO pretrained Cascade Mask R-CNN R50 model for more stable performance initialization,我们可以使用COCO预训练的级联掩模R-CNN R50模型来实现更稳定的性能初始化(迁移学习)
load_from = 'https://download.openmmlab.com/mmdetection/v2.0/cascade_rcnn/cascade_mask_rcnn_r50_fpn_1x_coco/cascade_mask_rcnn_r50_fpn_1x_coco_20200203-9d4dcb24.pth'
5、载入修改好的配置文件并进行打印
from mmcv import Config
import albumentations as albu
cfg = Config.fromfile('./configs/dcn/cascade_rcnn_r101_fpn_dconv_c3-c5_20e_coco.py')
打印整个配置
Tools /misc/print_config.py逐字打印整个配置,展开所有导入。
python tools/misc/print_config.py ${CONFIG} [-h] [--options ${OPTIONS [OPTIONS...]}]
可以使用以下的命令检查几个重要参数:
cfg.data.train
cfg.total_epochs
cfg.data.samples_per_gpu
cfg.resume_from
cfg.load_from
cfg.data
...
改变config中某些参数
from mmdet.apis import set_random_seed

# Modify dataset type and path

# cfg.dataset_type = 'Xray'
# cfg.data_root = 'Xray'

cfg.data.samples_per_gpu = 4
cfg.data.workers_per_gpu = 4

# cfg.data.test.type = 'Xray'
cfg.data.test.data_root = '../mmdetection_torch_1.5'
# cfg.data.test.img_prefix = '../mmdetection_torch_1.5'

# cfg.data.train.type = 'Xray'
cfg.data.train.data_root = '../mmdetection_torch_1.5'
# cfg.data.train.ann_file = 'instances_train2014.json'
# # cfg.data.train.classes = classes
# cfg.data.train.img_prefix = '../mmdetection_torch_1.5'

# cfg.data.val.type = 'Xray'
cfg.data.val.data_root = '../mmdetection_torch_1.5'
# cfg.data.val.ann_file = 'instances_val2014.json'
# # cfg.data.train.classes = classes
# cfg.data.val.img_prefix = '../mmdetection_torch_1.5'

# modify neck classes number
# cfg.model.neck.num_outs
# modify num classes of the model in box head
# for i in range(len(cfg.model.roi_head.bbox_head)):
#     cfg.model.roi_head.bbox_head[i].num_classes = 10


# cfg.data.train.pipeline[2].img_scale = (1333,800)

cfg.load_from = '../mmdetection_torch_1.5/coco_exps/latest.pth'
# cfg.resume_from = './coco_exps_v3/latest.pth'

# Set up working dir to save files and logs.
cfg.work_dir = './coco_exps_v4'

# The original learning rate (LR) is set for 8-GPU training.
# We divide it by 8 since we only use one GPU.
cfg.optimizer.lr = 0.02 / 8
# cfg.lr_config.warmup = None
# cfg.lr_config = dict(
#     policy='step',
#     warmup='linear',
#     warmup_iters=500,
#     warmup_ratio=0.001,
#     # [7] yields higher performance than [6]
#     step=[7])
# cfg.lr_config = dict(
#     policy='step',
#     warmup='linear',
#     warmup_iters=500,
#     warmup_ratio=0.001,
#     step=[36,39])
cfg.log_config.interval = 10

# # Change the evaluation metric since we use customized dataset.
# cfg.evaluation.metric = 'mAP'
# # We can set the evaluation interval to reduce the evaluation times
# cfg.evaluation.interval = 12
# # We can set the checkpoint saving interval to reduce the storage cost
# cfg.checkpoint_config.interval = 12

# # Set seed thus the results are more reproducible
cfg.seed = 0
set_random_seed(0, deterministic=False)
cfg.gpu_ids = range(1)
# cfg.total_epochs = 40

# # We can initialize the logger for training and have a look
# # at the final config used for training
print(f'Config:\n{cfg.pretty_text}')
给定一个在COCO数据集上训练Faster R-CNN的配置,我们需要修改一些值来使用它在KITTI数据集上训练Faster R-CNN。

from mmdet.apis import set_random_seed

# Modify dataset type and path
cfg.dataset_type = 'KittiTinyDataset'
cfg.data_root = 'kitti_tiny/'

cfg.data.test.type = 'KittiTinyDataset'
cfg.data.test.data_root = 'kitti_tiny/'
cfg.data.test.ann_file = 'train.txt'
cfg.data.test.img_prefix = 'training/image_2'

cfg.data.train.type = 'KittiTinyDataset'
cfg.data.train.data_root = 'kitti_tiny/'
cfg.data.train.ann_file = 'train.txt'
cfg.data.train.img_prefix = 'training/image_2'

cfg.data.val.type = 'KittiTinyDataset'
cfg.data.val.data_root = 'kitti_tiny/'
cfg.data.val.ann_file = 'val.txt'
cfg.data.val.img_prefix = 'training/image_2'

# modify num classes of the model in box head
cfg.model.roi_head.bbox_head.num_classes = 3
# We can still use the pre-trained Mask RCNN model though we do not need to
# use the mask branch
cfg.load_from = 'checkpoints/mask_rcnn_r50_caffe_fpn_mstrain-poly_3x_coco_bbox_mAP-0.408__segm_mAP-0.37_20200504_163245-42aa3d00.pth'

# Set up working dir to save files and logs.
cfg.work_dir = './tutorial_exps'

# The original learning rate (LR) is set for 8-GPU training.
# We divide it by 8 since we only use one GPU.
cfg.optimizer.lr = 0.02 / 8
cfg.lr_config.warmup = None
cfg.log_config.interval = 10

# Change the evaluation metric since we use customized dataset.
cfg.evaluation.metric = 'mAP'
# We can set the evaluation interval to reduce the evaluation times
cfg.evaluation.interval = 12
# We can set the checkpoint saving interval to reduce the storage cost
cfg.checkpoint_config.interval = 12

# Set seed thus the results are more reproducible
cfg.seed = 0
set_random_seed(0, deterministic=False)
cfg.gpu_ids = range(1)


# We can initialize the logger for training and have a look
# at the final config used for training
print(f'Config:\n{cfg.pretty_text}')
训练一个新的探测器
最后,初始化数据集和检测器,然后训练一个新的检测器!
from mmdet.datasets import build_dataset
from mmdet.models import build_detector
from mmdet.apis import train_detector


# Build dataset
datasets = [build_dataset(cfg.data.train)]

# Build the detector
model = build_detector(
    cfg.model, train_cfg=cfg.get('train_cfg'), test_cfg=cfg.get('test_cfg'))
# Add an attribute for visualization convenience
model.CLASSES = datasets[0].CLASSES

# Create work_dir
mmcv.mkdir_or_exist(osp.abspath(cfg.work_dir))
train_detector(model, datasets, cfg, distributed=False, validate=True)
6、源码进行修改禁用Mask(如何实现只有对象检测没有实例分割)
1.路径./configs/base/models/mask_rcnn_swin_fpn.py中第75行use_mask=True 修改为use_mask=False,目的是禁用Mask
还需要删除mask_roi_extractor和mask_head两个变量,大概在第63行和68行,这里删除之后注意末尾的逗号和小括号的格式匹配问题。
补充:mask_roi_extractor=None,
     mask_head=None),

2.路径/configs/swin/mask_rcnn_swin_tiny_patch4_window7_mstrain_480-800_adamw_3x_coco.py中:
第26行dict(type=‘LoadAnnotations’, with_bbox=True, with_mask=True)修改为dict(type=‘LoadAnnotations’, with_bbox=True, with_mask=False)
第60行删掉’gt_masks’

如果你不使用APEX,那么69行的EpochBasedRunnerAmp需要删除后面的Amp,如果你使用的话就保留不变,后面的max_epoch就是训练的epoch参数,可以根据自己的需要调整。

3、./configs/_base_/coco_detection.py

dict(type='LoadAnnotations', with_bbox=True),修改为:

dict(type='LoadAnnotations', with_bbox=True,with_mask=False ,with_seg=False,poly2mask=False),

新加这三个参数是为了保险起见,也可以不加,主要目的是为了防止在读取数据集标注时试图读取mask标签,而coco原生标注中是不存在mask的。
7、数据浏览browse_dataset
给你一个新的目标检测项目,转化为coco格式,设置好cfg后,难道不需要看下label和bbox是否正确?不需要看下数据增强策略是否合适?我想作为一个有经验的工程师必然少不了这个步骤。
故browse_dataset可以对datasets吐出的数据进行可视化检查,看下是否有错误。这个工具我是直接从mmdetection里面copy过来的,并修复了在voc那种数据的配置上面出错的bug。
用法非常简单,只需要传入cfg文件即可,以coco数据为例,如下所示:
Tools /misc/browse_data .py帮助用户可视化地浏览检测数据集(包括图像和边界框注释),或者将图像保存到指定目录
python tools/misc/browse_dataset.py ${CONFIG} [-h] [--skip-type ${SKIP_TYPE[SKIP_TYPE...]}] [--output-dir ${OUTPUT_DIR}] [--not-show] [--show-interval ${SHOW_INTERVAL}]
可视化数据集标签 – browse_dataset.py
一般训练前放好数据集和设置好相应的配置文件之后,需要先看看自己数据集标签这块对着没。可运行如下命令以faster_rcnn为例
示例:
python tools/misc/browse_dataset.py configs/faster_rcnn/faster_rcnn_r50_fpn_1x_coco.py

python tools/misc/browse_dataset.py work_dirs/mask_rcnn_swin_tiny_patch4_window7_mstrain_480-800_adamw_3x_coco_visdrone2019/mask_rcnn_swin_tiny_patch4_window7_mstrain_480-800_adamw_3x_coco.py --output-dir data/VisDrone2019-DET-coco/VisDrone2019-DET-val_Show/
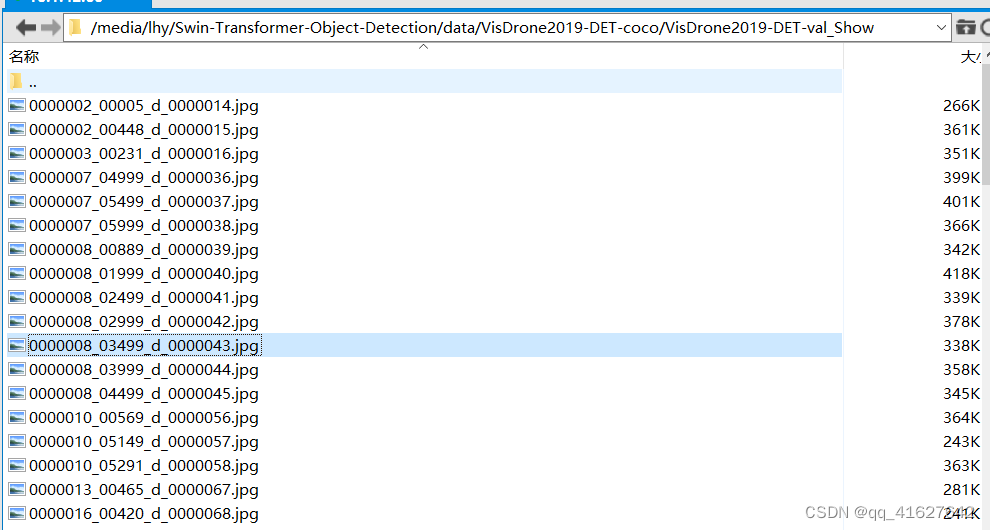
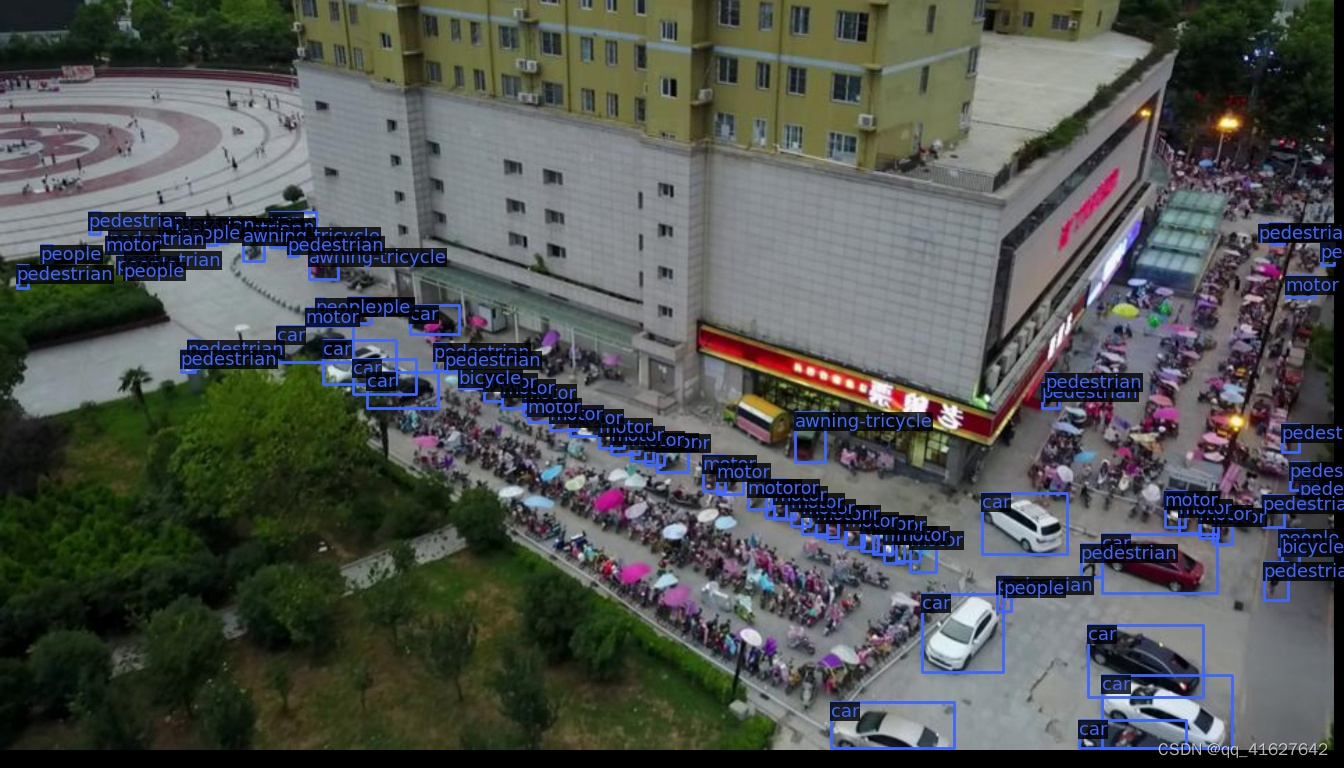
7、模型执行训练
1、 在单个GPU上训练
python tools/train.py \
    ${CONFIG_FILE} \
    [optional arguments]
案例:
python tools/train.py configs/swin/mask_rcnn_swin_tiny_patch4_window7_mstrain_480-800_adamw_3x_coco.py
在培训过程中,日志文件和检查点将被保存到工作目录中,工作目录由配置文件中的work_dir指定或通过CLI参数——work-dir指定。在命令中指定工作目录,则可以添加参数–work_dir $ {YOUR_WORK_DIR}
默认情况下,模型每隔一段时间就会在验证集上评估,评估间隔可以在配置文件中指定,如下所示。
#evaluate the model every 12 epoch.
evaluation = dict(interval=12)
该工具接受几个可选参数,包括:
–no-validate (not suggested): Disable evaluation during training.在培训期间禁用评估
–work-dir ${WORK_DIR}: Override the working directory.设置工作目录
–resume-from ${CHECKPOINT_FILE}: Resume from a previous checkpoint file.从上一个检查点文件恢复
–options ‘Key=value’: Overrides other settings in the used config.覆盖所使用配置中的其他设置
2、Training on CPU
CPU上的训练过程与单GPU训练过程一致。我们只需要在训练前禁用图形处理器。
export CUDA_VISIBLE_DEVICES=-1
3、Training on multiple GPUs
bash ./tools/dist_train.sh \
    ${CONFIG_FILE} \
    ${GPU_NUM} \
    [optional arguments]

./tools/dist_train.sh $ {CONFIG_FILE} $ {GPU_NUM} [可选参数]
案例:多gpu断点恢复模型训练
./tools/dist_train.sh configs/swin/mask_rcnn_swin_tiny_patch4_window7_mstrain_480-800_adamw_3x_coco.py 3 --resume-from work_dirs/mask_rcnn_swin_tiny_patch4_window7_mstrain_480-800_adamw_3x_coco/latest.pth
在单台计算机上启动多个作业
如果你使用dist_train.sh启动训练作业,则可以在命令中设置端口。
如果你想在一台机器上启动多个任务,例如,在一台有8个gpu的机器上启动2个4-GPU训练的任务,你需要为每个任务指定不同的端口(默认29500),以避免通信冲突。如果使用dist_train.sh启动培训作业,可以在命令中设置端口。
CUDA_VISIBLE_DEVICES=0,1,2,3 PORT=29500 ./tools/dist_train.sh ${CONFIG_FILE} 4
CUDA_VISIBLE_DEVICES=4,5,6,7 PORT=29501 ./tools/dist_train.sh ${CONFIG_FILE} 4
4、(用多台机器训练)
如果您使用多台仅连接以太网的机器启动,您可以简单地运行以下命令:
在第一台机器上:
NNODES=2 NODE_RANK=0 PORT=$MASTER_PORT MASTER_ADDR=$MASTER_ADDR sh tools/dist_train.sh $CONFIG $GPUS
在第二台机器上:
NNODES=2 NODE_RANK=1 PORT=$MASTER_PORT MASTER_ADDR=$MASTER_ADDR sh tools/dist_train.sh $CONFIG $GPUS
python -m torch.distributed.launch --nproc_per_node 4 --master_port 12345 main.py --cfg configs/swin_tiny_patch4_window7_224.yaml --data-path imagenet --batch-size 64
如果你没有像InfiniBand这样的高速网络,通常会很慢。
用Slurm管理工作,Slurm是一种很好的计算集群作业调度系统
Slurm
。在由Slurm管理的集群上,可以使用slurm_train.sh生成培训作业。它支持单节点和多节点培训。
如果在由slurm(https://slurm.schedmd.com/) 管理的群集上运行MMDetection,则可以使用脚本”slurm_train.sh”。(此脚本还支持单机训练。)
[GPUS=${GPUS}] ./tools/slurm_train.sh ${PARTITION} ${JOB_NAME} ${CONFIG_FILE} ${WORK_DIR}
./tools/slurm_train.sh ${PARTITION} ${JOB_NAME} ${CONFIG_FILE} ${WORK_DIR} [${GPUS}]
下面是一个使用16个gpu在一个名为dev的Slurm分区上训练Mask R-CNN的示例,并将工作目录设置为一些共享文件系统。
GPUS=16 ./tools/slurm_train.sh dev mask_r50_1x configs/mask_rcnn_r50_fpn_1x_coco.py /nfs/xxxx/mask_rcnn_r50_fpn_1x
你可以检查slurm_train.sh(https://github.com/open-mmlab/mmdetection/blob/master/tools/slurm_train.sh) 中的完整参数和环境变量。
使用Slurm时,port选项可以通过以下方式设置:
CUDA_VISIBLE_DEVICES=0,1,2,3 GPUS=4 ./tools/slurm_train.sh ${PARTITION} ${JOB_NAME} config1.py ${WORK_DIR} --options 'dist_params.port=29500'
CUDA_VISIBLE_DEVICES=4,5,6,7 GPUS=4 ./tools/slurm_train.sh ${PARTITION} ${JOB_NAME} config2.py ${WORK_DIR} --options 'dist_params.port=29501'
如果只有多台计算机与以太网连接,则可以参考 pytorch 启动实用程序(https://pytorch.org/docs/stable/distributed_deprecated.html#launch-utility)。
如果没有像infiniband这样的高速网络,通常速度很慢。
如果你将启动训练作业与slurm一起使用,则需要修改配置文件(通常是配置文件底部的第6行)以设置不同的通信端口。
在config1.py中,
dist_params = dict(backend='nccl', port=29500)
In config2.py, set
dist_params = dict(backend='nccl',port= 29501)
然后,你可以使用config1.py和config2.py启动两个作业。
CUDA_VISIBLE_DEVICES=0,1,2,3 GPUS=4 ./tools/slurm_train.sh ${PARTITION} ${JOB_NAME} config1.py ${WORK_DIR}
CUDA_VISIBLE_DEVICES=4,5,6,7 GPUS=4 ./tools/slurm_train.sh ${PARTITION} ${JOB_NAME} config2.py ${WORK_DIR}
8、使用Tensorboard进行可视化,查看训练效果
如果有在default_runtime中解除注释tensorboard,键入下面的命令可以开启实时更新的tensorboard可视化模块。
在config文件修改如下

log_config = dict(
    interval=50,
    hooks=[
        dict(type='TextLoggerHook'),
        dict(type='TensorboardLoggerHook') #生成Tensorboard 日志
    ])


设置之后,会在work_dir目录下生成一个tf_logs目录,使用Tensorboard打开日志

    cd /path/to/tf_logs
    tensorboard --logdir . --host 服务器IP地址 --port 6006

tensorboard --logdir work_dirs/mask_rcnn_swin_tiny_patch4_window7_mstrain_480-800_adamw_3x_coco/tf_logs --host 10.1.42.60


tensorboard 默认端口号是6006,在浏览器中输入http://:6006即可打开tensorboard界面
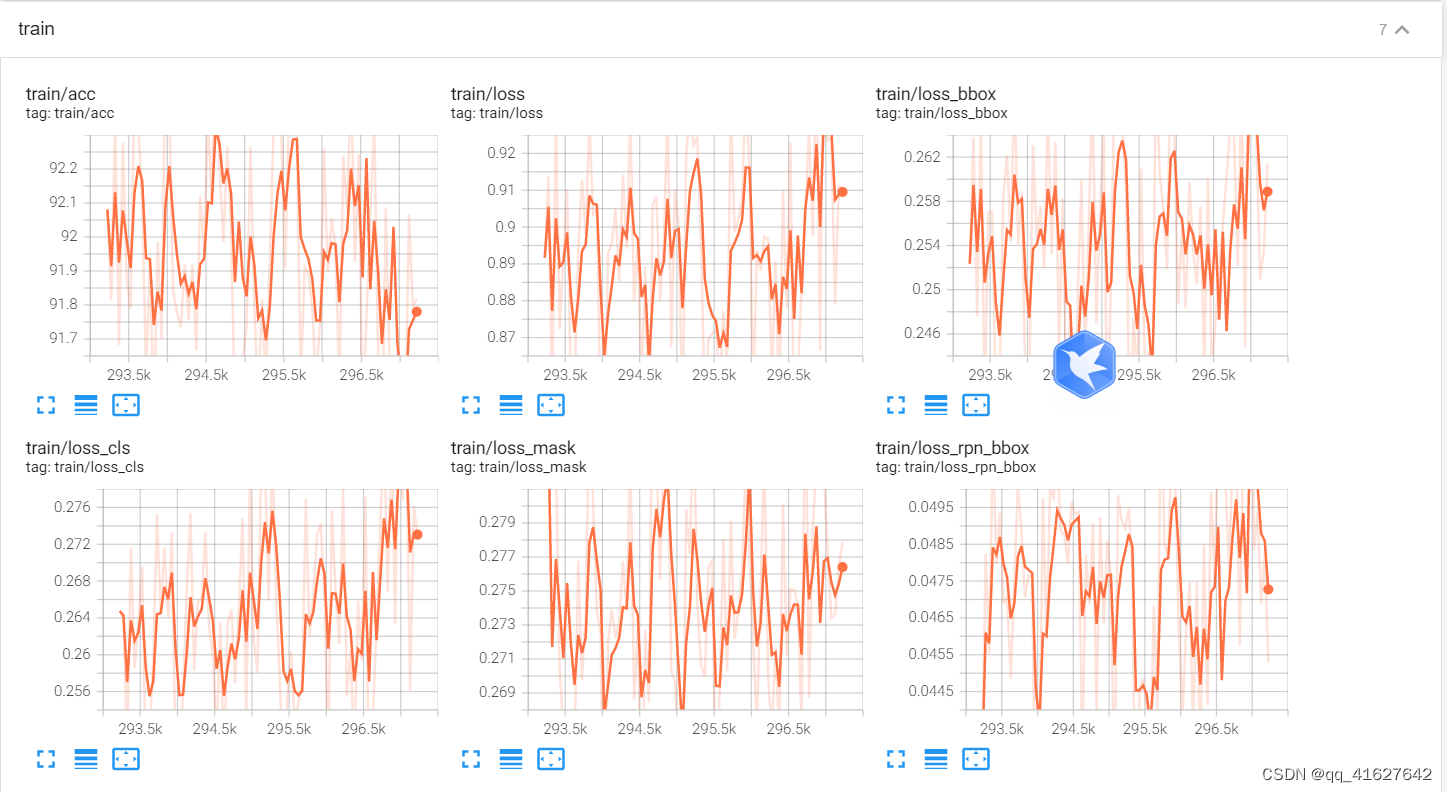
9、模型训练结果
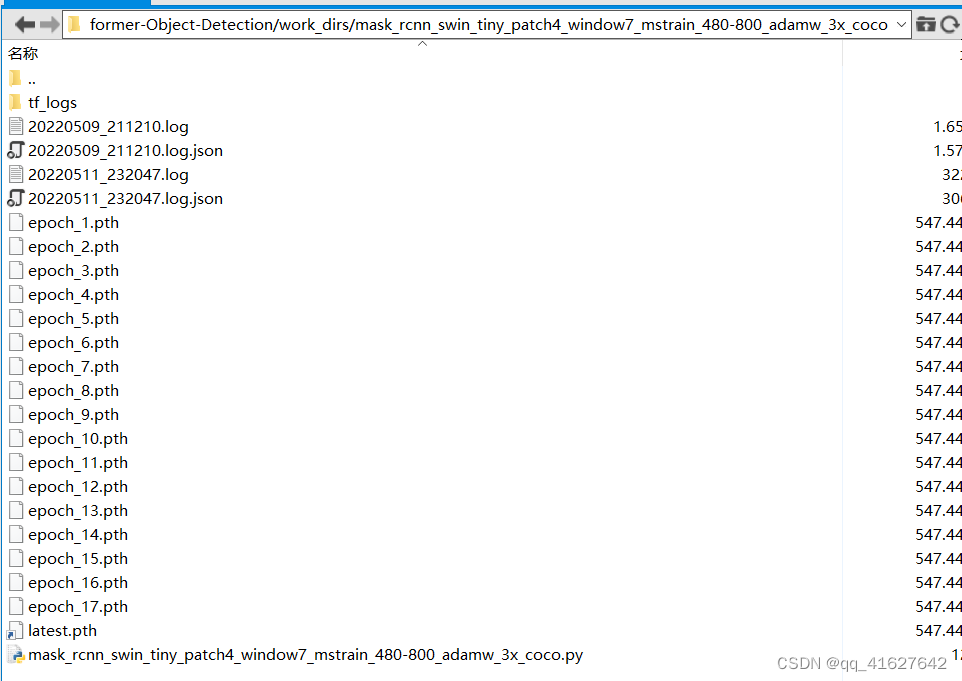
上面的.log、.log.json文件就是训练的日志文件,每训练完一个epoch后目录下还会有对应的以epoch_x.pth的模型文件,最新训练的模型文件命名为latest.pth。
上面的文件内容大同小异,有当前时间、epoch次数,迭代次数(配置文件中默认设置50个batch输出一次log信息),学习率、损失函数loss、准确率等信息,可以根据上面的训练信息进行模型的评估与测试,另外可以通过读取.log.json文件进行可视化展示,方便调试。
10、VisDrone数据的训练记录
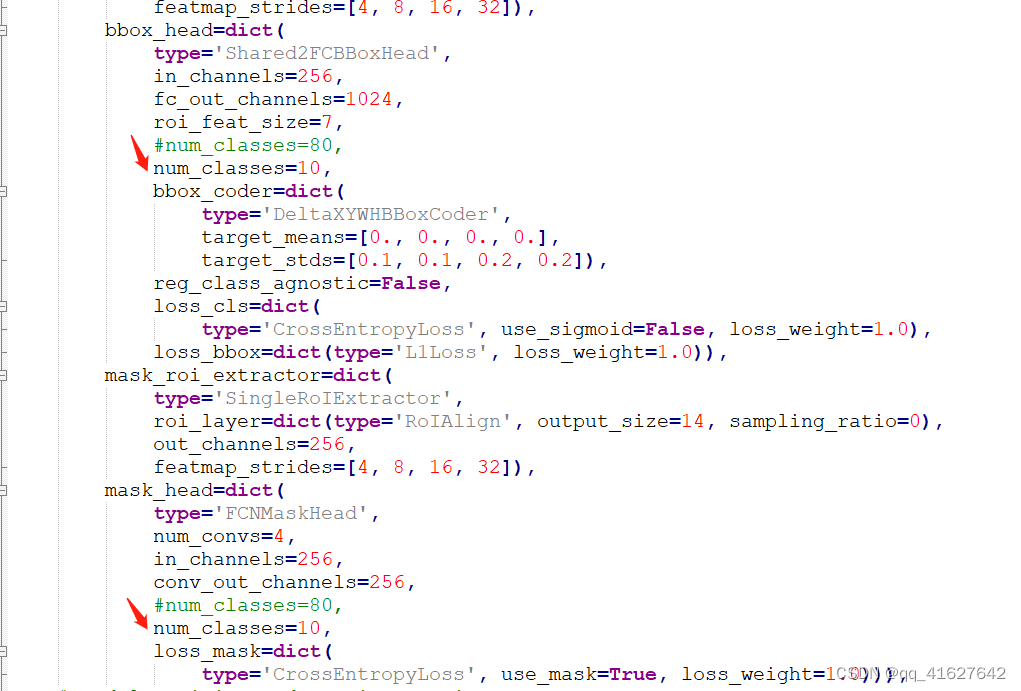
1、修改类别数
由于visdrone数据类别共有11类,标签从0到11分别为’ignored regions’,‘pedestrian’,‘people’,‘bicycle’,‘car’,‘van’,
‘truck’,‘tricycle’,‘awning-tricycle’,‘bus’,‘motor’,‘others’。本次在数据转化过程中我们只想检测这十个类, 0和11没有加入转化
PREDEF_CLASSE = { 'pedestrian': 1, 'people': 2,
    'bicycle': 3, 'car': 4, 'van': 5, 'truck': 6, 'tricycle': 7,
    'awning-tricycle': 8, 'bus': 9, 'motor': 10}
2、修改运行信息配置(configs/
base
/default_runtime.py)
修改配置信息(间隔和加载预训练模型configs/base/default_runtime.py)
修改 configs/base/default_runtime.py 中的 interval,loadfrom
1、第1行interval=1,表示多少个 epoch 验证一次模型,然后保存一次权重信息。
2、第4行interval=50,表示每50个batch打印一次日志信息
3、loadfrom:表示加载哪一个训练好的权重,可以直接写绝对路径如:
```bash
load_from = r"E:\workspace\Python\Pytorch\Swin-Transformer-Object-Detection\mask_rcnn_swin_tiny_patch4_window7.pth"
修改内容如下所示:

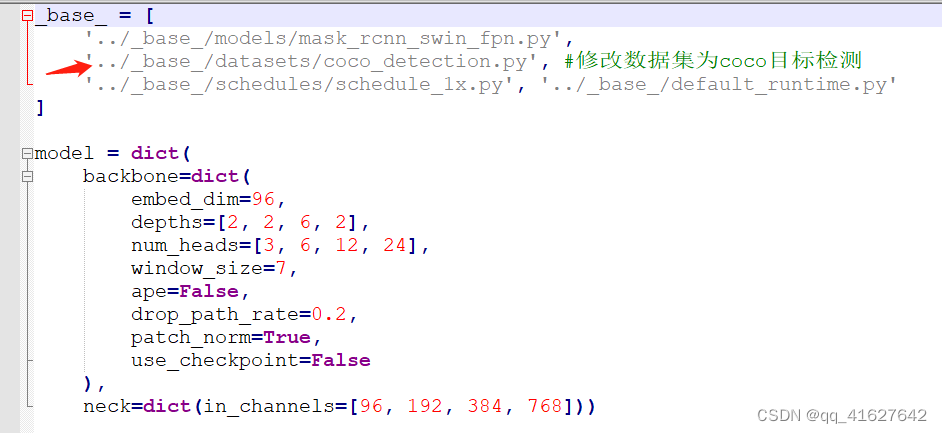
3、修改基础配置(configs/swin/mask_rcnn_swin_tiny_patch4_window7_mstrain_480-800_adamw_3x_coco.py)
修改数据集的基础配置信息如下:
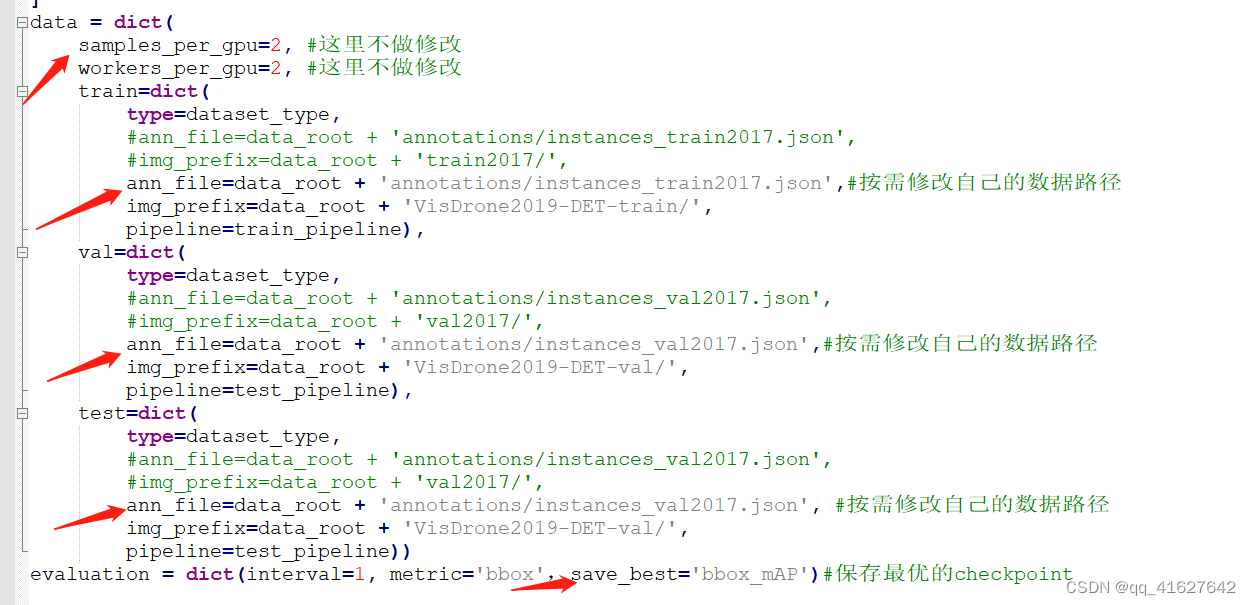
4、修改基础数据信息(路径、batch_size、线程等信息)(configs/base/datasets/coco_detection.py)

5、修改学习率(mmdetection/configs/
base
/schedules/ schedule_1x.py)
schedule_1x.py是调整学习率的schedule的位置,可以设置warmup schedule和衰减策略。 1x, 2x分别对应12epochs和24epochs,20e对应20epochs,这里注意配置都是默认8块gpu的训练,如果用一块gpu训练,需要在lr/8。
这里是引用配置文件中默认的学习速率为8gpu和每张gpu 2张img (batch size = 8*2 = 16)。
根据线性缩放规则,如果你使用不同的GPU或每个GPU的图像,则需要按批大小设置成比例的学习率。
例如,对于我们目前的机器有4个GPU,每张gpu 2张img, batch_size=8, lr = 0.02 * 8 / 16;

修改内容如下:

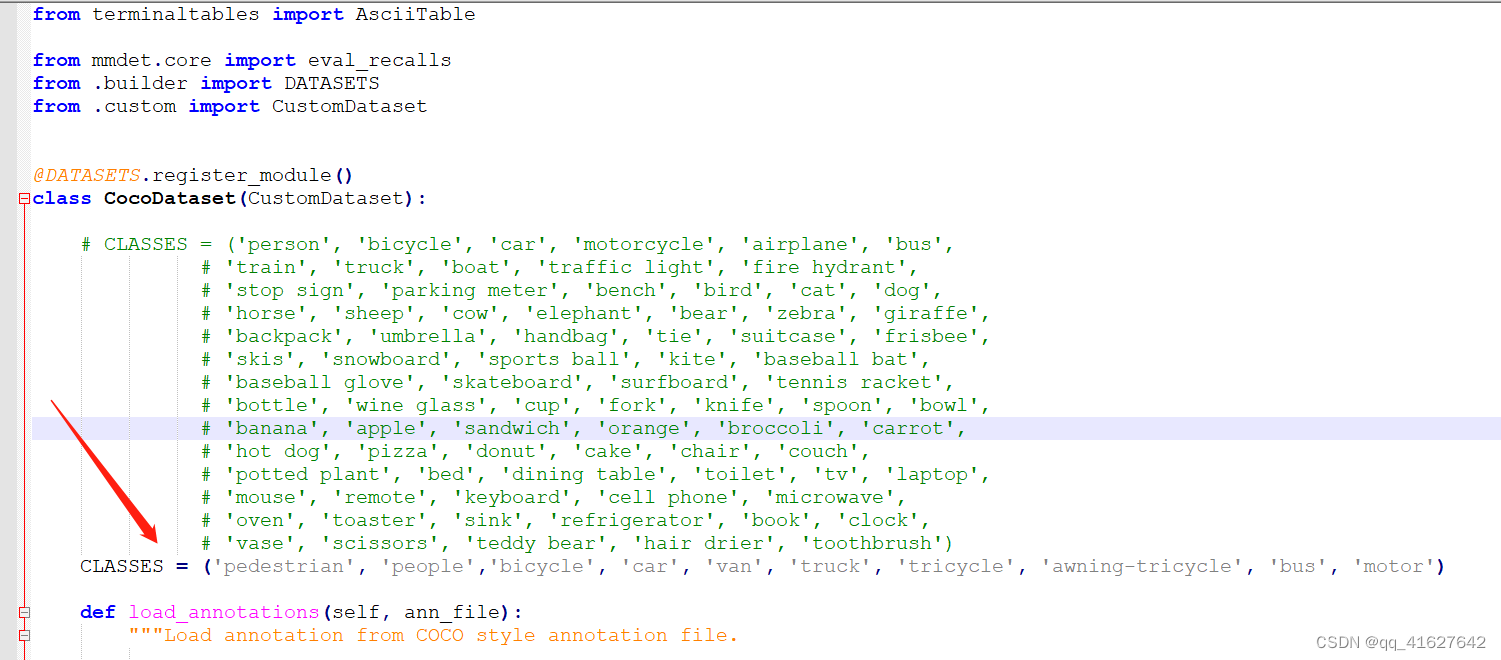
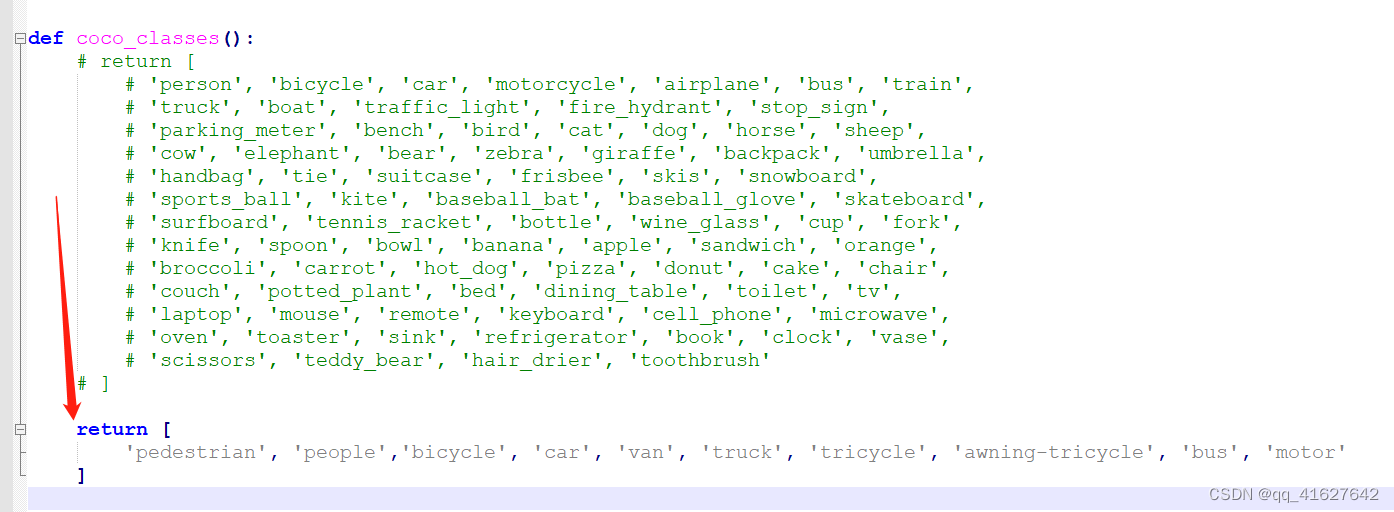
6、修该类别名称CLASSES
one:路径/mmdet/datasets/coco.py的第23行CLASSES
two:路径/mmdet/core/evaluation/class_names.py的第67行coco_classes,这里把coco_classes改成自己对应的class名称,不然在evaluation的时候返回的名称不对应。
'pedestrian', 'people','bicycle', 'car', 'van', 'truck', 'tricycle', 'awning-tricycle', 'bus', 'motor'
7、加载打印保存修改好的配置文件
1、#载入修改好的配置文件
from mmcv import Config
import albumentations as albu
cfg = Config.fromfile('./configs/swin/mask_rcnn_swin_tiny_patch4_window7_mstrain_480-800_adamw_3x_coco.py')
2、打印整个配置,Tools /misc/print_config.py逐字打印整个配置,展开所有导入。
python tools/misc/print_config.py ${CONFIG} [-h] [--options ${OPTIONS [OPTIONS...]}]
python tools/misc/print_config.py configs/swin/mask_rcnn_swin_tiny_patch4_window7_mstrain_480-800_adamw_3x_coco.py
Config:
model = dict(
    type='MaskRCNN',
    pretrained=None,
    backbone=dict(
        type='SwinTransformer',
        embed_dim=96,
        depths=[2, 2, 6, 2],
        num_heads=[3, 6, 12, 24],
        window_size=7,
        mlp_ratio=4.0,
        qkv_bias=True,
        qk_scale=None,
        drop_rate=0.0,
        attn_drop_rate=0.0,
        drop_path_rate=0.2,
        ape=False,
        patch_norm=True,
        out_indices=(0, 1, 2, 3),
        use_checkpoint=False),
    neck=dict(
        type='FPN',
        in_channels=[96, 192, 384, 768],
        out_channels=256,
        num_outs=5),
    rpn_head=dict(
        type='RPNHead',
        in_channels=256,
        feat_channels=256,
        anchor_generator=dict(
            type='AnchorGenerator',
            scales=[8],
            ratios=[0.5, 1.0, 2.0],
            strides=[4, 8, 16, 32, 64]),
        bbox_coder=dict(
            type='DeltaXYWHBBoxCoder',
            target_means=[0.0, 0.0, 0.0, 0.0],
            target_stds=[1.0, 1.0, 1.0, 1.0]),
        loss_cls=dict(
            type='CrossEntropyLoss', use_sigmoid=True, loss_weight=1.0),
        loss_bbox=dict(type='L1Loss', loss_weight=1.0)),
    roi_head=dict(
        type='StandardRoIHead',
        bbox_roi_extractor=dict(
            type='SingleRoIExtractor',
            roi_layer=dict(type='RoIAlign', output_size=7, sampling_ratio=0),
            out_channels=256,
            featmap_strides=[4, 8, 16, 32]),
        bbox_head=dict(
            type='Shared2FCBBoxHead',
            in_channels=256,
            fc_out_channels=1024,
            roi_feat_size=7,
            num_classes=10,
            bbox_coder=dict(
                type='DeltaXYWHBBoxCoder',
                target_means=[0.0, 0.0, 0.0, 0.0],
                target_stds=[0.1, 0.1, 0.2, 0.2]),
            reg_class_agnostic=False,
            loss_cls=dict(
                type='CrossEntropyLoss', use_sigmoid=False, loss_weight=1.0),
            loss_bbox=dict(type='L1Loss', loss_weight=1.0)),
        mask_roi_extractor=dict(
            type='SingleRoIExtractor',
            roi_layer=dict(type='RoIAlign', output_size=14, sampling_ratio=0),
            out_channels=256,
            featmap_strides=[4, 8, 16, 32]),
        mask_head=dict(
            type='FCNMaskHead',
            num_convs=4,
            in_channels=256,
            conv_out_channels=256,
            num_classes=10,
            loss_mask=dict(
                type='CrossEntropyLoss', use_mask=True, loss_weight=1.0))),
    train_cfg=dict(
        rpn=dict(
            assigner=dict(
                type='MaxIoUAssigner',
                pos_iou_thr=0.7,
                neg_iou_thr=0.3,
                min_pos_iou=0.3,
                match_low_quality=True,
                ignore_iof_thr=-1),
            sampler=dict(
                type='RandomSampler',
                num=256,
                pos_fraction=0.5,
                neg_pos_ub=-1,
                add_gt_as_proposals=False),
            allowed_border=-1,
            pos_weight=-1,
            debug=False),
        rpn_proposal=dict(
            nms_pre=2000,
            max_per_img=1000,
            nms=dict(type='nms', iou_threshold=0.7),
            min_bbox_size=0),
        rcnn=dict(
            assigner=dict(
                type='MaxIoUAssigner',
                pos_iou_thr=0.5,
                neg_iou_thr=0.5,
                min_pos_iou=0.5,
                match_low_quality=True,
                ignore_iof_thr=-1),
            sampler=dict(
                type='RandomSampler',
                num=512,
                pos_fraction=0.25,
                neg_pos_ub=-1,
                add_gt_as_proposals=True),
            mask_size=28,
            pos_weight=-1,
            debug=False)),
    test_cfg=dict(
        rpn=dict(
            nms_pre=1000,
            max_per_img=1000,
            nms=dict(type='nms', iou_threshold=0.7),
            min_bbox_size=0),
        rcnn=dict(
            score_thr=0.05,
            nms=dict(type='nms', iou_threshold=0.5),
            max_per_img=100,
            mask_thr_binary=0.5)))
dataset_type = 'CocoDataset'
data_root = 'data/VisDrone2019-DET-coco/'
img_norm_cfg = dict(
    mean=[123.675, 116.28, 103.53], std=[58.395, 57.12, 57.375], to_rgb=True)
train_pipeline = [
    dict(type='LoadImageFromFile'),
    dict(type='LoadAnnotations', with_bbox=True, with_mask=True),
    dict(type='RandomFlip', flip_ratio=0.5),
    dict(
        type='AutoAugment',
        policies=[[{
            'type':
            'Resize',
            'img_scale': [(480, 1333), (512, 1333), (544, 1333), (576, 1333),
                          (608, 1333), (640, 1333), (672, 1333), (704, 1333),
                          (736, 1333), (768, 1333), (800, 1333)],
            'multiscale_mode':
            'value',
            'keep_ratio':
            True
        }],
                  [{
                      'type': 'Resize',
                      'img_scale': [(400, 1333), (500, 1333), (600, 1333)],
                      'multiscale_mode': 'value',
                      'keep_ratio': True
                  }, {
                      'type': 'RandomCrop',
                      'crop_type': 'absolute_range',
                      'crop_size': (384, 600),
                      'allow_negative_crop': True
                  }, {
                      'type':
                      'Resize',
                      'img_scale': [(480, 1333), (512, 1333), (544, 1333),
                                    (576, 1333), (608, 1333), (640, 1333),
                                    (672, 1333), (704, 1333), (736, 1333),
                                    (768, 1333), (800, 1333)],
                      'multiscale_mode':
                      'value',
                      'override':
                      True,
                      'keep_ratio':
                      True
                  }]]),
    dict(
        type='Normalize',
        mean=[123.675, 116.28, 103.53],
        std=[58.395, 57.12, 57.375],
        to_rgb=True),
    dict(type='Pad', size_divisor=32),
    dict(type='DefaultFormatBundle'),
    dict(type='Collect', keys=['img', 'gt_bboxes', 'gt_labels', 'gt_masks'])
]
test_pipeline = [
    dict(type='LoadImageFromFile'),
    dict(
        type='MultiScaleFlipAug',
        img_scale=(1333, 800),
        flip=False,
        transforms=[
            dict(type='Resize', keep_ratio=True),
            dict(type='RandomFlip'),
            dict(
                type='Normalize',
                mean=[123.675, 116.28, 103.53],
                std=[58.395, 57.12, 57.375],
                to_rgb=True),
            dict(type='Pad', size_divisor=32),
            dict(type='ImageToTensor', keys=['img']),
            dict(type='Collect', keys=['img'])
        ])
]
data = dict(
    samples_per_gpu=2,
    workers_per_gpu=2,
    train=dict(
        type='CocoDataset',
        ann_file=
        'data/VisDrone2019-DET-coco/annotations/instances_train2017.json',
        img_prefix='data/VisDrone2019-DET-coco/VisDrone2019-DET-train/',
        pipeline=[
            dict(type='LoadImageFromFile'),
            dict(type='LoadAnnotations', with_bbox=True, with_mask=True),
            dict(type='RandomFlip', flip_ratio=0.5),
            dict(
                type='AutoAugment',
                policies=[[{
                    'type':
                    'Resize',
                    'img_scale': [(480, 1333), (512, 1333), (544, 1333),
                                  (576, 1333), (608, 1333), (640, 1333),
                                  (672, 1333), (704, 1333), (736, 1333),
                                  (768, 1333), (800, 1333)],
                    'multiscale_mode':
                    'value',
                    'keep_ratio':
                    True
                }],
                          [{
                              'type': 'Resize',
                              'img_scale': [(400, 1333), (500, 1333),
                                            (600, 1333)],
                              'multiscale_mode': 'value',
                              'keep_ratio': True
                          }, {
                              'type': 'RandomCrop',
                              'crop_type': 'absolute_range',
                              'crop_size': (384, 600),
                              'allow_negative_crop': True
                          }, {
                              'type':
                              'Resize',
                              'img_scale': [(480, 1333), (512, 1333),
                                            (544, 1333), (576, 1333),
                                            (608, 1333), (640, 1333),
                                            (672, 1333), (704, 1333),
                                            (736, 1333), (768, 1333),
                                            (800, 1333)],
                              'multiscale_mode':
                              'value',
                              'override':
                              True,
                              'keep_ratio':
                              True
                          }]]),
            dict(
                type='Normalize',
                mean=[123.675, 116.28, 103.53],
                std=[58.395, 57.12, 57.375],
                to_rgb=True),
            dict(type='Pad', size_divisor=32),
            dict(type='DefaultFormatBundle'),
            dict(
                type='Collect',
                keys=['img', 'gt_bboxes', 'gt_labels', 'gt_masks'])
        ]),
    val=dict(
        type='CocoDataset',
        ann_file=
        'data/VisDrone2019-DET-coco/annotations/instances_val2017.json',
        img_prefix='data/VisDrone2019-DET-coco/VisDrone2019-DET-val/',
        pipeline=[
            dict(type='LoadImageFromFile'),
            dict(
                type='MultiScaleFlipAug',
                img_scale=(1333, 800),
                flip=False,
                transforms=[
                    dict(type='Resize', keep_ratio=True),
                    dict(type='RandomFlip'),
                    dict(
                        type='Normalize',
                        mean=[123.675, 116.28, 103.53],
                        std=[58.395, 57.12, 57.375],
                        to_rgb=True),
                    dict(type='Pad', size_divisor=32),
                    dict(type='ImageToTensor', keys=['img']),
                    dict(type='Collect', keys=['img'])
                ])
        ]),
    test=dict(
        type='CocoDataset',
        ann_file=
        'data/VisDrone2019-DET-coco/annotations/instances_val2017.json',
        img_prefix='data/VisDrone2019-DET-coco/VisDrone2019-DET-val/',
        pipeline=[
            dict(type='LoadImageFromFile'),
            dict(
                type='MultiScaleFlipAug',
                img_scale=(1333, 800),
                flip=False,
                transforms=[
                    dict(type='Resize', keep_ratio=True),
                    dict(type='RandomFlip'),
                    dict(
                        type='Normalize',
                        mean=[123.675, 116.28, 103.53],
                        std=[58.395, 57.12, 57.375],
                        to_rgb=True),
                    dict(type='Pad', size_divisor=32),
                    dict(type='ImageToTensor', keys=['img']),
                    dict(type='Collect', keys=['img'])
                ])
        ]))
evaluation = dict(interval=1, metric='bbox', save_best='bbox_mAP')
optimizer = dict(
    type='AdamW',
    lr=0.0001,
    betas=(0.9, 0.999),
    weight_decay=0.05,
    paramwise_cfg=dict(
        custom_keys=dict(
            absolute_pos_embed=dict(decay_mult=0.0),
            relative_position_bias_table=dict(decay_mult=0.0),
            norm=dict(decay_mult=0.0))))
optimizer_config = dict(
    grad_clip=None,
    type='DistOptimizerHook',
    update_interval=1,
    coalesce=True,
    bucket_size_mb=-1,
    use_fp16=True)
lr_config = dict(
    policy='step',
    warmup='linear',
    warmup_iters=500,
    warmup_ratio=0.001,
    step=[27, 33])
runner = dict(type='EpochBasedRunnerAmp', max_epochs=36)
checkpoint_config = dict(interval=1)
log_config = dict(
    interval=50,
    hooks=[dict(type='TextLoggerHook'),
           dict(type='TensorboardLoggerHook')])
custom_hooks = [dict(type='NumClassCheckHook')]
dist_params = dict(backend='nccl')
log_level = 'INFO'
load_from = '/media/lhy/Swin-Transformer-Object-Detection/weights/mask_rcnn_swin_tiny_patch4_window7.pth'
resume_from = None
workflow = [('train', 1)]
fp16 = None
3、整个配置的保存
# dump config,转储配置
cfg.dump(osp.join(cfg.work_dir, osp.basename(args.config)))
8、Training on multiple GPUs
bash ./tools/dist_train.sh \
    ${CONFIG_FILE} \
    ${GPU_NUM} \
    [optional arguments]

./tools/dist_train.sh $ {CONFIG_FILE} $ {GPU_NUM} [可选参数]
./tools/dist_train.sh  configs/swin/mask_rcnn_swin_tiny_patch4_window7_mstrain_480-800_adamw_3x_coco.py  4
案例:多gpu断点恢复模型训练
./tools/dist_train.sh configs/swin/mask_rcnn_swin_tiny_patch4_window7_mstrain_480-800_adamw_3x_coco.py 3 --resume-from work_dirs/mask_rcnn_swin_tiny_patch4_window7_mstrain_480-800_adamw_3x_coco/latest.pth
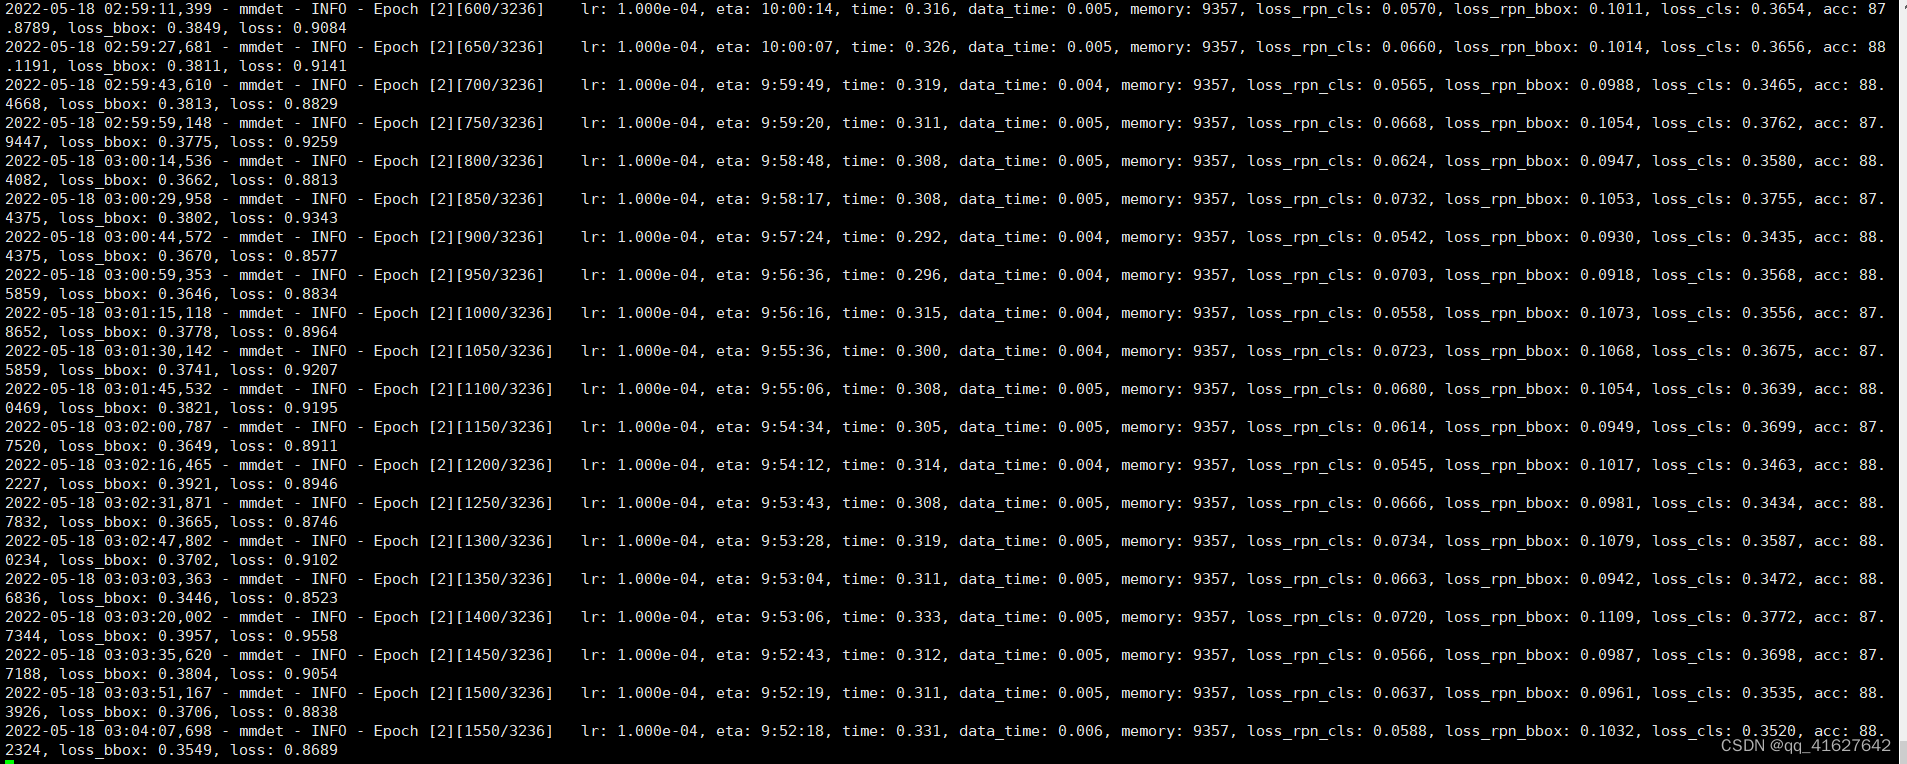

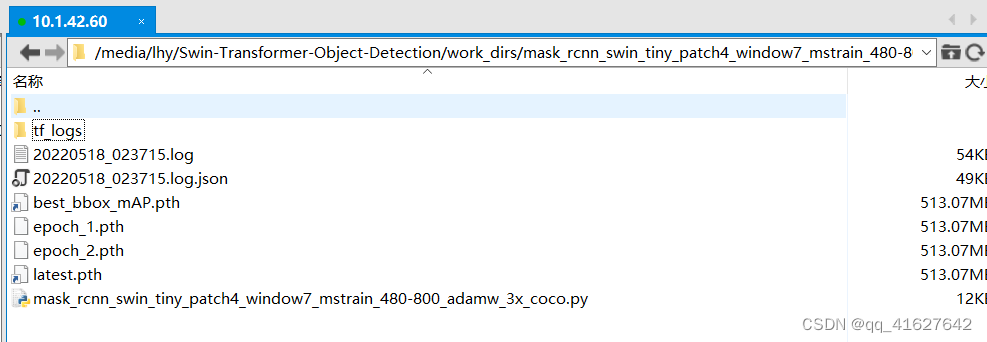
如下为本次模型的运行结果。上面的.log、.log.json文件就是训练的日志文件,每训练完一个epoch后目录下还会有对应的以epoch_x.pth的模型文件,最新训练的模型文件命名为latest.pth,最好的训练模型为best_bbox_mAP.pth。上面的文件内容大同小异,有当前时间、epoch次数,迭代次数(配置文件中默认设置50个batch输出一次log信息),学习率、损失函数loss、准确率等信息,可以根据上面的训练信息进行模型的评估与测试,另外可以通过读取.log.json文件进行可视化展示,方便调试。
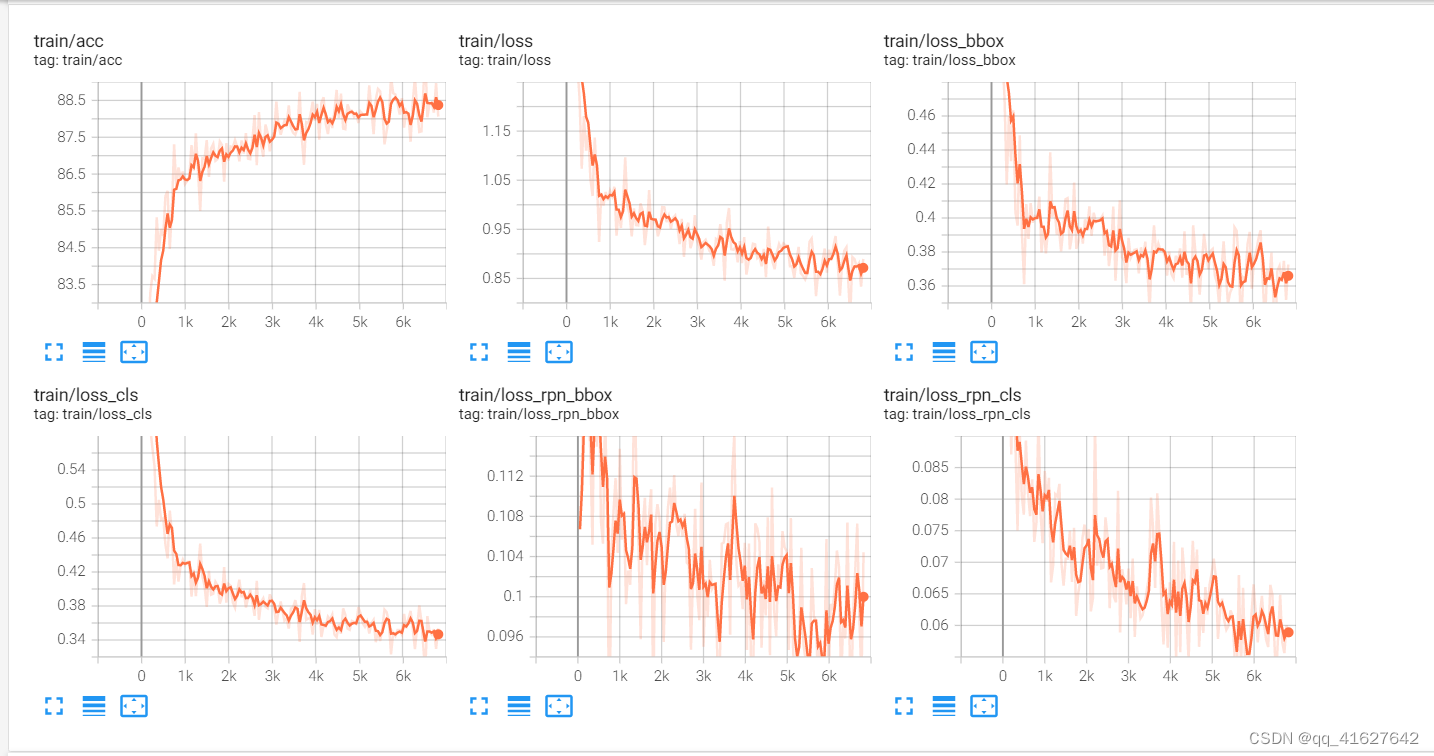
9、开启tensorboard在线观察模型训练情况
cd /path/to/tf_logs tensorboard --logdir . --host 服务器IP地址 --port 6006

 #案例
tensorboard --logdir work_dirs/mask_rcnn_swin_tiny_patch4_window7_mstrain_480-800_adamw_3x_coco/tf_logs --host 10.1.42.60

tensorboard --logdir work_dirs/mask_rcnn_swin_tiny_patch4_window7_mstrain_480-800_adamw_3x_coco_visdrone2019/tf_logs --host 10.1.42.60
11、运行出现的问题
1、File “pycocotools/_mask.pyx”, line 292, in pycocotools._mask.frPyObjects IndexError: list index out of range
issues/154
#解决方案
Comment out the configuration related to the mask
我的更新后的congfig配置文件如下,注释掉关于mask的内容
model = dict(
    type='MaskRCNN',
    pretrained=None,
    backbone=dict(
        type='SwinTransformer',
        embed_dim=96,
        depths=[2, 2, 6, 2],
        num_heads=[3, 6, 12, 24],
        window_size=7,
        mlp_ratio=4.0,
        qkv_bias=True,
        qk_scale=None,
        drop_rate=0.0,
        attn_drop_rate=0.0,
        drop_path_rate=0.2,
        ape=False,
        patch_norm=True,
        out_indices=(0, 1, 2, 3),
        use_checkpoint=False),
    neck=dict(
        type='FPN',
        in_channels=[96, 192, 384, 768],
        out_channels=256,
        num_outs=5),
    rpn_head=dict(
        type='RPNHead',
        in_channels=256,
        feat_channels=256,
        anchor_generator=dict(
            type='AnchorGenerator',
            scales=[8],
            ratios=[0.5, 1.0, 2.0],
            strides=[4, 8, 16, 32, 64]),
        bbox_coder=dict(
            type='DeltaXYWHBBoxCoder',
            target_means=[0.0, 0.0, 0.0, 0.0],
            target_stds=[1.0, 1.0, 1.0, 1.0]),
        loss_cls=dict(
            type='CrossEntropyLoss', use_sigmoid=True, loss_weight=1.0),
        loss_bbox=dict(type='L1Loss', loss_weight=1.0)),
    roi_head=dict(
        type='StandardRoIHead',
        bbox_roi_extractor=dict(
            type='SingleRoIExtractor',
            roi_layer=dict(type='RoIAlign', output_size=7, sampling_ratio=0),
            out_channels=256,
            featmap_strides=[4, 8, 16, 32]),
        bbox_head=dict(
            type='Shared2FCBBoxHead',
            in_channels=256,
            fc_out_channels=1024,
            roi_feat_size=7,
            num_classes=10,
            bbox_coder=dict(
                type='DeltaXYWHBBoxCoder',
                target_means=[0.0, 0.0, 0.0, 0.0],
                target_stds=[0.1, 0.1, 0.2, 0.2]),
            reg_class_agnostic=False,
            loss_cls=dict(
                type='CrossEntropyLoss', use_sigmoid=False, loss_weight=1.0),
            loss_bbox=dict(type='L1Loss', loss_weight=1.0))
        # mask_roi_extractor=dict(
            # type='SingleRoIExtractor',
            # roi_layer=dict(type='RoIAlign', output_size=14, sampling_ratio=0),
            # out_channels=256,
            # featmap_strides=[4, 8, 16, 32]),
        # mask_head=dict(
            # type='FCNMaskHead',
            # num_convs=4,
            # in_channels=256,
            # conv_out_channels=256,
            # num_classes=10,
            # loss_mask=dict(
                # type='CrossEntropyLoss', use_mask=True, loss_weight=1.0))
    ),

    train_cfg=dict(
        rpn=dict(
            assigner=dict(
                type='MaxIoUAssigner',
                pos_iou_thr=0.7,
                neg_iou_thr=0.3,
                min_pos_iou=0.3,
                match_low_quality=True,
                ignore_iof_thr=-1),
            sampler=dict(
                type='RandomSampler',
                num=256,
                pos_fraction=0.5,
                neg_pos_ub=-1,
                add_gt_as_proposals=False),
            allowed_border=-1,
            pos_weight=-1,
            debug=False),
        rpn_proposal=dict(
            nms_pre=2000,
            max_per_img=1000,
            nms=dict(type='nms', iou_threshold=0.7),
            min_bbox_size=0),
        rcnn=dict(
            assigner=dict(
                type='MaxIoUAssigner',
                pos_iou_thr=0.5,
                neg_iou_thr=0.5,
                min_pos_iou=0.5,
                match_low_quality=True,
                ignore_iof_thr=-1),
            sampler=dict(
                type='RandomSampler',
                num=512,
                pos_fraction=0.25,
                neg_pos_ub=-1,
                add_gt_as_proposals=True),
            mask_size=28,
            pos_weight=-1,
            debug=False)),
    test_cfg=dict(
        rpn=dict(
            nms_pre=1000,
            max_per_img=1000,
            nms=dict(type='nms', iou_threshold=0.7),
            min_bbox_size=0),
        rcnn=dict(
            score_thr=0.05,
            nms=dict(type='nms', iou_threshold=0.5),
            max_per_img=100,
            #mask_thr_binary=0.5
            )))
dataset_type = 'CocoDataset'
data_root = 'data/VisDrone2019-DET-coco/'
img_norm_cfg = dict(
    mean=[123.675, 116.28, 103.53], std=[58.395, 57.12, 57.375], to_rgb=True)
train_pipeline = [
    dict(type='LoadImageFromFile'),
    #dict(type='LoadAnnotations', with_bbox=True, with_mask=True),
    dict(type='LoadAnnotations', with_bbox=True),
    dict(type='RandomFlip', flip_ratio=0.5),
    dict(
        type='AutoAugment',
        policies=[[{
            'type':
            'Resize',
            'img_scale': [(480, 1333), (512, 1333), (544, 1333), (576, 1333),
                          (608, 1333), (640, 1333), (672, 1333), (704, 1333),
                          (736, 1333), (768, 1333), (800, 1333)],
            'multiscale_mode':
            'value',
            'keep_ratio':
            True
        }],
                  [{
                      'type': 'Resize',
                      'img_scale': [(400, 1333), (500, 1333), (600, 1333)],
                      'multiscale_mode': 'value',
                      'keep_ratio': True
                  }, {
                      'type': 'RandomCrop',
                      'crop_type': 'absolute_range',
                      'crop_size': (384, 600),
                      'allow_negative_crop': True
                  }, {
                      'type':
                      'Resize',
                      'img_scale': [(480, 1333), (512, 1333), (544, 1333),
                                    (576, 1333), (608, 1333), (640, 1333),
                                    (672, 1333), (704, 1333), (736, 1333),
                                    (768, 1333), (800, 1333)],
                      'multiscale_mode':
                      'value',
                      'override':
                      True,
                      'keep_ratio':
                      True
                  }]]),
    dict(
        type='Normalize',
        mean=[123.675, 116.28, 103.53],
        std=[58.395, 57.12, 57.375],
        to_rgb=True),
    dict(type='Pad', size_divisor=32),
    dict(type='DefaultFormatBundle'),
    #dict(type='Collect', keys=['img', 'gt_bboxes', 'gt_labels', 'gt_masks'])
    dict(type='Collect', keys=['img', 'gt_bboxes', 'gt_labels'])

]
test_pipeline = [
    dict(type='LoadImageFromFile'),
    dict(
        type='MultiScaleFlipAug',
        img_scale=(1333, 800),
        flip=False,
        transforms=[
            dict(type='Resize', keep_ratio=True),
            dict(type='RandomFlip'),
            dict(
                type='Normalize',
                mean=[123.675, 116.28, 103.53],
                std=[58.395, 57.12, 57.375],
                to_rgb=True),
            dict(type='Pad', size_divisor=32),
            dict(type='ImageToTensor', keys=['img']),
            dict(type='Collect', keys=['img'])
        ])
]
data = dict(
    samples_per_gpu=2,
    workers_per_gpu=2,
    train=dict(
        type='CocoDataset',
        ann_file='data/VisDrone2019-DET-coco/annotations/instances_train2017.json',
        img_prefix='data/VisDrone2019-DET-coco/VisDrone2019-DET-train/',
        pipeline=[
            dict(type='LoadImageFromFile'),
            # dict(type='LoadAnnotations', with_bbox=True, with_mask=True),
            dict(type='LoadAnnotations', with_bbox=True),
            dict(type='RandomFlip', flip_ratio=0.5),
            dict(
                type='AutoAugment',
                policies=[[{
                    'type':
                    'Resize',
                    'img_scale': [(480, 1333), (512, 1333), (544, 1333),
                                  (576, 1333), (608, 1333), (640, 1333),
                                  (672, 1333), (704, 1333), (736, 1333),
                                  (768, 1333), (800, 1333)],
                    'multiscale_mode':
                    'value',
                    'keep_ratio':
                    True
                }],
                          [{
                              'type': 'Resize',
                              'img_scale': [(400, 1333), (500, 1333),
                                            (600, 1333)],
                              'multiscale_mode': 'value',
                              'keep_ratio': True
                          }, {
                              'type': 'RandomCrop',
                              'crop_type': 'absolute_range',
                              'crop_size': (384, 600),
                              'allow_negative_crop': True
                          }, {
                              'type':
                              'Resize',
                              'img_scale': [(480, 1333), (512, 1333),
                                            (544, 1333), (576, 1333),
                                            (608, 1333), (640, 1333),
                                            (672, 1333), (704, 1333),
                                            (736, 1333), (768, 1333),
                                            (800, 1333)],
                              'multiscale_mode':
                              'value',
                              'override':
                              True,
                              'keep_ratio':
                              True
                          }]]),
            dict(
                type='Normalize',
                mean=[123.675, 116.28, 103.53],
                std=[58.395, 57.12, 57.375],
                to_rgb=True),
            dict(type='Pad', size_divisor=32),
            dict(type='DefaultFormatBundle'),
            # dict(
                # type='Collect',
                # keys=['img', 'gt_bboxes', 'gt_labels', 'gt_masks'])
            dict(
                type='Collect',
                keys=['img', 'gt_bboxes', 'gt_labels'])
        ]),
    val=dict(
        type='CocoDataset',
        ann_file='data/VisDrone2019-DET-coco/annotations/instances_val2017.json',
        img_prefix='data/VisDrone2019-DET-coco/VisDrone2019-DET-val/',
        pipeline=[
            dict(type='LoadImageFromFile'),
            dict(
                type='MultiScaleFlipAug',
                img_scale=(1333, 800),
                flip=False,
                transforms=[
                    dict(type='Resize', keep_ratio=True),
                    dict(type='RandomFlip'),
                    dict(
                        type='Normalize',
                        mean=[123.675, 116.28, 103.53],
                        std=[58.395, 57.12, 57.375],
                        to_rgb=True),
                    dict(type='Pad', size_divisor=32),
                    dict(type='ImageToTensor', keys=['img']),
                    dict(type='Collect', keys=['img'])
                ])
        ]),
    test=dict(
        type='CocoDataset',
        ann_file='data/VisDrone2019-DET-coco/annotations/instances_val2017.json',
        img_prefix='data/VisDrone2019-DET-coco/VisDrone2019-DET-val/',
        pipeline=[
            dict(type='LoadImageFromFile'),
            dict(
                type='MultiScaleFlipAug',
                img_scale=(1333, 800),
                flip=False,
                transforms=[
                    dict(type='Resize', keep_ratio=True),
                    dict(type='RandomFlip'),
                    dict(
                        type='Normalize',
                        mean=[123.675, 116.28, 103.53],
                        std=[58.395, 57.12, 57.375],
                        to_rgb=True),
                    dict(type='Pad', size_divisor=32),
                    dict(type='ImageToTensor', keys=['img']),
                    dict(type='Collect', keys=['img'])
                ])
        ]))
evaluation = dict(interval=1, metric='bbox', save_best='bbox_mAP')
optimizer = dict(
    type='AdamW',
    lr=0.0001,
    betas=(0.9, 0.999),
    weight_decay=0.05,
    paramwise_cfg=dict(
        custom_keys=dict(
            absolute_pos_embed=dict(decay_mult=0.0),
            relative_position_bias_table=dict(decay_mult=0.0),
            norm=dict(decay_mult=0.0))))
optimizer_config = dict(
    grad_clip=None,
    type='DistOptimizerHook',
    update_interval=1,
    coalesce=True,
    bucket_size_mb=-1,
    use_fp16=True)
lr_config = dict(
    policy='step',
    warmup='linear',
    warmup_iters=500,
    warmup_ratio=0.001,
    step=[27, 33])
runner = dict(type='EpochBasedRunnerAmp', max_epochs=36)
checkpoint_config = dict(interval=1)
log_config = dict(
    interval=50,
    hooks=[dict(type='TextLoggerHook'),
           dict(type='TensorboardLoggerHook')])
custom_hooks = [dict(type='NumClassCheckHook')]
dist_params = dict(backend='nccl')
log_level = 'INFO'
load_from = '/media/lhy/Swin-Transformer-Object-Detection/weights/mask_rcnn_swin_tiny_patch4_window7.pth'
resume_from = None
workflow = [('train', 1)]
fp16 = None
work_dir = './work_dirs/mask_rcnn_swin_tiny_patch4_window7_mstrain_480-800_adamw_3x_coco_visdrone2019'
gpu_ids = range(0, 1)
