本文总结了carla-autoware bridge示例程序的文件结构及组成并解决用autoware runtime manager(下文简称为autoware管理器)进行算法改动遇到的问题(相差两个节点没有启动)。
一、carla-autoware bridge示例程序的文件组成
1. carla-autoware bridge在联合仿真中的基本作用
carla-autoware bridge(下文简称为“桥”),顾名思义,它连接了前端模拟器carla和起到后端算法处理作用的autoware。该桥文件使用carla模拟器原本自带的manual control程序作为交互窗口,加载修改后的carla中的城市点云地图,并且对carla中的一些传感器数据重新映射到autoware中(remapping),例如激光雷达、摄像头、定位信息(GNSS)等信息。carla-autoware bridge的作用示意图如下:

2. 对carla-autoware bridge所含文件结构进行分析
carla-autoware bridge桥程序并不仅仅包含桥程序本身,还启动了autoware的一些算法节点,下图是桥程序本身的文件组成示意图:(下图中相关文件名称均是简写,为了更好看清楚其功能,实际中文件名为my_
module_name
.launch)

(文件中大部分都是.launch文件,文件中较常使用include语句,便于启动autoware中的算法程序)
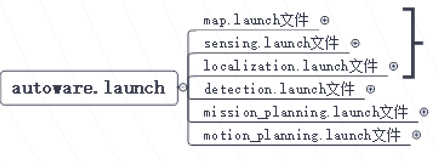
而autoware.launch文件是由6个子文件组成,如下图所示,这里map.launch文件是空文件,个人的理解是map文件已经由先前的桥程序启动好了,这里无需重复启动。
二、直接用autoware管理器的算法以实现相同效果出现的问题
1. 最初的目的
运行前文中的桥程序的示例时,尽管轨迹跟踪的效果一般,但是道路点,规划出的路径在rviz中可以看的很清楚。所以一开始就在思考能否在仅使用autoware.launch中的map, sensing和localization的文件的前提下,直接使用autoware管理器来调用后续的规划算法。
2. 遇到的问题
这样做遇到的问题就是由于该思路过于简单,直接用autoware管理器调用该算法之后在rviz窗口中看不到相关路径的生成。
3. 问题的分析
这里先跳过完整的过程细节,直接进入分析的结果:autoware管理器直接调用相关算法后会缺少一些必要的节点,具体来说是以下两个:
-
缺少
/waypoint_marker_publisher
(autoware管理器中没有明确表明存在这个节点,但是点击
waypoint_maker
中的
waypoint_loader
会开启
/waypoint_marker_publisher
和
/waypoint_replanner
) -
缺少
/config_waypoint_follower_rostopic
节点(该节点所在launch文件是my_motion_planning.launch),相关launch文件中的语句是:
  <node pkg="rostopic" type="rostopic" name="config_waypoint_follower_rostopic"
        args="pub -l /config/waypoint_follower autoware_config_msgs/ConfigWaypointFollower
        '{ header: auto, param_flag: 1, velocity: 15.0, lookahead_distance: 4.0, lookahead_ratio: 2.0, minimum_lookahead_distance: 6.0, displacement_threshold: 0.0, relative_angle_threshold: 0.0 }' " />
对于该语句的解读如下:
首先是rostopic在launch file中的基本语法
:
<node pkg="rostopic" type="rostopic" name="arbitrary_name" args="pub /pkg_topic pkg_executable_file/message" output="screen"/>
这里args之后的语句与命令行中的
rostopic pub
语句功能一致。该语句有四种模式,
latch(默认模式
,目的是只发布一次消息message,并确保订阅subscribe该消息的节点能够正确接收), once(只发布一次消息), rate(以某个设定的频率进行消息的发布), file(发布某个文件中的消息)。四种模式对应的命令行参数是:-l(dash ell), -1(dash one), -r和-f。
有了基本语法的了解之后,对上述节点中的语句进行分析:
node-name:
/config_waypoint_follower_rostopic
topic-name:
/config/waypoint_follower
topic-type:
autoware_config_msgs/ConfigWaypointFollower
message-content: (如下)
header: auto,
param_flag: 1,
velocity: 15.0,
lookahead_distance: 4.0,
lookahead_ratio: 2.0,
minimum_lookahead_distance: 6.0,
displacement_threshold: 0.0,
relative_angle_threshold: 0.0
以上的message content其实和autoware管理器中pure_pursuit里面的app中的参数一致。可以通过启动器直接改动相应参数,这里需要改的只有
velocity
这个参数。
ROS中header的值有两种:
auto
: create a new Header with the timestamp set to the current time.Frame ID will be empty.
now
: create a new time initialized to the current time.
(这里消息内容是
YAML格式
,准确的说是YAML dictionary,个人感觉跟python字典类型类似,就没有细究细节,ROS中的YAML格式语法可以参考后文链接)
以上的message type可以用命令行语句进行查询,但遇到了找不到msg的问题,这里记录下报错信息:
Unable to load msg
[autoware_config_msgs/ConfigWaypointFollower]: Cannot locate message [ConfigWaypointFollower]: unknown package [autoware_config_msgs] on search path […]
解决方法
:
问题在于这条message type是relative name相对名称,如果系统本身环境变量中缺少autoware.ai所用包的路径,那么这条message type就无法被解析(resolve),在shell中输入以下语句即可解决:
cd ~/autoware.ai
source install/setup.bash
rostopic type /config/waypoint_follower | rosmsg show
4. 实验过程细节记录(可跳过)
主要用到的语句是:
rostopic node list
vim -d file1 file2 # 用于对比两个文件的不同
I. 启动carla-autoware bridge之后所有节点如下所示
(”/”前面的数字代表是由以下带有标号的哪些子文件启动)
5/astar_avoid
2/can_odometry
4/can_status_translator
5/config_waypoint_follower_rostopic
5/costmap_generator
3/detection/lidar_detector/cluster_detect_visualization_01
2/joint_state_publisher
4/lane_rule
4/lane_select
4/lane_stop
3/lidar_euclidean_cluster_detect
2/ndt_matching
4/pose_relay
5/pure_pursuit
1/ray_ground_filter
2/robot_state_publisher
5/twist_filter
5/twist_gate
4/vel_relay
5/velocity_set
2/voxel_grid_filter
4/waypoint_marker_publisher
(有一个共性的不同就是负责pcd map加载的名称不同)
II. 一次只打开一个launch文件,记录新增的节点名称。
-
只打开my_map和my_sensing(因为my_map文件中是空文件)
/ray_ground_filter
-
打开my_localization新增的节点
/can_odometry; /joint_state_publisher; /ndt_matching; /robot_state_publisher; /voxel_grid_filter
-
打开my_detection新增的节点
/detection/lidar_detector/cluster_detect_visualization_01; /lidar_euclidean_cluster_detect
-
打开mission planning新增的节点
/can_status_translator; /lane_rule; /lane_select; /lane_stop; /pose_relay; /vel_relay; /waypoint_marker_publisher
-
打开motion planning新增的节点
/astar_avoid; /config_waypoint_follower_rostopic; /costmap_generator; /pure_pursuit; /twist_filter; /twist_gate; /velocity_set
这里的/costmap_generator 来自autoware管理器中的Semantics部分(找了半天才找到)
参考网站: