
01
引言
Apache DolphinScheduler官方文档地址:
https://dolphinscheduler.apache.org/zh-cn/index.html
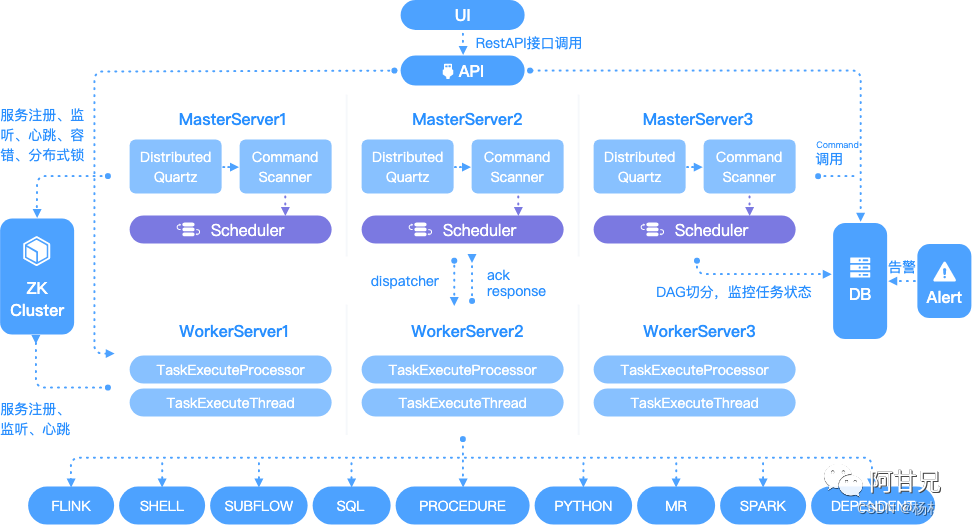
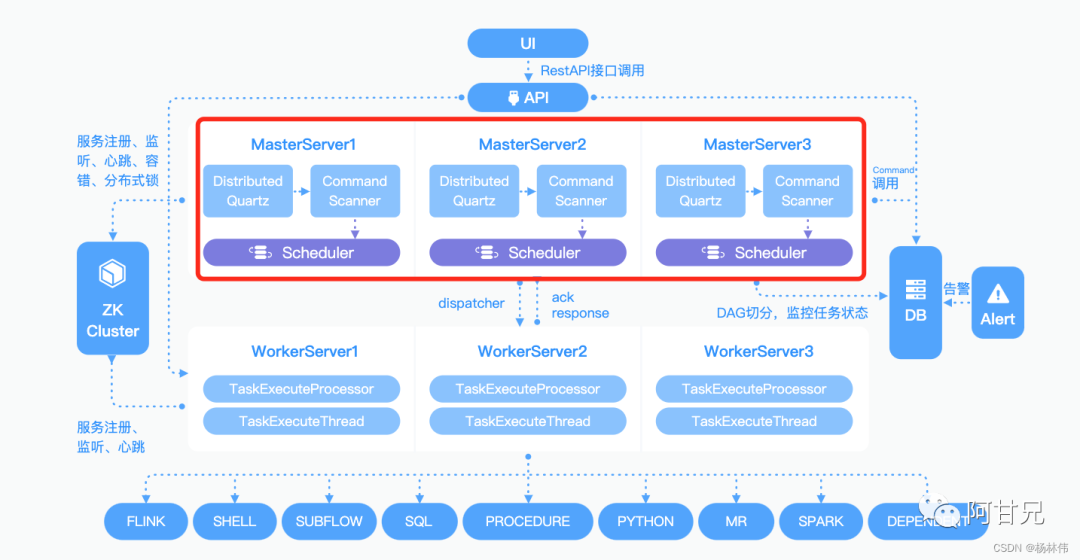
Apache DolphinScheduler是一个分布式去中心化,易扩展的可视化DAG工作流任务调度平台
。致力于解决数据处理流程中错综复杂的依赖关系,使调度系统在数据处理流程中开箱即用。
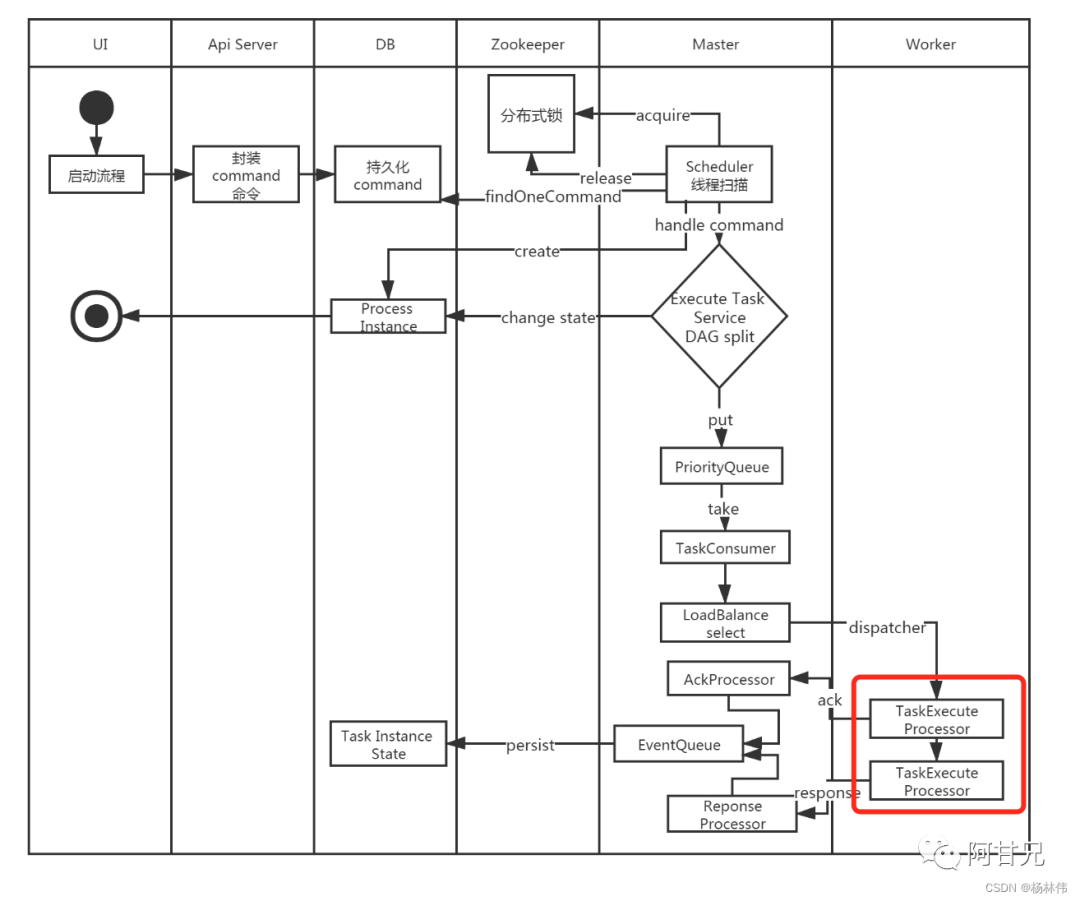
其原理图如下:
接下来,本文一步一步详细地讲解其源码。
02
DolphinScheduler 项目结构
2.1 结构分析
DS
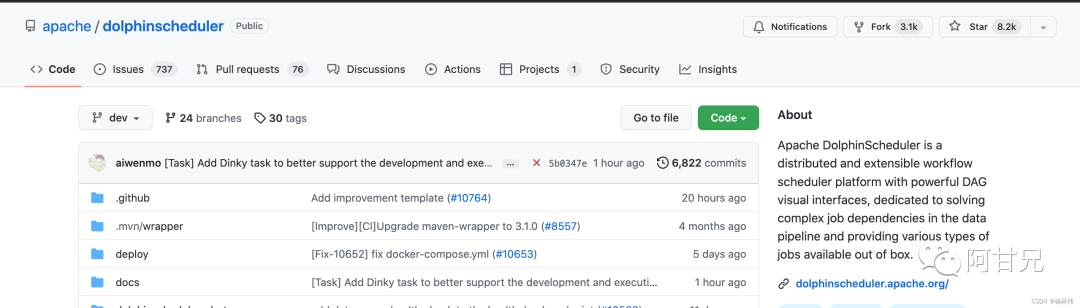
导入项目后,可以看到
其主要核心模块如下:
| 模块 | 描述 |
|---|---|
|
dolphinscheduler-alert |
告警模块,提供 AlertServer 服务。 |
|
dolphinscheduler-api |
web应用模块,提供 ApiServer 服务。 |
|
dolphinscheduler-common |
通用的常量枚举、工具类、数据结构或者基类 |
|
dolphinscheduler-dao |
提供数据库访问等操作。 |
|
dolphinscheduler-remote |
基于 netty 的客户端、服务端 |
|
dolphinscheduler-server |
MasterServer 和 WorkerServer 服务 |
|
dolphinscheduler-service |
service模块,包含Quartz、Zookeeper、日志客户端访问服务,便于server模块和api模块调用 |
|
dolphinscheduler-ui |
前端模块 |
2.2 表分析
DS
dolphinscheduler_ddl.sql及dolphinscheduler_dml.sql
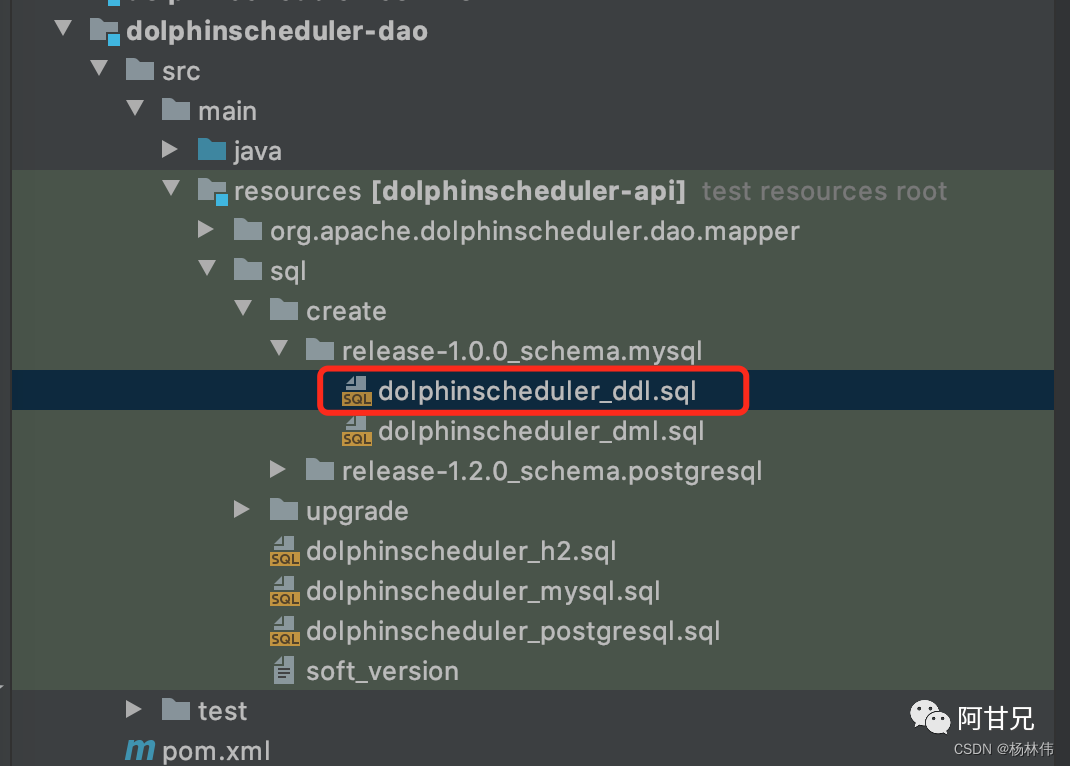
执行完后,可以在数据库里看到有如下表:
| 表名 | 表信息 |
|---|---|
| t_ds_access_token | 访问ds后端的token |
| t_ds_alert | 告警信息 |
| t_ds_alertgroup | 告警组 |
| t_ds_command | 执行命令 |
| t_ds_datasource | 数据源 |
|
t_ds_error_command(核心表) |
错误命令 |
|
t_ds_process_definition(核心表) |
流程定义 |
|
t_ds_process_instance(核心表) |
流程实例 |
| t_ds_project | 项目 |
| t_ds_queue | 队列 |
| t_ds_relation_datasource_user | 用户关联数据源 |
| t_ds_relation_process_instance | 子流程 |
| t_ds_relation_project_user | 用户关联项目 |
| t_ds_relation_resources_user | 用户关联资源 |
| t_ds_relation_udfs_user | 用户关联UDF函数 |
| t_ds_relation_user_alertgroup | 用户关联告警组 |
| t_ds_resources | 资源文件 |
|
t_ds_schedules(核心表) |
流程定时调度 |
| t_ds_session | 用户登录的session |
|
t_ds_task_instance(核心表) |
任务实例 |
| t_ds_tenant | 租户 |
| t_ds_udfs | UDF资源 |
| t_ds_user | 用户 |
| t_ds_version | ds版本信息 |
核心表可以直接看文末附录。
2.2.1 类关系图 (用户/队列/数据源)
DS
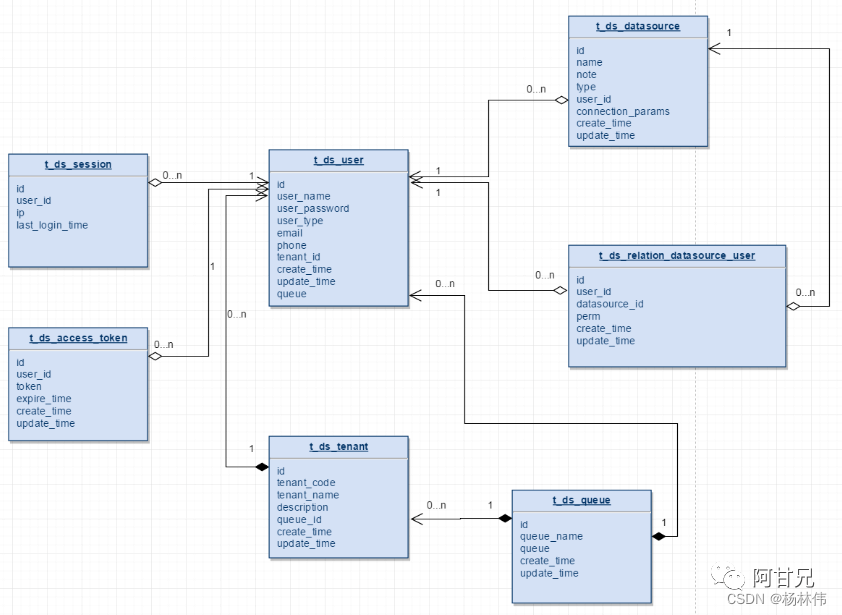
描述如下:
-
一个租户下可以有多个用户;
-
t_ds_user
中的
queue
字段存储的是队列表中的
queue_name
信息; -
t_ds_tenant
下存的是
queue_id
,在流程定义执行过程中,用户队列优先级最高,用户队列为空则采用租户队列; -
t_ds_datasource
表中的
user_id
字段表示创建该数据源的用户; -
t_ds_relation_datasource_user
中的
user_id
表示,对数据源有权限的用户。
2.2.2 类关系图 (项目/资源/告警)
DS
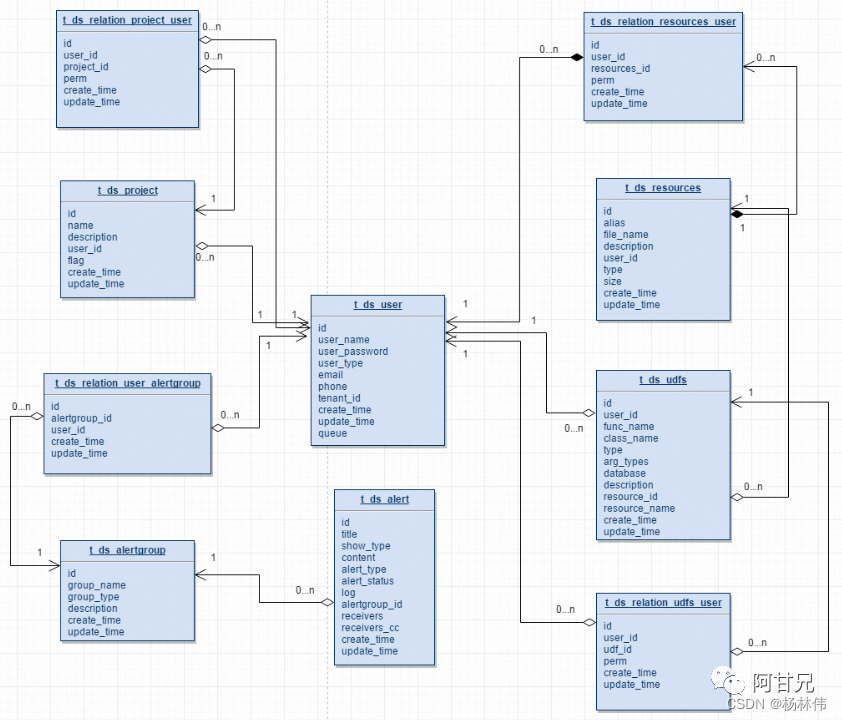
描述如下:
-
一个用户可以有多个项目,用户项目授权通过t_ds_relation_project_user表完成project_id和user_id的关系绑定
; -
t_ds_projcet表中的user_id表示创建该项目的用户;
-
t_ds_relation_project_user表中的user_id表示对项目有权限的用户;
-
t_ds_resources表中的user_id表示创建该资源的用户;
-
t_ds_relation_resources_user中的user_id表示对资源有权限的用户;
-
t_ds_udfs表中的user_id表示创建该UDF的用户;
-
t_ds_relation_udfs_user表中的user_id表示对UDF有权限的用户。
2.2.3 类关系图 ( 命令/流程/任务)
DS
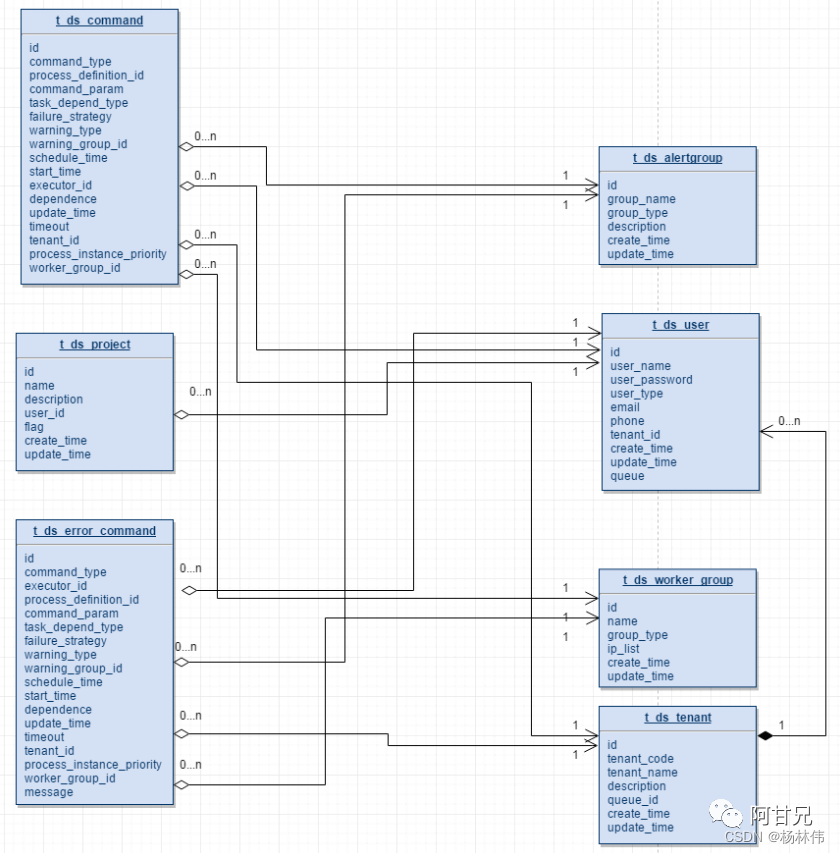
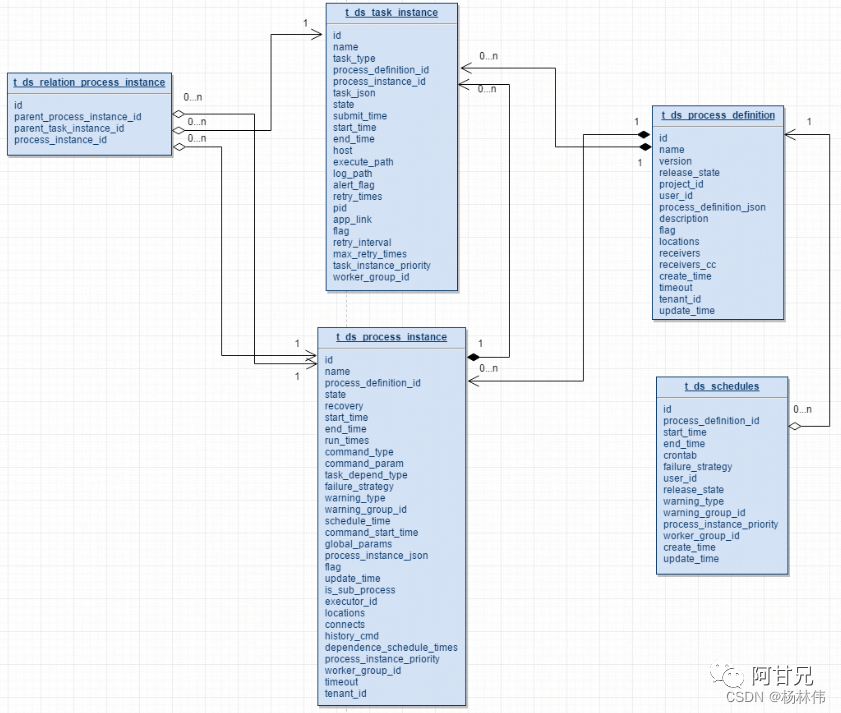
描述如下:
-
一个项目有多个流程定义,一个流程定义可以生成多个流程实例,一个流程实例可以生成多个任务实例
; -
t_ds_schedulers表存放流程定义的定时调度信息;
-
t_ds_relation_process_instance表存放的数据用于处理流程定义中含有子流程的情况,parent_process_instance_id表示含有子流程的主流程实例id,process_instance_id表示子流程实例的id,parent_task_instance_id表示子流程节点的任务实例id,流程实例表和任务实例表分别对应t_ds_process_instance表和t_ds_task_instance表
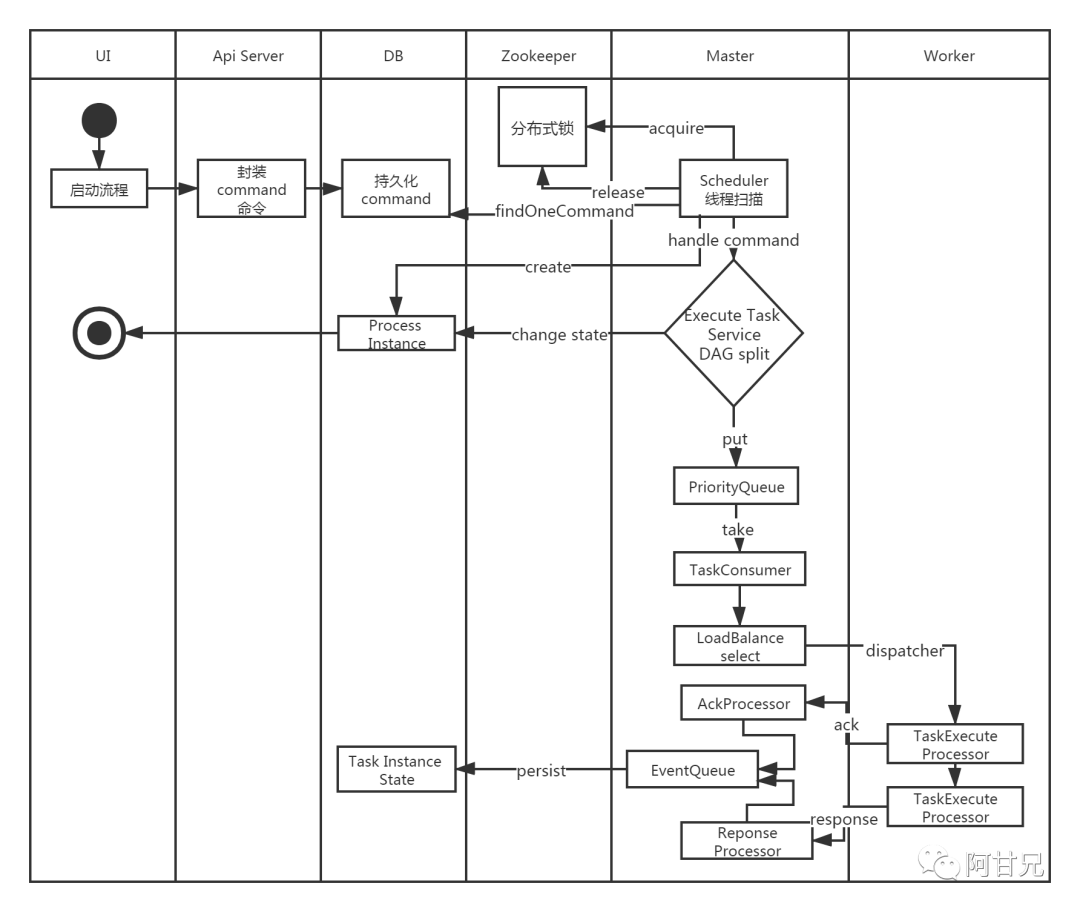
03
DolphinScheduler 源码分析
讲解源码前,先贴一份官网的启动流程图:
3.1 ExecutorController
DS
org.apache.dolphinscheduler.api.controller.ExecutorController

以下是对各接口的描述:
| 接口 | 描述 |
|---|---|
| /start-process-instance | 执行流程实例 |
| /batch-start-process-instance | 批量执行流程实例 |
| /execute | 操作流程实例,如:暂停, 停止, 重跑, 从暂停恢复,从停止恢复 |
| /batch-execute | 批量操作流程实例 |
| /start-check | 检查流程定义或检查所有的子流程定义是否在线 |
接下我们看看最核心的方法:
/**
     * do action to process instance: pause, stop, repeat, recover from pause, recover from stop
     *
     * @param loginUser login user
     * @param projectCode project code
     * @param processInstanceId process instance id
     * @param executeType execute type
     * @return execute result code
     */
    @ApiOperation(value = "execute", notes = "EXECUTE_ACTION_TO_PROCESS_INSTANCE_NOTES")
    @ApiImplicitParams({
            @ApiImplicitParam(name = "processInstanceId", value = "PROCESS_INSTANCE_ID", required = true, dataType = "Int", example = "100"),
            @ApiImplicitParam(name = "executeType", value = "EXECUTE_TYPE", required = true, dataType = "ExecuteType")
    })
    @PostMapping(value = "/execute")
    @ResponseStatus(HttpStatus.OK)
    @ApiException(EXECUTE_PROCESS_INSTANCE_ERROR)
    @AccessLogAnnotation(ignoreRequestArgs = "loginUser")
    public Result execute(@ApiIgnore @RequestAttribute(value = Constants.SESSION_USER) User loginUser,
                          @ApiParam(name = "projectCode", value = "PROJECT_CODE", required = true) @PathVariable long projectCode,
                          @RequestParam("processInstanceId") Integer processInstanceId,
                          @RequestParam("executeType") ExecuteType executeType
    ) {
        Map result = execService.execute(loginUser, projectCode, processInstanceId, executeType);
        return returnDataList(result);
    }
可以看到execute接口,是直接使用ExecService去执行了,下面分析下。
3.2 ExecService
DS
下面看看里面的execute方法,已经加好了注释:
/**
 * 操作工作流实例
 *
 * @param loginUser         登录用户
 * @param projectCode       项目编码
 * @param processInstanceId 流程实例ID
 * @param executeType       执行类型(repeat running、resume pause、resume failure、stop、pause)
 * @return 执行结果
 */
@Override
public Map<String, Object> execute(User loginUser, long projectCode, Integer processInstanceId, ExecuteType executeType) {


    /*** 查询项目信息 **/
    Project project = projectMapper.queryByCode(projectCode);
    //check user access for project


    /*** 判断当前用户是否有操作权限 **/
    Map<String, Object> result = projectService.checkProjectAndAuth(loginUser, project, projectCode, ApiFuncIdentificationConstant.map.get(executeType));
    if (result.get(Constants.STATUS) != Status.SUCCESS) {
        return result;
    }


    /*** 检查Master节点是否存在 **/
    if (!checkMasterExists(result)) {
        return result;
    }


    /*** 查询工作流实例详情 **/
    ProcessInstance processInstance = processService.findProcessInstanceDetailById(processInstanceId);
    if (processInstance == null) {
        putMsg(result, Status.PROCESS_INSTANCE_NOT_EXIST, processInstanceId);
        return result;
    }


    /*** 根据工作流实例绑定的流程定义ID查询流程定义 **/
    ProcessDefinition processDefinition = processService.findProcessDefinition(processInstance.getProcessDefinitionCode(),
            processInstance.getProcessDefinitionVersion());
    if (executeType != ExecuteType.STOP && executeType != ExecuteType.PAUSE) {
        /*** 校验工作流定义能否执行(工作流是否存在?是否上线状态?存在子工作流定义不是上线状态?) **/
        result = checkProcessDefinitionValid(projectCode, processDefinition, processInstance.getProcessDefinitionCode(), processInstance.getProcessDefinitionVersion());
        if (result.get(Constants.STATUS) != Status.SUCCESS) {
            return result;
        }
    }


    /*** 根据当前工作流实例的状态判断能否执行对应executeType类型的操作 **/
    result = checkExecuteType(processInstance, executeType);
    if (result.get(Constants.STATUS) != Status.SUCCESS) {
        return result;
    }


    /*** 判断是否已经选择了合适的租户 **/
    if (!checkTenantSuitable(processDefinition)) {
        logger.error("there is not any valid tenant for the process definition: id:{},name:{}, ",
                processDefinition.getId(), processDefinition.getName());
        putMsg(result, Status.TENANT_NOT_SUITABLE);
    }


    /*** 在executeType为重跑的状态下,获取用户指定的启动参数 **/
    Map<String, Object> commandMap = JSONUtils.parseObject(processInstance.getCommandParam(), new TypeReference<Map<String, Object>>() {
    });
    String startParams = null;
    if (MapUtils.isNotEmpty(commandMap) && executeType == ExecuteType.REPEAT_RUNNING) {
        Object startParamsJson = commandMap.get(Constants.CMD_PARAM_START_PARAMS);
        if (startParamsJson != null) {
            startParams = startParamsJson.toString();
        }
    }


    /*** 根据不同的ExecuteType去执行相应的操作 **/
    switch (executeType) {
        case REPEAT_RUNNING: // 重跑
            result = insertCommand(loginUser, processInstanceId, processDefinition.getCode(), processDefinition.getVersion(), CommandType.REPEAT_RUNNING, startParams);
            break;
        case RECOVER_SUSPENDED_PROCESS: // 恢复挂载的工作流
            result = insertCommand(loginUser, processInstanceId, processDefinition.getCode(), processDefinition.getVersion(), CommandType.RECOVER_SUSPENDED_PROCESS, startParams);
            break;
        case START_FAILURE_TASK_PROCESS: // 启动失败的工作流
            result = insertCommand(loginUser, processInstanceId, processDefinition.getCode(), processDefinition.getVersion(), CommandType.START_FAILURE_TASK_PROCESS, startParams);
            break;
        case STOP: // 停止
            if (processInstance.getState() == ExecutionStatus.READY_STOP) {
                putMsg(result, Status.PROCESS_INSTANCE_ALREADY_CHANGED, processInstance.getName(), processInstance.getState());
            } else {
                result = updateProcessInstancePrepare(processInstance, CommandType.STOP, ExecutionStatus.READY_STOP);
            }
            break;
        case PAUSE: // 暂停
            if (processInstance.getState() == ExecutionStatus.READY_PAUSE) {
                putMsg(result, Status.PROCESS_INSTANCE_ALREADY_CHANGED, processInstance.getName(), processInstance.getState());
            } else {
                result = updateProcessInstancePrepare(processInstance, CommandType.PAUSE, ExecutionStatus.READY_PAUSE);
            }
            break;
        default:
            logger.error("unknown execute type : {}", executeType);
            putMsg(result, Status.REQUEST_PARAMS_NOT_VALID_ERROR, "unknown execute type");


            break;
    }
    return result;
}
可以看到,以上代码前半部分主要是做了校验的操作,后半部分是根据执行类型来做不同的操作,
操作主要分为两部分:insertCommand以及updateProcessInstancePrepare
。
3.2.1 insertCommand
DS
方法代码如下,
其实主要就是把生成命令并插入t_ds_command(执行命令表)
,插入已经添加好注释:
/**
 * 插入命令(re run, recovery (pause / failure) execution)
 *
 * @param loginUser             登录用户
 * @param instanceId            工作流实例id
 * @param processDefinitionCode 工作流定义id
 * @param processVersion        工作流版本
 * @param commandType           命令类型
 * @return 操作结果
 */
private Map<String, Object> insertCommand(User loginUser, Integer instanceId, long processDefinitionCode, int processVersion, CommandType commandType, String startParams) {
    Map<String, Object> result = new HashMap<>();


    /*** 封装启动参数 **/
    Map<String, Object> cmdParam = new HashMap<>();
    cmdParam.put(CMD_PARAM_RECOVER_PROCESS_ID_STRING, instanceId);
    if (!StringUtils.isEmpty(startParams)) {
        cmdParam.put(CMD_PARAM_START_PARAMS, startParams);
    }


    Command command = new Command();
    command.setCommandType(commandType);
    command.setProcessDefinitionCode(processDefinitionCode);
    command.setCommandParam(JSONUtils.toJsonString(cmdParam));
    command.setExecutorId(loginUser.getId());
    command.setProcessDefinitionVersion(processVersion);
    command.setProcessInstanceId(instanceId);


    /*** 判断工作流实例是否正在执行 **/
    if (!processService.verifyIsNeedCreateCommand(command)) {
        putMsg(result, Status.PROCESS_INSTANCE_EXECUTING_COMMAND, String.valueOf(processDefinitionCode));
        return result;
    }


    /*** 保存命令 **/
    int create = processService.createCommand(command);


    if (create > 0) {
        putMsg(result, Status.SUCCESS);
    } else {
        putMsg(result, Status.EXECUTE_PROCESS_INSTANCE_ERROR);
    }


    return result;
}
3.2.2 updateProcessInstancePrepare
DS
方法代码如下,已经添加注释
/**
 * 准备更新工作流实例的命令类型和状态
 *
 * @param processInstance 工作流实例
 * @param commandType     命令类型
 * @param executionStatus 执行状态
 * @return 更新结果
 */
private Map<String, Object> updateProcessInstancePrepare(ProcessInstance processInstance, CommandType commandType, ExecutionStatus executionStatus) {
    Map<String, Object> result = new HashMap<>();


    processInstance.setCommandType(commandType);
    processInstance.addHistoryCmd(commandType);
    processInstance.setState(executionStatus);
    int update = processService.updateProcessInstance(processInstance);


    // 判断流程是否正常
    if (update > 0) {
        StateEventChangeCommand stateEventChangeCommand = new StateEventChangeCommand(
                processInstance.getId(), 0, processInstance.getState(), processInstance.getId(), 0
        );
        Host host = new Host(processInstance.getHost());
        stateEventCallbackService.sendResult(host, stateEventChangeCommand.convert2Command());
        putMsg(result, Status.SUCCESS);
    } else {
        putMsg(result, Status.EXECUTE_PROCESS_INSTANCE_ERROR);
    }
    return result;
}
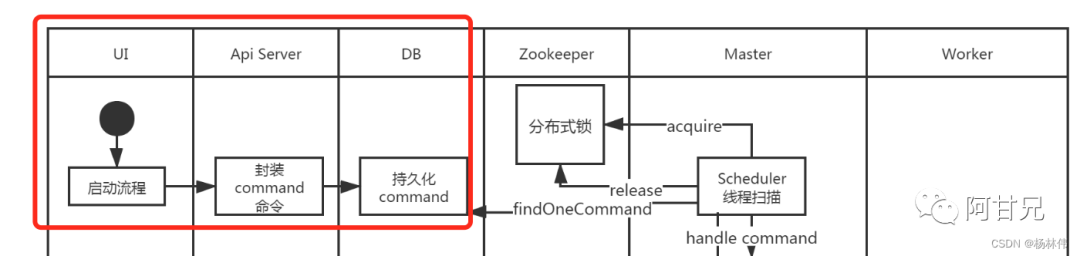
根据流程图,我们可以看到了已经执行了如下红框的代码,也就是把我们的
command已经缓存到了DB。
接下来需要看看Master的代码。
3.3 MasterServer
DS
@SpringBootApplication
@ComponentScan("org.apache.dolphinscheduler")
@EnableTransactionManagement
@EnableCaching
public class MasterServer implements IStoppable {
private static final Logger logger = LoggerFactory.getLogger(MasterServer.class);
@Autowired
private SpringApplicationContext springApplicationContext;
@Autowired
private MasterRegistryClient masterRegistryClient;
@Autowired
private TaskPluginManager taskPluginManager;
@Autowired
private MasterSchedulerService masterSchedulerService;
@Autowired
private SchedulerApi schedulerApi;
@Autowired
private EventExecuteService eventExecuteService;
@Autowired
private FailoverExecuteThread failoverExecuteThread;
@Autowired
private MasterRPCServer masterRPCServer;
public static void main(String[] args) {
Thread.currentThread().setName(Constants.THREAD_NAME_MASTER_SERVER);
SpringApplication.run(MasterServer.class);
}
/**
* 启动 master server
*/
@PostConstruct
public void run() throws SchedulerException {
// 初始化 RPC服务
this.masterRPCServer.start();
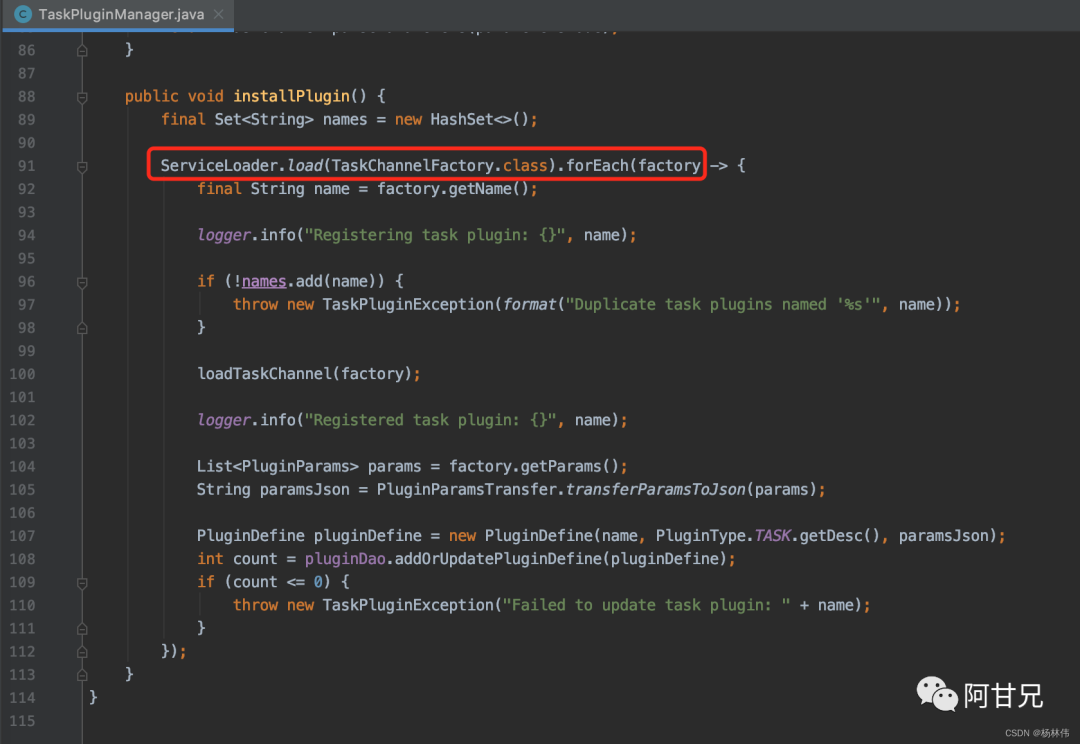
//安装任务插件
this.taskPluginManager.installPlugin();
/*** MasterServer 注册客户端,用于连接到注册表并传递注册表事件。
* 当主节点启动时,它将在注册中心注册,并调度一个{@link HeartBeatTask}来更新注册表中的元数据**/
this.masterRegistryClient.init();
this.masterRegistryClient.start();
this.masterRegistryClient.setRegistryStoppable(this);
// 主调度程序线程,该线程将使用来自数据库的命令并触发执行的processInstance。
this.masterSchedulerService.init();
this.masterSchedulerService.start();
this.eventExecuteService.start();
this.failoverExecuteThread.start();
//这是调度器的接口,包含操作调度任务的方法。
this.schedulerApi.start();
Runtime.getRuntime().addShutdownHook(new Thread(() -> {
if (Stopper.isRunning()) {
close("MasterServer shutdownHook");
}
}));
}
/**
* 优雅的关闭方法
*
* @param cause 关闭的原因
*/
public void close(String cause) {
try {
// set stop signal is true
// execute only once
if (!Stopper.stop()) {
logger.warn("MasterServer is already stopped, current cause: {}", cause);
return;
}
logger.info("Master server is stopping, current cause : {}", cause);
// thread sleep 3 seconds for thread quietly stop
ThreadUtils.sleep(Constants.SERVER_CLOSE_WAIT_TIME.toMillis());
// close
this.schedulerApi.close();
this.masterSchedulerService.close();
this.masterRPCServer.close();
this.masterRegistryClient.closeRegistry();
// close spring Context and will invoke method with @PreDestroy annotation to destroy beans.
// like ServerNodeManager,HostManager,TaskResponseService,CuratorZookeeperClient,etc
springApplicationContext.close();
logger.info("MasterServer stopped, current cause: {}", cause);
} catch (Exception e) {
logger.error("MasterServer stop failed, current cause: {}", cause, e);
}
}
@Override
public void stop(String cause) {
close(cause);
}
}在run方法里面,可以看到,主要依次执行了:
-
① MasterRPCServer.start()
:启动master的rpc服务; -
② TaskPluginManager.installPlugin()
:安装任务插件; -
③ MasterRegistryClient.start()
:向Zookeeper注册MasterServer; -
④ MasterSchedulerService.start()
:主调度程序线程,该线程将使用来自数据库的命令并触发执行的processInstance。 -
⑤ EventExecuteService.start()
:工作流实例执行情况 -
⑥ FailoverExecuteThread()
:故障转移检测 -
⑦ SchedulerApi.start()
:scheduler接口去操作任务实例
3.1.1 MasterRPCServer
DS
Master RPC Server主要用来发送或接收请求给其它系统
。
初始化方法如下:
@PostConstruct
private void init() {
    // 初始化远程服务
    NettyServerConfig serverConfig = new NettyServerConfig();
    serverConfig.setListenPort(masterConfig.getListenPort());
    this.nettyRemotingServer = new NettyRemotingServer(serverConfig);
    this.nettyRemotingServer.registerProcessor(CommandType.TASK_EXECUTE_RESPONSE, taskExecuteResponseProcessor);
    this.nettyRemotingServer.registerProcessor(CommandType.TASK_EXECUTE_RUNNING, taskExecuteRunningProcessor);
    this.nettyRemotingServer.registerProcessor(CommandType.TASK_KILL_RESPONSE, taskKillResponseProcessor);
    this.nettyRemotingServer.registerProcessor(CommandType.STATE_EVENT_REQUEST, stateEventProcessor);
    this.nettyRemotingServer.registerProcessor(CommandType.TASK_FORCE_STATE_EVENT_REQUEST, taskEventProcessor);
    this.nettyRemotingServer.registerProcessor(CommandType.TASK_WAKEUP_EVENT_REQUEST, taskEventProcessor);
    this.nettyRemotingServer.registerProcessor(CommandType.CACHE_EXPIRE, cacheProcessor);
    this.nettyRemotingServer.registerProcessor(CommandType.TASK_RECALL, taskRecallProcessor);


    // 日志服务
    this.nettyRemotingServer.registerProcessor(CommandType.GET_LOG_BYTES_REQUEST, loggerRequestProcessor);
    this.nettyRemotingServer.registerProcessor(CommandType.ROLL_VIEW_LOG_REQUEST, loggerRequestProcessor);
    this.nettyRemotingServer.registerProcessor(CommandType.VIEW_WHOLE_LOG_REQUEST, loggerRequestProcessor);
    this.nettyRemotingServer.registerProcessor(CommandType.REMOVE_TAK_LOG_REQUEST, loggerRequestProcessor);


    this.nettyRemotingServer.start();
}
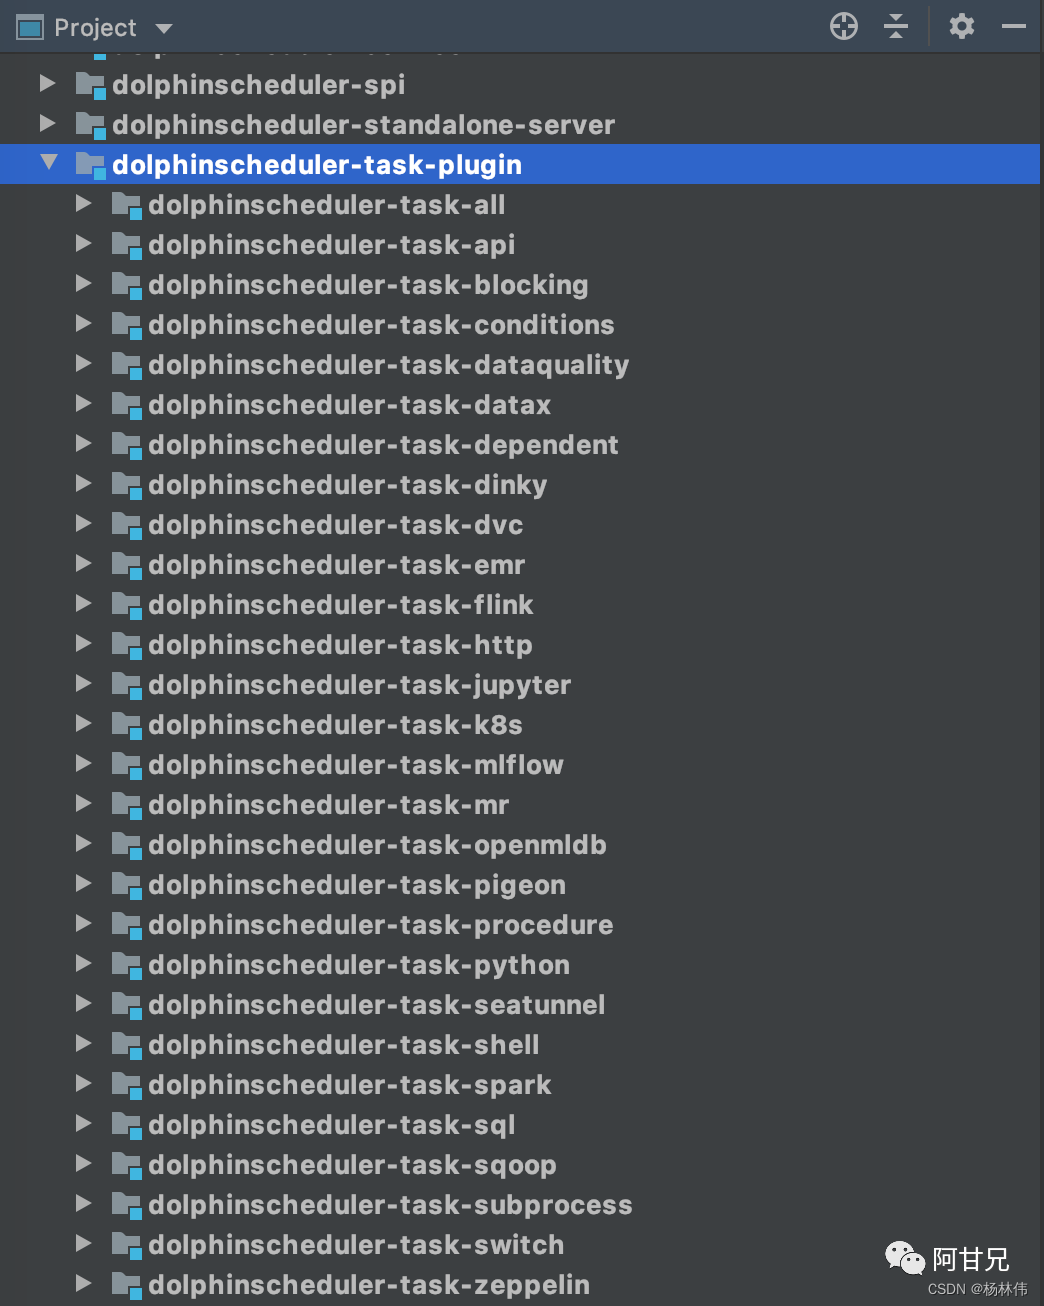
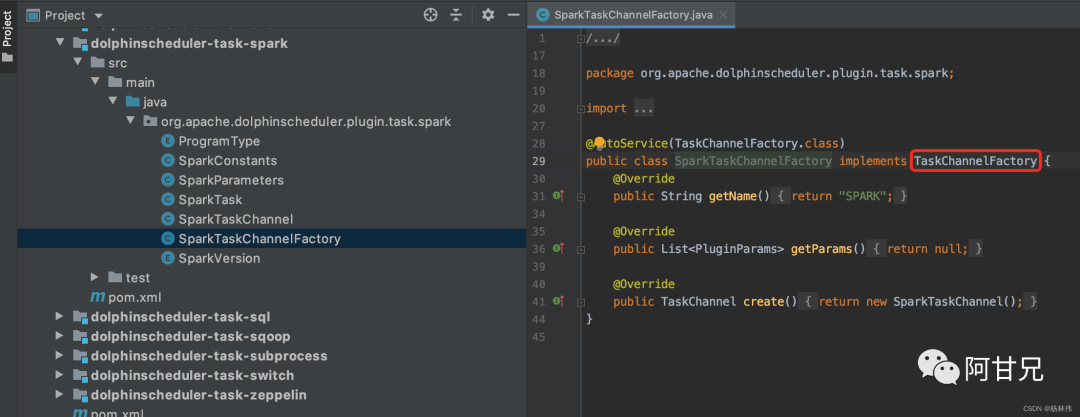
3.2.2 TaskPluginManager
DS
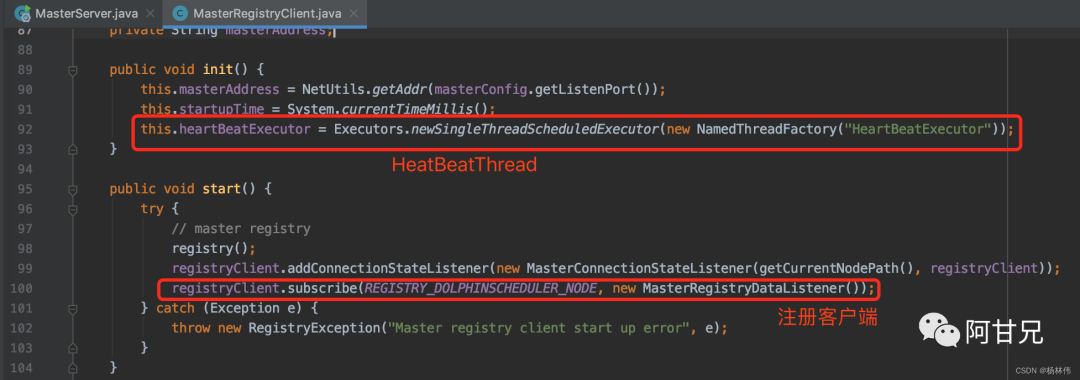
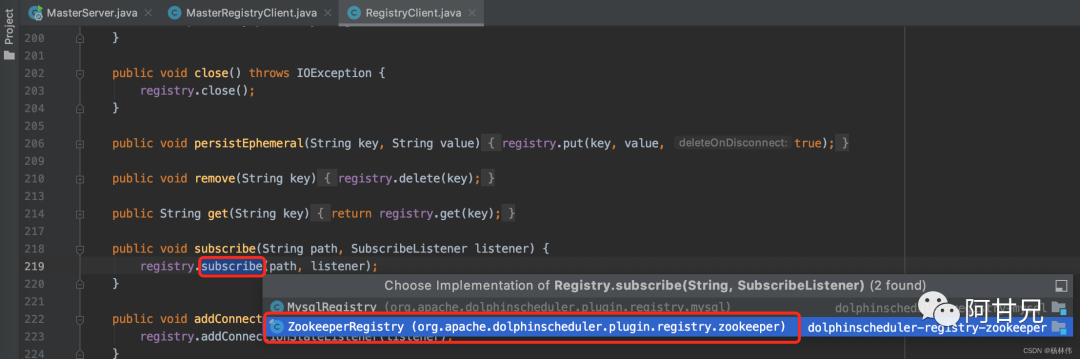
3.3.3 MasterRegistryClient
DS
去中心化思想
所以MasterRegistryClient主要的作用是
注册MasterServer客户端,
用于连接到注册表并传递注册表事件。
当Master节点启动时,
它将在注册中心注册,并调度一个HeartBeatTask来更新注册表中的元数据。
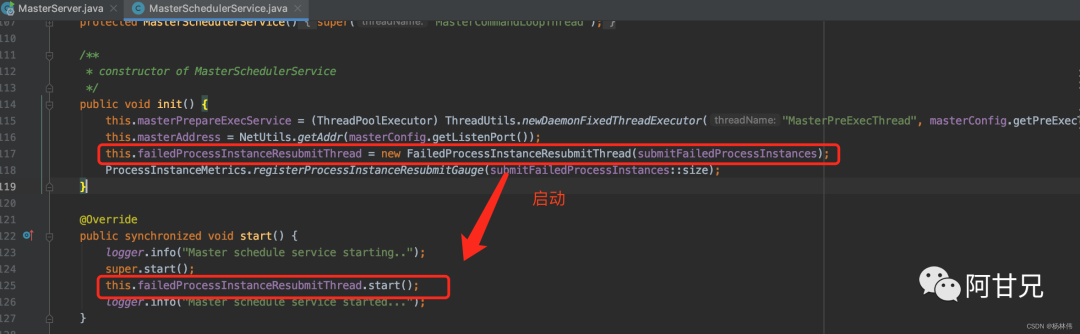
3.3.4 MasterSchedulerService
DS
其init和run方法如下,
init主要就是初始化一个工作流实例的队列:
scheduleWorkflow()
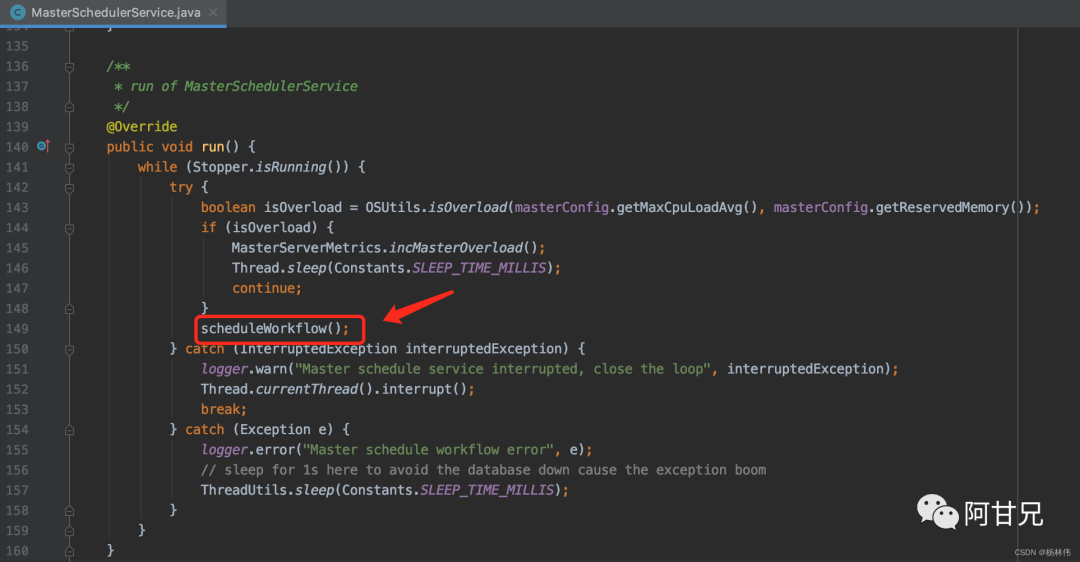
看看里面的scheduleWorkflow()方法,已写好注释:
/**
 * 从数据库中按槽位查询命令,转换为工作流实例,然后提交给workflowExecuteThreadPool。
 */
private void scheduleWorkflow() throws InterruptedException, MasterException {
    // 从数据库中按槽位查询命令
    List commands = findCommands();
    if (CollectionUtils.isEmpty(commands)) {
        // indicate that no command ,sleep for 1s
        Thread.sleep(Constants.SLEEP_TIME_MILLIS);
        return;
    }


    // 转换为工作流实例
    List processInstances = command2ProcessInstance(commands);
    if (CollectionUtils.isEmpty(processInstances)) {
        // indicate that the command transform to processInstance error, sleep for 1s
        Thread.sleep(Constants.SLEEP_TIME_MILLIS);
        return;
    }
    MasterServerMetrics.incMasterConsumeCommand(commands.size());


    for (ProcessInstance processInstance : processInstances) {
        //提交给workflowExecuteThreadPool
        submitProcessInstance(processInstance);
    }
}
提交工作流实例方法如下,
注意提交到了workflowExecuteThreadPool
:
/**
 * 提交工作流实例给 workflowExecuteThreadPool
 *
 * @param processInstance 工作流实例
 */
private void submitProcessInstance(@NonNull ProcessInstance processInstance) {
    try {
        LoggerUtils.setWorkflowInstanceIdMDC(processInstance.getId());
        logger.info("Master schedule service starting workflow instance");


        // 封装工作流实例Runnable
        final WorkflowExecuteRunnable workflowExecuteRunnable = new WorkflowExecuteRunnable(
                processInstance
                , processService
                , nettyExecutorManager
                , processAlertManager
                , masterConfig
                , stateWheelExecuteThread
                , curingGlobalParamsService);


        this.processInstanceExecCacheManager.cache(processInstance.getId(), workflowExecuteRunnable);
        if (processInstance.getTimeout() > 0) {
            stateWheelExecuteThread.addProcess4TimeoutCheck(processInstance);
        }
        ProcessInstanceMetrics.incProcessInstanceSubmit();


        // 提交封装好的工作流实例Runnable给workflowExecuteThreadPool
        CompletableFuture workflowSubmitFuture = CompletableFuture.supplyAsync(
                workflowExecuteRunnable::call, workflowExecuteThreadPool);
        workflowSubmitFuture.thenAccept(workflowSubmitStatue -> {
            if (WorkflowSubmitStatue.FAILED == workflowSubmitStatue) {
                // submit failed
                processInstanceExecCacheManager.removeByProcessInstanceId(processInstance.getId());
                stateWheelExecuteThread.removeProcess4TimeoutCheck(processInstance.getId());
                submitFailedProcessInstances.add(processInstance);
            }
        });
        logger.info("Master schedule service started workflow instance");


    } catch (Exception ex) {
        processInstanceExecCacheManager.removeByProcessInstanceId(processInstance.getId());
        stateWheelExecuteThread.removeProcess4TimeoutCheck(processInstance.getId());
        logger.info("Master submit workflow to thread pool failed, will remove workflow runnable from cache manager", ex);
    } finally {
        LoggerUtils.removeWorkflowInstanceIdMDC();
    }
}
3.3.5 EventExecuteService
DS

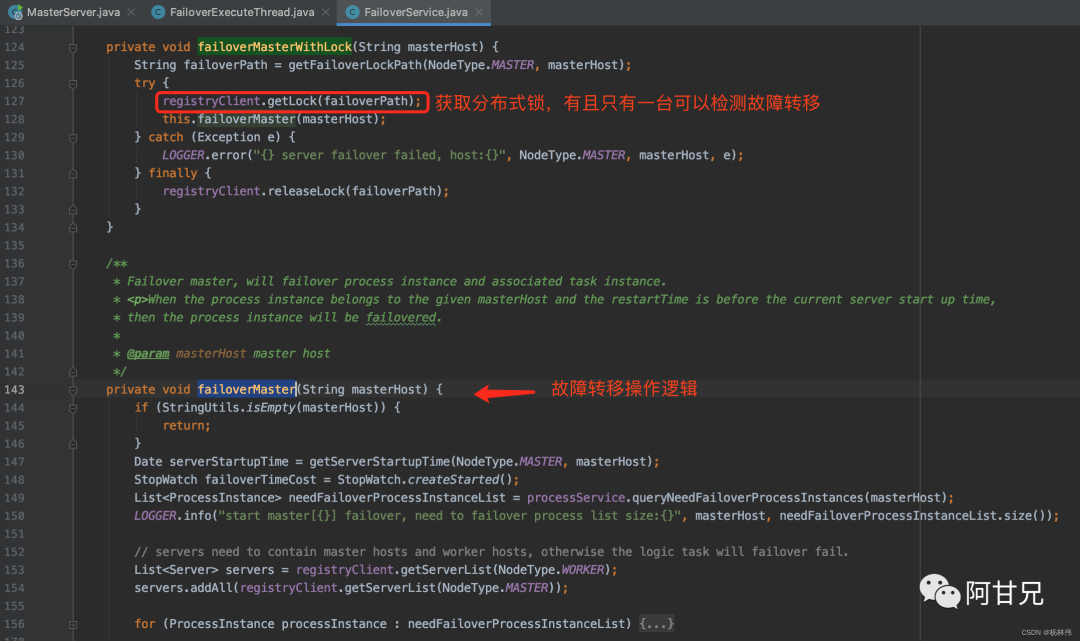
3.3.6 FailoverExecuteThread
DS
FailoverExecuteThread为故障转移检测线程
3.3.7 结构分析SchedulerApi
DS
SchedulerApi是操作调度任务实例的接口
,其主要功能是
启动调度程序、插入或更新调度任务、删除调度任务、关闭调度任务和释放资源
。
3.3.8 TaskPriorityQueueConsumer
DS
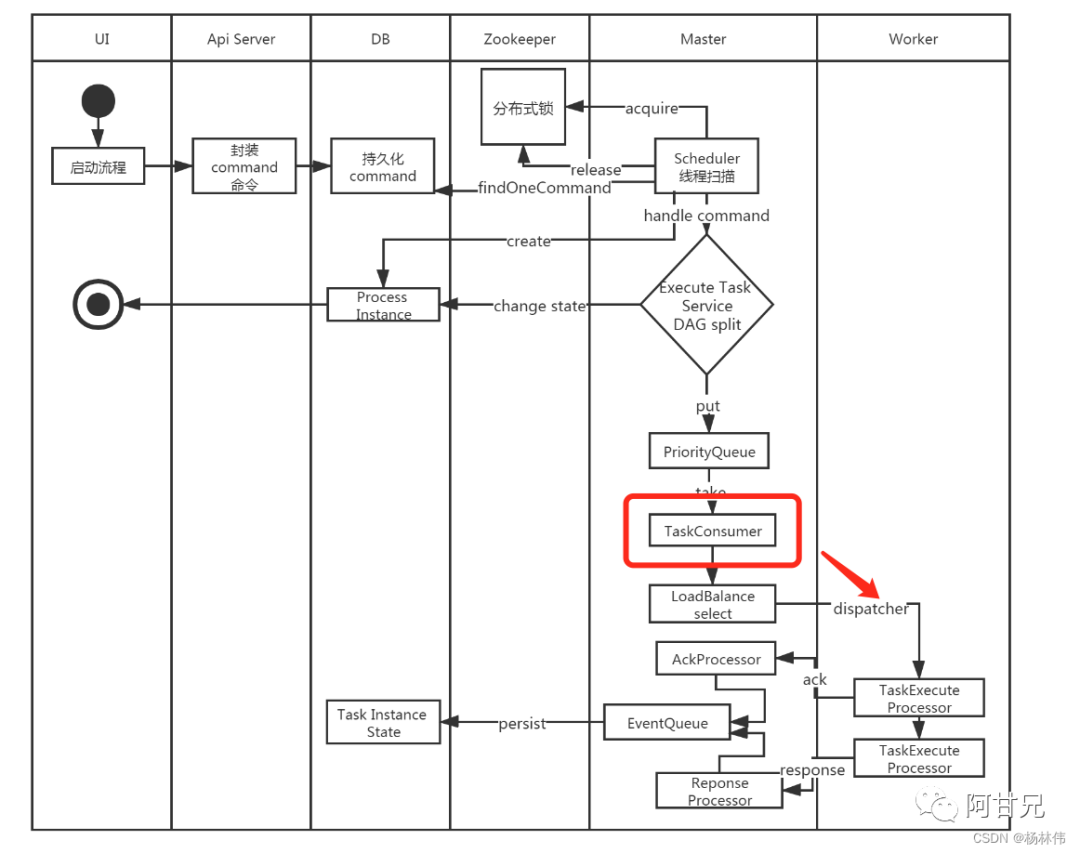
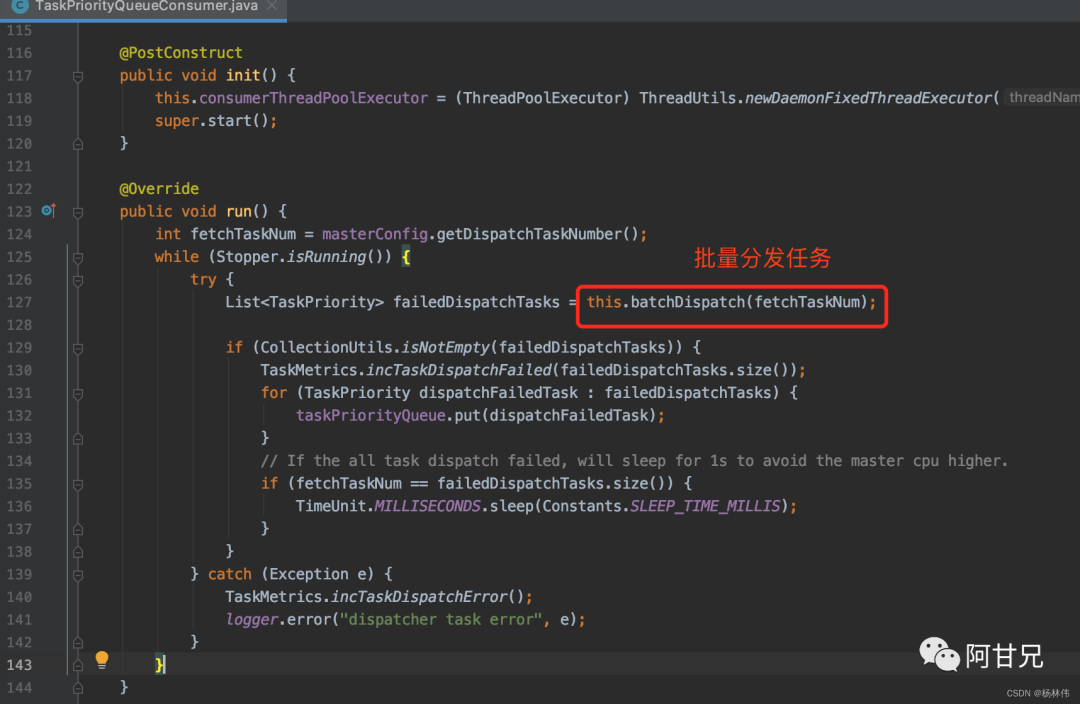
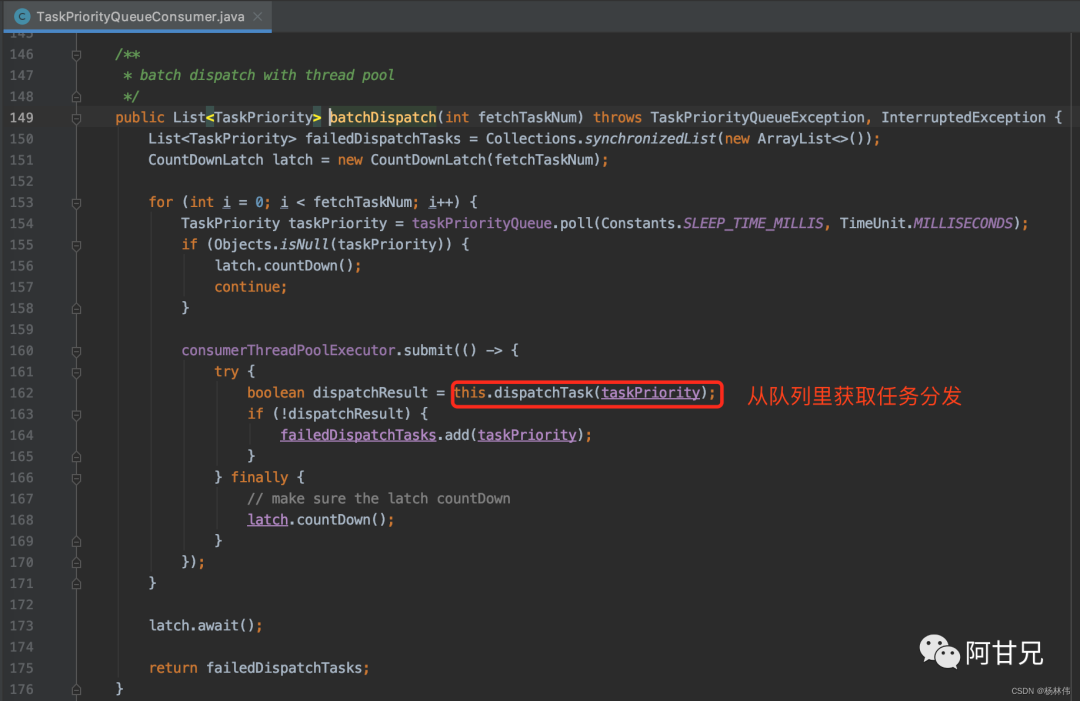
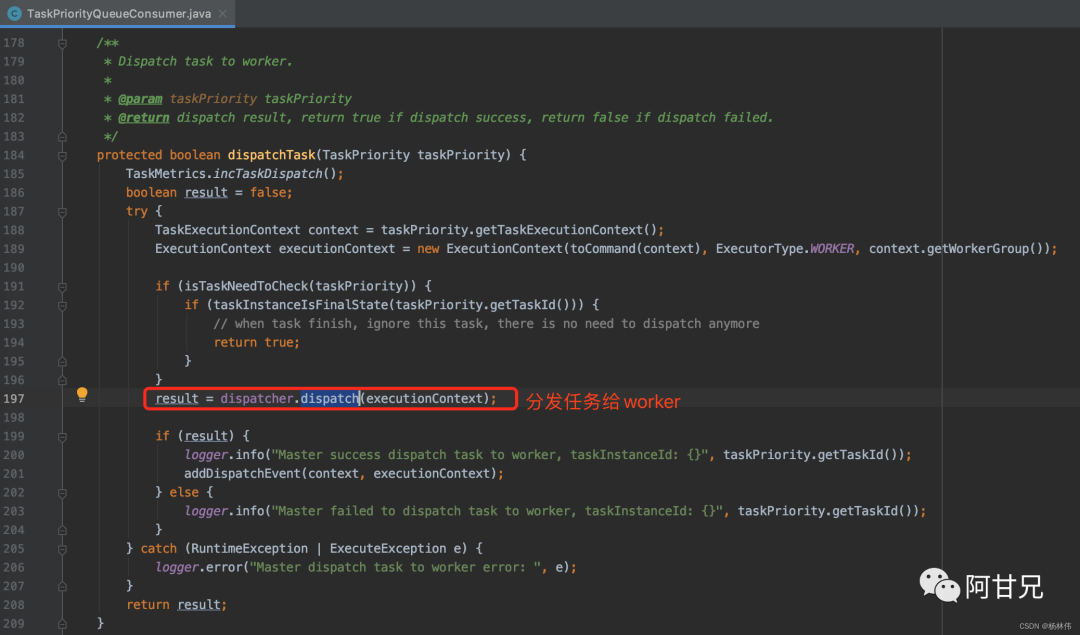
到这里,我们可以看到worker部分代码了。
3.4 WorkerServer
DS
@PostConstruct
public void run() {
  // worker rpc服务
    this.workerRpcServer.start();


  // 任务插件安装
    this.taskPluginManager.installPlugin();


    // 向Zookeeper注册客户端
    this.workerRegistryClient.registry();
    this.workerRegistryClient.setRegistryStoppable(this);
    Set workerZkPaths = this.workerRegistryClient.getWorkerZkPaths();
    this.workerRegistryClient.handleDeadServer(workerZkPaths, NodeType.WORKER, Constants.DELETE_OP);


   // 管理Worker线程
    this.workerManagerThread.start();

    // 报告状态线程
    this.retryReportTaskStatusThread.start();


    /*
     * registry hooks, which are called before the process exits
     */
    Runtime.getRuntime().addShutdownHook(new Thread(() -> {
        if (Stopper.isRunning()) {
            close("WorkerServer shutdown hook");
        }
    }));
}
3.4.1 TaskExecutePorcessor
DS
TaskExecuteProcessor
@Counted(value = "ds.task.execution.count", description = "task execute total count")
@Timed(value = "ds.task.execution.duration", percentiles = {0.5, 0.75, 0.95, 0.99}, histogram = true)
@Override
public void process(Channel channel, Command command) {
 // code ...
}

3.4.2 TaskExecuteThread
DS
TaskExecuteThread就是最终执行任务的代码了,里面的run方法如下,已加好注释:
@Override
public void run() {
    // dry run 预演模式
    if (Constants.DRY_RUN_FLAG_YES == taskExecutionContext.getDryRun()) {
        taskExecutionContext.setCurrentExecutionStatus(ExecutionStatus.SUCCESS);
        taskExecutionContext.setStartTime(new Date());
        taskExecutionContext.setEndTime(new Date());
        TaskExecutionContextCacheManager.removeByTaskInstanceId(taskExecutionContext.getTaskInstanceId());
        taskCallbackService.sendTaskExecuteResponseCommand(taskExecutionContext);
        logger.info("[WorkflowInstance-{}][TaskInstance-{}] Task dry run success",
            taskExecutionContext.getProcessInstanceId(), taskExecutionContext.getTaskInstanceId());
        return;
    }
    try {
        LoggerUtils.setWorkflowAndTaskInstanceIDMDC(taskExecutionContext.getProcessInstanceId(), taskExecutionContext.getTaskInstanceId());
        logger.info("script path : {}", taskExecutionContext.getExecutePath());
        if (taskExecutionContext.getStartTime() == null) {
            taskExecutionContext.setStartTime(new Date());
        }
        logger.info("the task begins to execute. task instance id: {}", taskExecutionContext.getTaskInstanceId());


        //回调任务执行状态
        taskExecutionContext.setCurrentExecutionStatus(ExecutionStatus.RUNNING_EXECUTION);
        taskCallbackService.sendTaskExecuteRunningCommand(taskExecutionContext);


        // 拷贝 hdfs/minio 文件到本地
        List<pair> fileDownloads = downloadCheck(taskExecutionContext.getExecutePath(), taskExecutionContext.getResources());</pair
        if (!fileDownloads.isEmpty()) {
            downloadResource(taskExecutionContext.getExecutePath(), logger, fileDownloads);
        }


        taskExecutionContext.setEnvFile(CommonUtils.getSystemEnvPath());


        taskExecutionContext.setTaskAppId(String.format("%s_%s",
                taskExecutionContext.getProcessInstanceId(),
                taskExecutionContext.getTaskInstanceId()));


        TaskChannel taskChannel = taskPluginManager.getTaskChannelMap().get(taskExecutionContext.getTaskType());
        if (null == taskChannel) {
            throw new ServiceException(String.format("%s Task Plugin Not Found,Please Check Config File.", taskExecutionContext.getTaskType()));
        }
        String taskLogName = LoggerUtils.buildTaskId(taskExecutionContext.getFirstSubmitTime(),
                taskExecutionContext.getProcessDefineCode(),
                taskExecutionContext.getProcessDefineVersion(),
                taskExecutionContext.getProcessInstanceId(),
                taskExecutionContext.getTaskInstanceId());
        taskExecutionContext.setTaskLogName(taskLogName);


        // 给当前线程设置名称
        Thread.currentThread().setName(taskLogName);


        task = taskChannel.createTask(taskExecutionContext);


        // 执行任务插件方法 - init
        this.task.init();


        //init varPool
        this.task.getParameters().setVarPool(taskExecutionContext.getVarPool());


        // 执行任务插件方法 -  handle
        this.task.handle();


        // 判断是否需要发送告警
        if (this.task.getNeedAlert()) {
            sendAlert(this.task.getTaskAlertInfo(), this.task.getExitStatus().getCode());
        }


        taskExecutionContext.setCurrentExecutionStatus(ExecutionStatus.of(this.task.getExitStatus().getCode()));
        taskExecutionContext.setEndTime(DateUtils.getCurrentDate());
        taskExecutionContext.setProcessId(this.task.getProcessId());
        taskExecutionContext.setAppIds(this.task.getAppIds());
        taskExecutionContext.setVarPool(JSONUtils.toJsonString(this.task.getParameters().getVarPool()));
        logger.info("task instance id : {},task final status : {}", taskExecutionContext.getTaskInstanceId(), this.task.getExitStatus());
    } catch (Throwable e) {
        logger.error("task scheduler failure", e);
        kill();
        taskExecutionContext.setCurrentExecutionStatus(ExecutionStatus.FAILURE);
        taskExecutionContext.setEndTime(DateUtils.getCurrentDate());
        taskExecutionContext.setProcessId(this.task.getProcessId());
        taskExecutionContext.setAppIds(this.task.getAppIds());
    } finally {
        TaskExecutionContextCacheManager.removeByTaskInstanceId(taskExecutionContext.getTaskInstanceId());
        taskCallbackService.sendTaskExecuteResponseCommand(taskExecutionContext);
        clearTaskExecPath();
        LoggerUtils.removeWorkflowAndTaskInstanceIdMDC();
    }
}
04
附录
4.1 核心表
DS
① t_ds_process_definition(流程定义表)
| 字段 | 类型 | 注释 |
|---|---|---|
| id | int | 主键 |
| name | varchar | 流程定义名称 |
| version | int | 流程定义版本 |
| release_state | tinyint | 流程定义的发布状态:0 未上线 1已上线 |
| project_id | int | 项目id |
| user_id | int | 流程定义所属用户id |
| process_definition_json | longtext | 流程定义json串 |
| description | text | 流程定义描述 |
| global_params | text | 全局参数 |
| flag | tinyint | 流程是否可用:0 不可用,1 可用 |
| locations | text | 节点坐标信息 |
| connects | text | 节点连线信息 |
| receivers | text | 收件人 |
| receivers_cc | text | 抄送人 |
| create_time | datetime | 创建时间 |
| timeout | int | 超时时间 |
| tenant_id | int | 租户id |
| update_time | datetime | 更新时间 |
| modify_by | varchar | 修改用户 |
| resource_ids | varchar | 资源id集 |
② t_ds_process_instance(流程实例表)
| 字段 | 类型 | 注释 |
|---|---|---|
| id | int | 主键 |
| name | varchar | 流程实例名称 |
| process_definition_id | int | 流程定义id |
| state | tinyint | 流程实例状态:0 提交成功,1 正在运行,2 准备暂停,3 暂停,4 准备停止,5 停止,6 失败,7 成功,8 需要容错,9 kill,10 等待线程,11 等待依赖完成 |
| recovery | tinyint | 流程实例容错标识:0 正常,1 需要被容错重启 |
| start_time | datetime | 流程实例开始时间 |
| end_time | datetime | 流程实例结束时间 |
| run_times | int | 流程实例运行次数 |
| host | varchar | 流程实例所在的机器 |
| command_type | tinyint | 命令类型:0 启动工作流,1 从当前节点开始执行,2 恢复被容错的工作流,3 恢复暂停流程,4 从失败节点开始执行,5 补数,6 调度,7 重跑,8 暂停,9 停止,10 恢复等待线程 |
| command_param | text | 命令的参数(json格式) |
| task_depend_type | tinyint | 节点依赖类型:0 当前节点,1 向前执行,2 向后执行 |
| max_try_times | tinyint | 最大重试次数 |
| failure_strategy | tinyint | 失败策略 0 失败后结束,1 失败后继续 |
| warning_type | tinyint | 告警类型:0 不发,1 流程成功发,2 流程失败发,3 成功失败都发 |
| warning_group_id | int | 告警组id |
| schedule_time | datetime | 预期运行时间 |
| command_start_time | datetime | 开始命令时间 |
| global_params | text | 全局参数(固化流程定义的参数) |
| process_instance_json | longtext | 流程实例json(copy的流程定义的json) |
| flag | tinyint | 是否可用,1 可用,0不可用 |
| update_time | timestamp | 更新时间 |
| is_sub_process | int | 是否是子工作流 1 是,0 不是 |
| executor_id | int | 命令执行用户 |
| locations | text | 节点坐标信息 |
| connects | text | 节点连线信息 |
| history_cmd | text | 历史命令,记录所有对流程实例的操作 |
| dependence_schedule_times | text | 依赖节点的预估时间 |
| process_instance_priority | int | 流程实例优先级:0 Highest,1 High,2 Medium,3 Low,4 Lowest |
| worker_group | varchar | 任务指定运行的worker分组 |
| timeout | int | 超时时间 |
| tenant_id | int | 租户id |
③ t_ds_task_instance(任务实例表)
| 字段 | 类型 | 注释 |
|---|---|---|
| id | int | 主键 |
| name | varchar | 任务名称 |
| task_type | varchar | 任务类型 |
| process_definition_id | int | 流程定义id |
| process_instance_id | int | 流程实例id |
| task_json | longtext | 任务节点json |
| state | tinyint | 任务实例状态:0 提交成功,1 正在运行,2 准备暂停,3 暂停,4 准备停止,5 停止,6 失败,7 成功,8 需要容错,9 kill,10 等待线程,11 等待依赖完成 |
| submit_time | datetime | 任务提交时间 |
| start_time | datetime | 任务开始时间 |
| end_time | datetime | 任务结束时间 |
| host | varchar | 执行任务的机器 |
| execute_path | varchar | 任务执行路径 |
| log_path | varchar | 任务日志路径 |
| alert_flag | tinyint | 是否告警 |
| retry_times | int | 重试次数 |
| pid | int | 进程pid |
| app_link | varchar | yarn app id |
| flag | tinyint | 是否可用:0 不可用,1 可用 |
| retry_interval | int | 重试间隔 |
| max_retry_times | int | 最大重试次数 |
| task_instance_priority | int | 任务实例优先级:0 Highest,1 High,2 Medium,3 Low,4 Lowest |
| worker_group | varchar | 任务指定运行的worker分组 |
④ t_ds_schedules(流程定时调度表):
| 字段 | 类型 | 注释 |
|---|---|---|
| id | int | 主键 |
| process_definition_id | int | 流程定义id |
| start_time | datetime | 调度开始时间 |
| end_time | datetime | 调度结束时间 |
| crontab | varchar | crontab 表达式 |
| failure_strategy | tinyint | 失败策略:0 结束,1 继续 |
| user_id | int | 用户id |
| release_state | tinyint | 状态:0 未上线,1 上线 |
| warning_type | tinyint | 告警类型:0 不发,1 流程成功发,2 流程失败发,3 成功失败都发 |
| warning_group_id | int | 告警组id |
| process_instance_priority | int | 流程实例优先级:0 Highest,1 High,2 Medium,3 Low,4 Lowest |
| worker_group | varchar | 任务指定运行的worker分组 |
| create_time | datetime | 创建时间 |
| update_time | datetime | 更新时间 |
⑤ t_ds_command(执行命令表)
| 字段 | 类型 | 注释 |
|---|---|---|
| id | int | 主键 |
| command_type | tinyint | 命令类型:0 启动工作流,1 从当前节点开始执行,2 恢复被容错的工作流,3 恢复暂停流程,4 从失败节点开始执行,5 补数,6 调度,7 重跑,8 暂停,9 停止,10 恢复等待线程 |
| process_definition_id | int | 流程定义id |
| command_param | text | 命令的参数(json格式) |
| task_depend_type | tinyint | 节点依赖类型:0 当前节点,1 向前执行,2 向后执行 |
| failure_strategy | tinyint | 失败策略:0结束,1继续 |
| warning_type | tinyint | 告警类型:0 不发,1 流程成功发,2 流程失败发,3 成功失败都发 |
| warning_group_id | int | 告警组 |
| schedule_time | datetime | 预期运行时间 |
| start_time | datetime | 开始时间 |
| executor_id | int | 执行用户id |
| dependence | varchar | 依赖字段 |
| update_time | datetime | 更新时间 |
| process_instance_priority | int | 流程实例优先级:0 Highest,1 High,2 Medium,3 Low,4 Lowest |
| worker_group | varchar | 任务指定运行的worker分组 |
05
文末
本文是个人阅读DolphinScheduler一些见解,欢迎大家跟我交流~
如有错误,请批评指正!

最后非常欢迎大家加入 DolphinScheduler 大家庭,融入开源世界!
我们鼓励任何形式的参与社区,最终成为 Committer 或 PPMC,如:
-
将遇到的问题通过 GitHub 上 issue 的形式反馈出来。
-
回答别人遇到的 issue 问题。
-
帮助完善文档。
-
帮助项目增加测试用例。
-
为代码添加注释。
-
提交修复 Bug 或者 Feature 的 PR。
-
发表应用案例实践、调度流程分析或者与调度相关的技术文章。
-
帮助推广 DolphinScheduler,参与技术大会或者 meetup 的分享等。
欢迎加入贡献的队伍,加入开源从提交第一个 PR 开始。
-
比如添加代码注释或找到带有 ”easy to fix” 标记或一些非常简单的 issue(拼写错误等) 等等,先通过第一个简单的 PR 熟悉提交流程。
注:贡献不仅仅限于 PR 哈,对促进项目发展的都是贡献。
相信参与 DolphinScheduler,一定会让您从开源中受益!
参与贡献
随着国内开源的迅猛崛起,Apache DolphinScheduler 社区迎来蓬勃发展,为了做更好用、易用的调度,真诚欢迎热爱开源的伙伴加入到开源社区中来,为中国开源崛起献上一份自己的力量,让本土开源走向全球。

参与 DolphinScheduler 社区有非常多的参与贡献的方式,包括:

贡献第一个PR(文档、代码) 我们也希望是简单的,第一个PR用于熟悉提交的流程和社区协作以及感受社区的友好度。
社区汇总了以下适合新手的问题列表:https://github.com/apache/dolphinscheduler/issues/5689
非新手问题列表:https://github.com/apache/dolphinscheduler/issues?q=is%3Aopen+is%3Aissue+label%3A%22volunteer+wanted%22
如何参与贡献链接:https://dolphinscheduler.apache.org/zh-cn/community/development/contribute.html
来吧,DolphinScheduler开源社区需要您的参与,为中国开源崛起添砖加瓦吧,哪怕只是小小的一块瓦,汇聚起来的力量也是巨大的。
参与开源可以近距离与各路高手切磋,迅速提升自己的技能,如果您想参与贡献,我们有个贡献者种子孵化群,可以添加社区小助手微信(Leonard-ds) ,手把手教会您( 贡献者不分水平高低,有问必答,关键是有一颗愿意贡献的心 )。
添加小助手微信时请说明想参与贡献。
来吧,开源社区非常期待您的参与。
< ?? >
更多精彩推荐
☞DophineSheduler上下游任务之间动态传参案例及易错点总结
☞ApacheCon Asia 2022 精彩回顾 | 如何让更多人从大数据中获益?
☞
一文读懂,硬核 Apache DolphinScheduler3.0 源码解析
☞
7W+任务实例,80+台任务节点,联通数科基于 DolphinScheduler 的差异化改造和升级
☞
ApacheCon精彩回顾|思科网讯DolphinScheduler与k8S整合实践,提高大数据处理效率!
☞
Apache DolphinScheduler PMC:我在社区里如何玩转开源?
☞ApacheCon Asia 2022 精彩回顾 | DolphinScheduler 在联想作为统一调度中心的落地实践
☞国民乳业巨头伊利如何基于 DolphinScheduler 开辟企业数字化转型“蹊径”?
☞示例讲解 | Apache DolphinScheduler 简单任务定义及复杂的跨节点传参
我知道你
在看哟!