简记组件注册
1. @ComponentScan
@ComponentScan是一个配置类的注解组件,作用于配置类,默认根据路径自动扫描该路径所在包下的所有类,并将其装载到Spring容器中,相当于xml配置文件中的<context:component-scan base-package=“路径”/>
<context:component-scan base-package="com.demo"></context:component-scan>
@Configuration // 相当于告诉Spring这是一个配置类
@CompoentScan(value = "com.demo")
public class springConfig{}
1.1. 参数
-
value :
设置被扫描的包路径 -
excludeFilter :
指定规则排除不扫描的包 -
includeFilter:
指定规则扫描需扫描的包 -
useDefaultFilters
默认为true, false(禁用默认扫描所有包的规则)
1.2. excludeFilter与includeFilter
- 这两个参数都是用来指定被扫描的包有哪些,因此,他们的使用方法也类似,如下举例
此处举例指定不扫描注解类型为@Controller的类

@ComponentScan(value="com.demo",
   excludeFilter = {@ComponentScan.Filter(
         type = FilterType.ANNOTATION,
         classes = {Controller.class}
         )}
         )
此处举例为指定规则只扫描自定义的类型过滤类
但需要添加参数useDefaultFilters = false(禁用默认扫描所有包的规则)

@ComponentScan(value="com.demo",
   includeFilter = {@ComponentScan.Filter(
         type = FilterType.CUSTOM,
         classes = {MyTypeFilter.class}
         ),useDefaultFilters = false}
         )
- type属性:
 * FilterType.ASPECTJ :
                    按aspectj表达式排除
  * FilterType.REGEX :
                    按照正则表达式排除
* FilterType.ANNOTATION :
                    按注解排除
* FilterType.ASSIGNABLE_TYPE :
                    按照类型排除
 * FilterType.CUSTOM
                    自定义排除
其中三个常用属性举例
 * FilterType.ANNOTATION ,classes = {Controller.class} 按注解排除(注解的类型)
 * FilterType.ASSIGNABLE_TYPE ,classes = {BookService.class} 按照类型排除(指定那种类型)
 * FilterType.CUSTOM ,classes = {MyTypeFilter.class} 自定义排除 需要一个Typefilter的实现类
1.3. FilterType.CUSTOM自定义
使用 FilterType.CUSTOM 属性时,需要实现TypeFilter接口,并且重写match方法,举例如下:
package com.liuqiang.config;

import org.springframework.core.io.Resource;
import org.springframework.core.type.AnnotationMetadata;
import org.springframework.core.type.ClassMetadata;
import org.springframework.core.type.classreading.MetadataReader;
import org.springframework.core.type.classreading.MetadataReaderFactory;
import org.springframework.core.type.filter.TypeFilter;

import java.io.IOException;

public class MyTypeFilter implements TypeFilter {
    /**
     *
     * @param metadataReader 读取当前正在扫描的类的信息
     * @param metadataReaderFactory 获取其他任何类的信息
     * @return true 匹配;false 不匹配
     * @throws IOException
     */
    @Override
    public boolean match(MetadataReader metadataReader, MetadataReaderFactory metadataReaderFactory) throws IOException {
        // 获取当前类注解的信息
        AnnotationMetadata annotationMetadata = metadataReader.getAnnotationMetadata();
        // 获取但在正在扫描的类的类信息
        ClassMetadata classMetadata = metadataReader.getClassMetadata();
        // 获取当前类资源(类的路径)
        Resource resource = metadataReader.getResource();

        String className = classMetadata.getClassName();
        System.out.println("classMetadata.getClassName()==>"+className);
        if(className.contains("er")){  // 如果类名中包含 er 则返回false不匹配,也就是不扫描
            return true;
        }

        return false;
    }
}
1.4.测试
在 AnnotationConfigApplicationContext类下有getBeanDefinitionNames()方法可以获取当前Spring容器中注入了哪些类,举例如下:
    @Test
    public void Test1(){
        AnnotationConfigApplicationContext applicationContext = new AnnotationConfigApplicationContext(MainConfig.class);
       String[] d =  applicationContext.getBeanDefinitionNames();
        for (String name:d
             ) {
            System.out.println(name);
        }
    }

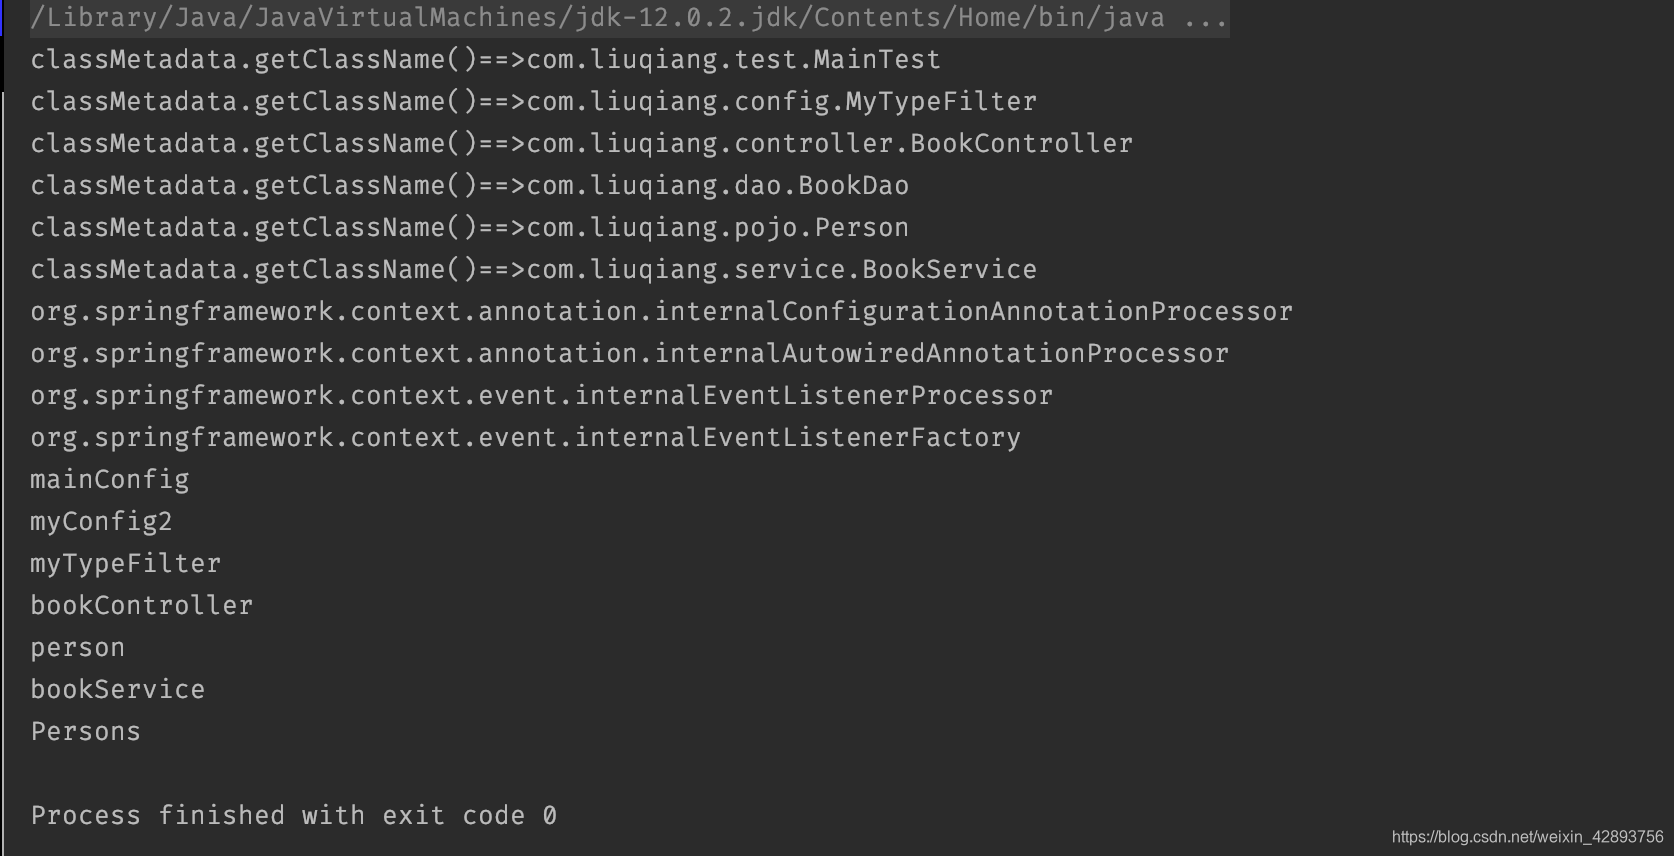
结果中的mainConfig和myConfiig2为我的配置类,所以加载到了spring容器中,Persons是我的实体类,使用了@Bean将其加载到Spring容器中, bookController,Person,bookService,则是通过实现TypeFilter接口来自定义加载的
1.5. 备注
- java8可直接使用@ComponentScan来指定多个@ComponentScan,而当多个@ComponentScan同时存在时,按照顺序层级进行过滤扫描
- 非java8可以使用@ComponentScans(values = {@ComponentScan(),@ComponentScan()} )指定多个@ComponentScan
2. @Bean
@Bean是一个将Bean实例注入到IOC容器的注解,类型为返回值类型,id默认使用方法名为id,但可以使用 @Bean(“name”)方式指定id名称:
 @Bean("Person")
    public Person person01(){
        return new Person(1,"james",0);
    }
相当于xml配置中的
   <bean id="person" class="com.liuqiang.pojo.Person" >
          <property name="id" value="1"></property>
          <property name="name" value="james"></property>
           <property name="gender" value="0"></property>
3. @Scope 与 @ Lazy
@Scope是一个默认为单实例的注解,当ioc容器启动时就会调用方法创建对象放到ioc容器,以后每次获取就直接从容器中拿他有两种取值,“singleton” 与 “propertype”;在web开发中还有“request” 与 “session”
 * @Scope("prototype") 多实例的
 *               ioc容器启动时不会调用方法创建对象放到ioc容器,每次获取时才会调用方法创建对象
 * @Scope("singleton") 单实例的(默认值)
 *               ioc容器启动时就会调用方法创建对象放到ioc容器,以后每次获取就直接从容器中拿
 *  @Scope("request") 同一次请求创建一个实例
 *  @Scope("session") 同一次session创建一个实例
@Scope(“prototype”)
<bean id="person" class="com.liuqiang.pojo.Person" scope="prototype">
          <property name="id" value="1"></property>
          <property name="name" value="james"></property>
          <property name="gender" value="0"></property>
@Lazy是一个懒加载,也就是说他在向IOC容器中注入Bean实例时会有延迟,相对于普通单实例Bean默认在ioc容器启动时就创建对象不同的是,@Lazy当ioc容器启动时不创建对象,只有第一次使用(获取)Bean时才创建对象并初始化
3.1. @Lazy测试
    @Lazy
    @Bean("kobe")  // 默认单实例bean
    public Person person(){
        System.out.println("向容器中加载Person");
        return new Person(2,"kobe",1);
    }
测试代码:
    @Test
    public void test3(){  // 懒加载
        AnnotationConfigApplicationContext applicationContext = new AnnotationConfigApplicationContext(MyConfig2.class);
        System.out.println("容器创建完成");
    }
测试结果:

当获取Bean实例时:
    @Test
    public void test3(){  // 懒加载
        AnnotationConfigApplicationContext applicationContext = new AnnotationConfigApplicationContext(MyConfig2.class);
        Person bean = applicationContext.getBean(Person.class);
        System.out.println("容器创建完成");
    }
测试结果:

3.2. @Scope测试
@Scope单实例测试
    @Scope
    @Bean("kobe")
    public Person person(){
        System.out.println("向容器中加载Person");
        return new Person(2,"kobe",1);
    }

#####################################
    @Test
    public void test3(){
        AnnotationConfigApplicationContext applicationContext = new AnnotationConfigApplicationContext(MyConfig2.class);
        Person bean = applicationContext.getBean(Person.class);
        Person bean1 = applicationContext.getBean(Person.class);
        System.out.println(bean);
        System.out.println(bean1);
        System.out.println(bean==bean1);
        System.out.println("容器创建完成");
    }
测试结果:
可以通过比较发现,在单实例下创建的对象是同一个对象

@Scope(“prototype”) 多实例测试
    @Scope("prototype")
    @Bean("kobe")
    public Person person(){
        System.out.println("向容器中加载Person");
        return new Person(2,"kobe",1);
    }
###############################################
  @Test
    public void test3(){
        AnnotationConfigApplicationContext applicationContext = new AnnotationConfigApplicationContext(MyConfig2.class);
        Person bean = applicationContext.getBean(Person.class);
        Person bean1 = applicationContext.getBean(Person.class);
        System.out.println(bean);
        System.out.println(bean1);
        System.out.println(bean==bean1);
        System.out.println("容器创建完成");
    }
测试结果:
可以通过对比发现两次偶去的实例不是同一个

4. @Conditional
@Conditional 是一个按照一定的条件进行判断, 当满足条件后给容器注册Bean的注解,该注解可以标记在类和方法上:
* 标记在类上:只有满足当前条件,这个类中配置的所有bean注册才能生效
* 标记在方法上:只有满足当前条件,这个方法中配置的所有bean注册才能生效
当我们自定义判断条件时,则需要实现Condition接口,并重写matches方法,
4.1. 自定义测试:
此处以操作系统为例进行条件判断,如果系统为mac给容器注册macos,windows则注册windows
public class MacOsXConditional implements Condition {
    /**
     *
     * @param conditionContext 判断条件能使用的上下文环境
     * @param annotatedTypeMetadata 标注了@Conditional注解的注释信息
     * @return
     */
    @Override
    public boolean matches(ConditionContext conditionContext, AnnotatedTypeMetadata annotatedTypeMetadata) {

        // 1. 获取ioc使用的beanFactory
        ConfigurableListableBeanFactory beanFactory = conditionContext.getBeanFactory();
        // 2. 获取类加载器
        ClassLoader classLoader = conditionContext.getClassLoader();
        // 3。 获取当前环境信息
        Environment environment = conditionContext.getEnvironment();
        //4。 获取bean定义的注册类
        BeanDefinitionRegistry registry = conditionContext.getRegistry();
        String property = environment.getProperty("os.name");
        // 容器中是否包含 macos
        boolean macos = registry.containsBeanDefinition("macos");
       System.out.println(harden);
        if(property.contains("Mac OS X")){
            return true;
        }
        if(macos == true){
            return true;
        }
        return false;
    }
}
##################################################
public class WindowsConditional implements Condition {
    @Override
    public boolean matches(ConditionContext conditionContext, AnnotatedTypeMetadata annotatedTypeMetadata) {
        Environment environment = conditionContext.getEnvironment();
        String property = environment.getProperty("os.name");
        if (property.contains("Windows")){
            return true;
        }
        return false;
    }
}

##########################################
  @Conditional({WindowsConditional.class})
    @Bean ("windows")
    public Person person1(){
        System.out.println("向容器中加载windows");
        return new Person(13,"harden",2);
    }

    @Conditional(MacOsXConditional.class)
    @Bean("macos")
    public Person person2(){
        System.out.println("向容器中加载macos");
        return new Person(14,"gorage",2);
    }
#################################################
   @Test
    public void test4() {  //{@Conditional:
        AnnotationConfigApplicationContext context = new AnnotationConfigApplicationContext(MyConfig2.class);
        String[] beanDefinition = context.getBeanNamesForType(Person.class);
        for (String name:beanDefinition
             ) {
            System.out.println(name);
        }
        // 按照类型获取当前bean的所有对象
        Map<String, Person> beansOfType = context.getBeansOfType(Person.class);
        System.out.println(beansOfType);

        // 获取环境运行系统
        ConfigurableEnvironment environment = context.getEnvironment();
        String property = environment.getProperty("os.name");// 动态获取环境变量的值 获取操作系统的名字
        System.out.println(property);
    }
运行结果:
有结果可知,windows实例并未注入到容器

5. @Import
快速给容器中导入组件,可使用数组导入多个组件

由源码可看出它是配置类的注解,实现时需要实现接口
-
ImportSelector :返回需要导入的组件全类名数组,需要实现ImportSelect接口 -
ImportBeanDefinitionRegistrar:手动注册bean到容器中
5.1. @Import测试

5.2. ImportSelector测试
@Import({Color.class, red.class, MyImportSelector.class})  //    导入组件id默认为全类名
public class MyConfig2 {}

######################################

public class MyImportSelector implements ImportSelector {
    /**
     *
     * @param annotationMetadata 获取当前标注@Import注解的类的所有注解信息和标注其他注解的类的信息
     * @return 要导入到容器中的组件全类名
     */
    @Override
    public String[] selectImports(AnnotationMetadata annotationMetadata) {

        return new String[]{"com.liuqiang.pojo.Blue","com.liuqiang.pojo.Yellow"};
    }
}
测试结果:

5.3. ImportBeanDefinitionRegistrar测试
public class MyImportBeanDefinitionRegistrar implements ImportBeanDefinitionRegistrar {

    /**
     * @param importingClassMetadata  当前类的注解信息
     * @param registry  BeanDefinition注册类
     *                 把所有需要添加到容器的bean调用BeanDefinitionRegistry.registerBeanDefinition手动注册
     */
    @Override
    public void registerBeanDefinitions(AnnotationMetadata importingClassMetadata, BeanDefinitionRegistry registry
                                         ) {
        boolean b = registry.containsBeanDefinition("com.liuqiang.pojo.Yellow");
        boolean b1 = registry.containsBeanDefinition("com.liuqiang.pojo.Blue");
        if(b && b1){  // 如果容器中有这两个bean,则注册rainBow
            // 指定bean类型
            RootBeanDefinition beanDefinition = new RootBeanDefinition(RainBow.class);
            //注册bean指定bean名
            registry.registerBeanDefinition("rainBow",beanDefinition);
        }
    }
}
测试结果1:

测试结果2: 当容器没有条件时

6. 使用Spring提供的FactoryBean
FactoryBean默认获取使用FactoryBean调用getObject创建的对象,如果要获取FactoryBean本身实例对象,则需要如例
‘context.getBean("&colorFactoryBean");’
,在colorFactoryBean前加
&
; 在使用Spring提供的FactoryBean进行组件注册时,需要实现FactoryBean接口,在FactoryBean接口中有三个方法:
* getObject()
* 获取返回对象(返回值类型为泛型),将其放入容器
* getObjectType()
* 获取返回对象类型
* isSingleton()
* 是否单例:是单例,在容器中保留一份;不是单例:每次获取都会调用getObject()方法创建一个新的bean
6.1. getObject()测试
public class ColorFactoryBean implements FactoryBean<Color> {
    /**
     *
     * @return Color对象,添加到容器
     * @throws Exception
     */
    @Override
    public Color getObject() throws Exception {
        System.out.println("Bean创建中");
        return new Color();
    }

    @Override
    public Class<?> getObjectType() {
        return Color.class;
    }

    /**
     * 是否单例
      * @return true or false
     */
    @Override
    public boolean isSingleton() {
        return false;
    }
}

###############################################

@Test
    public void test6() {  // @ImportSelector
        AnnotationConfigApplicationContext context = new AnnotationConfigApplicationContext(MyConfig2.class);
        String[] beanDefinitionNames = context.getBeanDefinitionNames();
        for (String name : beanDefinitionNames
        ) {
            System.err.println(name);
        }
        // FactoryBean获取的是调用getObject方法创建的对象
        Object colorFactoryBean = context.getBean("colorFactoryBean");
        // 调用getObject方法创建的对象
        Object colorFactoryBean1 = context.getBean("colorFactoryBean");
        System.out.println(colorFactoryBean.getClass());
        System.out.println(colorFactoryBean1.getClass()==colorFactoryBean.getClass());

    }
测试结果:

6.2. 获取FactoryBean实例

6.3. 问题求助:具体为啥会执行多次getObjectType() 我也没弄清楚,好像是与isSingleton()返回值有关,希望有懂的大佬评论区指教。。。。
7. 包扫描+组件标注注解
在注解中的value属性值可以不写,默认为类名称,首字母小写
-
(1)@Component:普通组件,都可用它创建对象 -
(2)@Service:使用在业务逻辑层上(service层) -
(3)@Controller:使用在web层 -
(4)@Repository:使用在Dao持久层
7.1 :基于注解方式实现属性注入
-
(1)AutoWired:根据属性类型进行自动装配 -
(2)Qualifier:根据属性名称进行注入 -
(3)Resource:可以根据类型注入,也可根据属性名称注入 -
(4)Value:注入普通类型属性