SpringBoot框架用了这么久了,今天就来总结一下
SpringBoot的优点和特性这里就不说了,我今天要结合Redis和MyBatis和Lombook来搭建一个简单的SpringBoot框架。
首先我们从创建一个SpringBoot项目开始,当然,我用的项目管理工具是maven
版本信息:
SpringBoot > 2.0.3
Maven > 3.5.3
JDK > 1.8

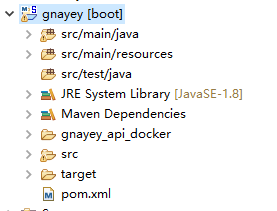
上图是刚创建好的SpringBoot项目的初始结构
接下来需要将项目所需的包配置在pom.xml文件中:
文中已加了详细的注解:
<project xmlns="http://maven.apache.org/POM/4.0.0" xmlns:xsi="http://www.w3.org/2001/XMLSchema-instance"
         xsi:schemaLocation="http://maven.apache.org/POM/4.0.0 http://maven.apache.org/xsd/maven-4.0.0.xsd">
    <modelVersion>4.0.0</modelVersion>
    <groupId>com.example</groupId>
    <artifactId>GnayEyTestProject</artifactId>
    <version>0.0.1-GnayEy</version>
    <packaging>jar</packaging>
    <name>GnayEyTestProject</name>
    <description>GnayEyTestProject project for Spring Boot</description>
    <!-- SpringBoot版本,当然你也可以使用最新的版本 -->
    <parent>
        <groupId>org.springframework.boot</groupId>
        <artifactId>spring-boot-starter-parent</artifactId>
        <version>2.0.3.RELEASE</version>
        <relativePath/> <!-- lookup parent from service -->
    </parent>
    <!-- UTF8编码格式 -->
    <properties>
        <project.build.sourceEncoding>UTF-8</project.build.sourceEncoding>
        <project.reporting.outputEncoding>UTF-8</project.reporting.outputEncoding>
        <java.version>1.8</java.version>
    </properties>
    <dependencies>
        <dependency>
            <groupId>org.springframework.boot</groupId>
            <artifactId>spring-boot-starter-web</artifactId>
        </dependency>
        <dependency>
            <groupId>org.springframework.boot</groupId>
            <artifactId>spring-boot-configuration-processor</artifactId>
        </dependency>
        <dependency>
            <groupId>org.springframework.boot</groupId>
            <artifactId>spring-boot-starter-actuator</artifactId>
        </dependency>
        <!-- 这里配置的是lombook,你的开发工具也需要配置lombok,这点可以上百度查 -->
		<dependency>
		    <groupId>org.projectlombok</groupId>
		    <artifactId>lombok</artifactId>
		    <scope>provided</scope>
		</dependency>
		<dependency>
			<groupId>eu.bitwalker</groupId>
			<artifactId>UserAgentUtils</artifactId>
			<version>1.20</version>
		</dependency>
        <dependency>
            <groupId>org.springframework.boot</groupId>
			<artifactId>spring-boot-starter-test</artifactId>
			<scope>test</scope>
        </dependency>
        <dependency>
            <groupId>org.springframework.boot</groupId>
            <artifactId>spring-boot-starter-tomcat</artifactId>
        </dependency>
        <!-- 在没有前台之前,项目使用swagger来进行接口的调试 -->
        <dependency>
			<groupId>io.springfox</groupId>
			<artifactId>springfox-swagger2</artifactId>
			<version>2.6.1</version>
		</dependency>
		<dependency>
			<groupId>io.springfox</groupId>
			<artifactId>springfox-swagger-ui</artifactId>
			<version>2.6.1</version>
		</dependency>
		<!-- mybatis配置 -->
        <dependency>
			<groupId>org.mybatis.spring.boot</groupId>
			<artifactId>mybatis-spring-boot-starter</artifactId>
			<version>1.3.0</version>
		</dependency>
		<!--jdbc连接池配置-->
        <dependency>
            <groupId>org.springframework.boot</groupId>
            <artifactId>spring-boot-starter-jdbc</artifactId>
        </dependency>
        <dependency>
            <groupId>mysql</groupId>
            <artifactId>mysql-connector-java</artifactId>
        </dependency>
        <dependency>
		  <groupId>com.google.code.gson</groupId>
		  <artifactId>gson</artifactId>
		</dependency>
		<!-- redis操作需导入包 -->
		<dependency>
		    <groupId>commons-configuration</groupId>
		    <artifactId>commons-configuration</artifactId>
		    <version>1.10</version>
		</dependency>
	  	<dependency>
			<groupId>redis.clients</groupId>
			<artifactId>jedis</artifactId>
			<version>2.6.0</version>
		</dependency>
		<!-- 我加了一个Excel文件的读取功能,需要此配置:后缀为xlsx或xls的excel操作需要导入包 -->
		<dependency>
            <groupId>org.apache.poi</groupId>
            <artifactId>poi</artifactId>
            <version>3.17</version>
        </dependency>
        <dependency>
            <groupId>org.apache.poi</groupId>
            <artifactId>poi-ooxml</artifactId>
            <version>3.17</version>
        </dependency>
		<dependency>
			<groupId>log4j</groupId>
			<artifactId>log4j</artifactId>
			<version>1.2.16</version>
		</dependency>
    </dependencies>
    <build>
        <plugins>
            <plugin>
                <groupId>org.springframework.boot</groupId>
                <artifactId>spring-boot-maven-plugin</artifactId>
            </plugin>
            <plugin>
				<groupId>org.apache.maven.plugins</groupId>
				<artifactId>maven-compiler-plugin</artifactId>
				<configuration>
					<source>1.8</source>
					<target>1.8</target>
				</configuration>
			</plugin>
        </plugins>
    </build>
    <repositories>
		<repository>
			<id>aliyun</id>
			<name>aliyun</name>
			<url>http://maven.aliyun.com/nexus/content/groups/public</url>
		</repository>
	</repositories>
</project>
pom.xml文件配置文成后,右键项目,店家maven–Update Project…,项目会自动下载所配置的jar包。
完成后,需要先准备一些工具类:
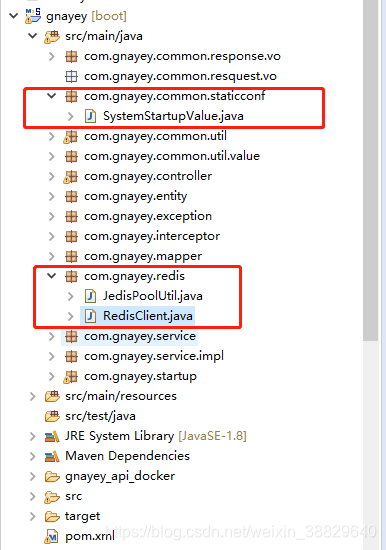
redis操作类:如图是目录结构

这三个类是操作redis的工具类。
下面贴上代码:
package com.gnayey.common.staticconf;
//用来从配置文件获取redis的链接信息
public class SystemStartupValue {
	public static String REDIS_IP;
	public static Integer REDIS_PORT;
}
package com.gnayey.redis;
import org.apache.commons.configuration.Configuration;
import org.apache.commons.configuration.ConfigurationException;
import org.apache.commons.configuration.PropertiesConfiguration;
import com.gnayey.common.staticconf.SystemStartupValue;
import redis.clients.jedis.Jedis;
import redis.clients.jedis.JedisPool;
import redis.clients.jedis.JedisPoolConfig;
public class JedisPoolUtil {
	private static volatile JedisPool jedisPool = null;
	private JedisPoolUtil() {
	}
	public static JedisPool getJedisPoolInstance() {
		if(jedisPool == null) {
			synchronized (JedisPoolUtil.class) {
				if(jedisPool == null) {
					Configuration conf = null;
					try {
						conf = new PropertiesConfiguration("config.properties");
					} catch (ConfigurationException e) {
						e.printStackTrace();
					}
					// 池基本配置
					JedisPoolConfig config = new JedisPoolConfig();
					config.setMaxIdle(conf.getInt("maxIdle"));
					config.setMaxWaitMillis(conf.getInt("maxWaitMillis"));
					config.setTestOnBorrow(conf.getBoolean("testOnBorrow"));
					config.setMaxTotal(conf.getInt("maxTotal"));

					if(SystemStartupValue.REDIS_IP!=null && SystemStartupValue.REDIS_PORT!=0){
						jedisPool = new JedisPool(config, SystemStartupValue.REDIS_IP, SystemStartupValue.REDIS_PORT);
					}else{
						jedisPool = new JedisPool(config, conf.getString("host"), conf.getInt("port"));
					}
				}
			}
		}
		return jedisPool;
	}
	public static void release(JedisPool jedisPool, Jedis jedis) {
		if(jedis != null) {
			jedisPool.returnResource(jedis);
		}
	}
}
RedisClient 类的内容为操作redis的具体方法,也可以添加方法来满足自己的业务
package com.gnayey.redis;
import java.util.List;
import java.util.Map;
import java.util.Set;
import redis.clients.jedis.Jedis;
import redis.clients.jedis.JedisPool;
import org.apache.commons.configuration.ConfigurationException;
public class RedisClient {
	private Jedis jedis;// 非切片额客户端连接
	private JedisPool jedisPool = JedisPoolUtil.getJedisPoolInstance();  //非切片数据库连接池
	public RedisClient() {
		synchronized (this) {
			if(jedis == null) {
				jedis = jedisPool.getResource();
			}
		}
	}
	/**
	 * 关闭资源
	 */
	public void closeResource(){
		if(jedis != null) {
			try {
				JedisPoolUtil.release(jedisPool, jedis);
			} catch (Exception e) {
			}
		}
	}
	/**
	 * 用于key-value形式获取值
	 * @param key
	 * @return
	 */
	public String getValue(String key) {
		String str = jedis.get(key);
		return str;
	}
	/**
	 * 获取List全部集合
	 * @param key
	 * @return
	 */
	public List<String> getList(String key) {
		List<String> list = jedis.lrange(key, 0, -1);
		return list;
	}
	/**
	 * 获取List集合中一部分,start:开始下标(list从0开始计数),end:结束下标(填写-1表示获取全部list)
	 * @param key
	 * @param start
	 * @param end
	 * @return
	 */
	public List<String> getList(String key, int start, int end) {
		List<String> list = jedis.lrange(key, start, end);
		return list;
	}
	/**
	 * 获取指定下标的list数据
	 * @param key
	 * @param index
	 * @return
	 */
	public String getListByIndex(String key, int index) {
		String str = jedis.lindex(key, index);

		return str;
	}
	/**
	 * 获取Set全部集合
	 * @param key
	 * @return
	 */
	public Set<String> getSet(String key) {
		Set<String> set = jedis.smembers(key);
		return set;
	}
	/**
	 * 检查content是否存在于key集合中
	 * @param key
	 * @param content
	 * @return
	 */
	public boolean isInSet(String key, String content)	{
		boolean bool = jedis.sismember(key, content);
		return bool;
	}
	/**
	 * 获取hash表中value集合
	 * @param key
	 * @return
	 */
	public List<String> getHashVal(String key){
		List<String> list = jedis.hvals(key);
		return list;
	}
	/**
	 * 判断conent是否在key的hash中时候存在
	 * @param key
	 * @param content
	 * @return
	 */
	public boolean isInHash(String key, String content){
		boolean bool = jedis.hexists(key, content);
		return bool;
	}
	/**
	 * 获取hash中字段为contents1,contents2...的值
	 * @param key
	 * @param contents
	 * @return
	 */
	public List<String> getHash(String key,String ... contents){
		List<String> list = jedis.hmget(key, contents);
		return list;
	}
	/**
	 * 获取hash为key的某一字段
	 * @param key
	 * @param content
	 * @return
	 */
	public String getHashVal(String key, String content) {
		String str = jedis.hget(key, content);
		return str;
	}
	/**
	 * 获取hash中所有的key
	 * @param key
	 * @return
	 */
	public Set<String> getHashKeys(String key){
		Set<String> set = jedis.hkeys(key);
		return set;
	}
	/**
	 * 获取hash中所有的key
	 * @param key
	 * @return
	 */
	public Set<String> getKeys(String key){
		Set<String> set = jedis.keys(key);
		return set;
	}
	/**
	 * 获取指定hash表中指定字段的value
	 * @param key
	 * @param field
	 * @return
	 */
	public String getHashValueByKey(String key, String field) {
		String str = jedis.hget(key, field);
		return str;
	}
	/**
	 * 获取指定hash表中所有字段
	 * @param key
	 * @return
	 * @throws ConfigurationException
	 */
	public Map<String, String> getHash(String key){
		return jedis.hgetAll(key);
	}
	public String setHash(String key, Map<String, String> map){
		return jedis.hmset(key, map);
	}
	public void setHashAndTime(String key, Map<String, String> map,int times){
		jedis.hmset(key, map);
		jedis.expire(key, times);
	}
	public long del(String key) {
		long lon = jedis.del(key);
		return lon;
	}
	/**
	 * 获取非切片额客户端连接,当其余接口不能解决开发问题时,使用此接口解决redis读取问题。具体查看jedis官方api
	 * @return
	 */
	public Jedis getJedis() {
		return jedis;
	}
}
在resoures文件夹下创建application.properties
内容如下:
server.port=8099
#配置数据源
spring.datasource.url=jdbc:mysql://localhost:3306/sys?useUnicode=true&characterEncoding=utf8&zeroDateTimeBehavior=convertToNull&useSSL=false&serverTimezone=UTC
spring.datasource.username = root
spring.datasource.password = 123456
spring.datasource.driver-class-name=com.mysql.jdbc.Driver
#配置MyBatis的xml文件路径
mybatis.mapper-locations: classpath:/mapper/*Mapper.xml
再创建一个config.properties文件,用来配置项目中用到的一些公共配置,比如:文件服务器地址,redis链接信息等,下面是我写的一些内容:
#######################################################redis config###############################################################
maxIdle=1000
maxTotal=1000
maxWaitMillis=10000
testOnBorrow=false
host=10.0.0.30
port=6379
name=master
file_server_ip=10.0.0.30
file_server_port=22
fole_server_user=root
file_server_password=qwe123
接下来需要创建一个MyBatis的xml文件映射的目录,也就是在application.properties里面配置的:mybatis.mapper-locations: classpath:/mapper/*Mapper.xml
如下图:

mapper内放置的就是你的xml文件
接下来,创建一个启动类GnayEyApplication.java和Swagger.java类
如下
package com.gnayey.startup;

import org.mybatis.spring.annotation.MapperScan;
import org.springframework.boot.SpringApplication;
import org.springframework.boot.autoconfigure.SpringBootApplication;
import org.springframework.context.annotation.ComponentScan;
import org.springframework.transaction.annotation.EnableTransactionManagement;

import springfox.documentation.swagger2.annotations.EnableSwagger2;

@EnableTransactionManagement(proxyTargetClass = true)
@EnableSwagger2
@ComponentScan(basePackages = "com.gnayey.exception")
@ComponentScan(basePackages = "com.gnayey.controller")
@ComponentScan(basePackages = "com.gnayey.service")
@MapperScan("com.gnayey.mapper")
@SpringBootApplication
public class GnayEyApplication {
	public static void main(String[] args) {
		SpringApplication.run(GnayEyApplication.class, args);
	}
}
package com.gnayey.startup;

import org.springframework.context.annotation.Bean;
import org.springframework.context.annotation.Configuration;
import org.springframework.web.servlet.config.annotation.WebMvcConfigurer;
import springfox.documentation.builders.ApiInfoBuilder;
import springfox.documentation.builders.PathSelectors;
import springfox.documentation.builders.RequestHandlerSelectors;
import springfox.documentation.service.ApiInfo;
import springfox.documentation.spi.DocumentationType;
import springfox.documentation.spring.web.plugins.Docket;
import springfox.documentation.swagger2.annotations.EnableSwagger2;

@Configuration
@EnableSwagger2
public class Swagger2 implements WebMvcConfigurer {
	// 接口版本号
    private final String version = "1.0";
    // 接口大标题
    private final String title = "GnayEyTestProject";
    // 具体的描述
    private final String description = "公共数据服务接口文档";
    // basePackage
    private final String basePackage = "com.gnayey.controller";
    @Bean
    public Docket createRestApi() {
        return new Docket(DocumentationType.SWAGGER_2)
                .apiInfo(apiInfo())
                .select()
                .apis(RequestHandlerSelectors.basePackage(basePackage))
                .paths(PathSelectors.any())
                .build();
    }
    private ApiInfo apiInfo() {
        return new ApiInfoBuilder()
                .title(title)
                .description(description)
                .version(version)
                .build();
    }
}
目录结构如下:

到这,一个SpringBoot框架就完成了,下面我们写一个登陆接口,并给项目配置拦截器,使用redis来保存用户登陆信息。直接上代码:
拦截器配置类:如上图中的WebAppConfig.java
package com.gnayey.startup;

import org.springframework.context.annotation.Bean;
import org.springframework.context.annotation.Configuration;
import org.springframework.web.servlet.config.annotation.EnableWebMvc;
import org.springframework.web.servlet.config.annotation.InterceptorRegistry;
import org.springframework.web.servlet.config.annotation.ResourceHandlerRegistry;
import org.springframework.web.servlet.config.annotation.WebMvcConfigurer;
import com.gnayey.interceptor.InterceptorConfig;

@EnableWebMvc
@Configuration
public class WebAppConfig  implements WebMvcConfigurer {
	@Bean
	InterceptorConfig localInterceptor() {
        return new InterceptorConfig();
    }
	@Override
	public void addInterceptors(InterceptorRegistry registry) {

		registry.addInterceptor(localInterceptor())
				.addPathPatterns("/v1/**")
				.excludePathPatterns("/v1/login/**/")//配置登陆接口不被拦截
				.excludePathPatterns( "/swagger-ui.html/**");//配置swagger地址不被拦截
		WebMvcConfigurer.super.addInterceptors(registry);
	}
	@Override
	public void addResourceHandlers(ResourceHandlerRegistry registry) {
		registry.addResourceHandler("swagger-ui.html")
        	.addResourceLocations("classpath:/META-INF/resources/");
		registry.addResourceHandler("/webjars/**")
        	.addResourceLocations("classpath:/META-INF/resources/webjars/");
	}
}
下面是拦截器的具体实现,里面是写你的具体业务
package com.gnayey.interceptor;

import javax.servlet.http.HttpServletRequest;
import javax.servlet.http.HttpServletResponse;
import org.springframework.web.servlet.HandlerInterceptor;
import org.springframework.web.servlet.ModelAndView;

public class InterceptorConfig implements HandlerInterceptor {
	@Autowired
	private GnayeyLoginServicegnayeyLoginService;*/
	/**
     * 进入controller层之前拦截请求
     * @param httpServletRequest
     * @param httpServletResponse
     * @param o
     * @return
     * @throws Exception
     */
    @Override
    public boolean preHandle(HttpServletRequest httpServletRequest, HttpServletResponse httpServletResponse, Object o) throws Exception {
    	//获取前端tocken
    	String token = httpServletRequest.getParameter("token");
		if(token != null) {
	    		if(token.length() > 0) {
						SchoolfellowUserLoginResVo schoolfellowUserLoginRepVo = schoolfellowLoginService.getLoginedUserInfo(token);
						if (schoolfellowUserLoginRepVo == null) {
								return false;
						} else {
								return true;
						}
				}
		}
		return false;
    }
    @Override
    public void postHandle(HttpServletRequest httpServletRequest, HttpServletResponse httpServletResponse, Object o, ModelAndView modelAndView) throws Exception {
    }
    @Override
    public void afterCompletion(HttpServletRequest httpServletRequest, HttpServletResponse httpServletResponse, Object o, Exception e) throws Exception {
    }
}
下面是DAO类,其中包含了Lombok的用法,
Lombok的用法参考:
https://www.cnblogs.com/heyonggang/p/8638374.html
package com.gnayey.entity;
import lombok.Getter;
import lombok.Setter;
public class SysUserInfoDo {
	@Getter
	@Setter
	private String id;
	@Getter
	@Setter
    private String loginName;
	@Getter
	@Setter
    private String userName;
}
下面是mapperj接口
package com.gnayey.mapper;
import org.apache.ibatis.annotations.Mapper;
import com.gnayey.entity.SysUserInfoDo;
@Mapper
public interface SysUserInfoMapper {
	/**
     * 根据用户登录名和密码查询
     * @param loginName password
     * @return
     */
	SysUserInfoDo selectByLoginNameAndPassword(@Param("loginName")String loginName, @Param("password")String password);
}
下面是MyBatis的.xml文件
<?xml version="1.0" encoding="UTF-8" ?>
<!DOCTYPE mapper PUBLIC "-//mybatis.org//DTD Mapper 3.0//EN" "http://mybatis.org/dtd/mybatis-3-mapper.dtd">
<mapper namespace="com.gnayey.mapper.SysUserInfoMapper">
	<resultMap id="sysUserInfoDo" type="com.gnayey.entity.SysUserInfoDo">
        <id column="ID" property="id" jdbcType="VARCHAR" />
        <result column="LOGINNAME" property="loginName" jdbcType="VARCHAR" />
        <result column="USERNAME" property="userName" jdbcType="VARCHAR" />
    </resultMap>
    <sql id="Base_List" >
        ID, LOGINNAME, USERNAME
    </sql>
    <select id="selectByLoginNameAndPassword" resultMap="sysUserInfoDo"  >
       SELECT
       <include refid="Base_List" />
       FROM sys_userInfo
       WHERE LOGINNAME = #{loginName}
       AND PASSWORD= #{password}
    </select>
</mapper>
下面是我们的Controller类,代码如下
package com.gnayey.controller;

import org.springframework.beans.factory.annotation.Autowired;
import org.springframework.stereotype.Controller;
import org.springframework.web.bind.annotation.RequestMapping;
import org.springframework.web.bind.annotation.RequestMethod;
import org.springframework.web.bind.annotation.RequestParam;
import org.springframework.web.bind.annotation.ResponseBody;
import com.gnayey.common.request.vo.GnayeyUserLoginResVo;
import com.gnayey.common.response.vo.ResponseData;
import com.gnayey.common.util.value.SystemCodeConstant;
import com.gnayey.service.GnayeyLoginService;
import io.swagger.annotations.ApiImplicitParam;
import io.swagger.annotations.ApiImplicitParams;
import io.swagger.annotations.ApiOperation;

@Controller
@RequestMapping("/v1/login")
public class GnayeySysUserLoginController {
	@Autowired
	private GnayeyLoginService gnayeyLoginService;
	@ApiOperation(value = "用户登陆", notes = "注意事项")
    @ApiImplicitParams({
            @ApiImplicitParam(name = "loginName", value = "登录名", required = true, paramType = "query", example = ""),
            @ApiImplicitParam(name = "password", value = "登陆密码", required = true, paramType = "query", example = "")
    })
	@RequestMapping(value="/userLogin",method=RequestMethod.POST)
	@ResponseBody
	public ResponseData userLogin(@RequestParam(value="loginName") String loginName, @RequestParam(value="password") String password) {
		GnayeyUserLoginResVo response = gnayeyLoginService.userLogion(loginName, password);
        if (response != null) {
	        return new ResponseData(SystemCodeConstant.RIGHT_CODE, response, "请求成功");
		}else{
            return new ResponseData(SystemCodeConstant.ERROR_CODE, response, "请求失败");
		}
	}
}
下面是登陆业务接口
package com.gnayey.service;
import com.gnayey.common.request.vo.GnayeyUserLoginResVo;
public interface GnayeyLoginService {
	/**
     * 用户登陆获取个人信息
     * @param loginName 用户名
     * @return
     */
    public GnayeyUserLoginResVo userLogion(String userCode, String password);
    /**
     * 从redis中获取用户的登陆信息
     * @param tocken 用户登陆tocken
     * @return
     */
    public GnayeyUserLoginResVo getLoginedUserInfoByRedis(String token);
    /**
     * 用户登出,从redis中删除用户的登陆信息
     * @param tocken 用户登陆tocken
     * @return
     */
    public void processUserLogout(String token);
    /**
     * 清楚redis中的token数据
     * @param tocken 用户登陆tocken
     * @return
     */
	void extendUserTokenTime(String token);
}
下面是接口的实现,具体业务写在这里面,有详细的注解:
package com.gnayey.service;

import java.util.HashMap;
import java.util.Map;
import org.springframework.beans.factory.annotation.Autowired;
import org.springframework.stereotype.Service;
import com.gnayey.common.request.vo.GnayeyUserLoginResVo;
import com.gnayey.common.util.Base64Util;
import com.gnayey.common.vo.GnayeyLoginUserInfoTokenVo;
import com.gnayey.entity.SysUserInfoDo;
import com.gnayey.mapper.SysUserInfoMapper;
import com.gnayey.redis.RedisClient;
@Service
public class GnayeyLoginServiceImpl implements GnayeyLoginService {
	@Autowired
	private SysUserInfoMapper sysUserInfoMapper;
	@Override
	public GnayeyUserLoginResVo userLogion(String loginName, String password) {
		String loginNameB = Base64Util.decodeData(loginName);//登陆名解密
		String passwordB = Base64Util.decodeData(password);//登陆密码解密
		SysUserInfoDo sysUserInfeoDo = sysUserInfoMapper.selectByLoginNameAndPassword(loginNameB, passwordB);
		if(sysUserInfeoDo == null) {
			return null;
		}
		//生成token,并将其写入到redis中,key值为token
		return addUserLoginInfoToRedis(sysUserInfeoDo);
	}
	@Override
	public GnayeyUserLoginResVo getLoginedUserInfoByRedis(String token) {
		GnayeyUserLoginResVo response = new GnayeyUserLoginResVo();
		RedisClient redisClient = new RedisClient();
		Map<String, String> redisUserInfo = redisClient.getHash(token);
		if(redisUserInfo.size() == 0){
			return null;
		}
		//从redis中可获取到用户的登陆信息
		response.setUserId(redisUserInfo.get(GnayeyLoginUserInfoTokenVo.REDIS_KEY_USERID));
		response.setToken(token);
		response.setLoginName(redisUserInfo.get(GnayeyLoginUserInfoTokenVo.REDIS_KEY_LOGINNAME));
		response.setUserName(redisUserInfo.get(GnayeyLoginUserInfoTokenVo.REDIS_KEY_USERNAME));
		redisClient.closeResource();//记得每次操作redis最后都必须要执行关闭方法,不然会导致资源占用,系统内存爆满
		return response;
	}
	@Override
	public void processUserLogout(String token) {
		RedisClient redisClient = new RedisClient();
		redisClient.del(token);
		redisClient.closeResource();
	}
	private GnayeyUserLoginResVo addUserLoginInfoToRedis(SysUserInfoDo sysUserInfeoDo) {
		//生成token
		String token = java.util.UUID.randomUUID().toString();
		//将token写入到redis中,key值为token
		RedisClient redisClient = new RedisClient();
		//保存至redis的用户数据
		Map<String, String> hash = new HashMap<String, String>();
		hash.put(GnayeyLoginUserInfoTokenVo.REDIS_KEY_TOKEN, token);
		hash.put(GnayeyLoginUserInfoTokenVo.REDIS_KEY_USERID, sysUserInfeoDo.getId() == null ? "":sysUserInfeoDo.getId());
		hash.put(GnayeyLoginUserInfoTokenVo.REDIS_KEY_LOGINNAME, sysUserInfeoDo.getLoginName() == null ? "":sysUserInfeoDo.getLoginName());
		hash.put(GnayeyLoginUserInfoTokenVo.REDIS_KEY_USERNAME, sysUserInfeoDo.getUserName() == null ? "":sysUserInfeoDo.getUserName());
		//将数据保存至redis数据库并设置失效时间
		redisClient.setHashAndTime(token, hash, 36000);
		redisClient.closeResource();
		//返回给前端的用户数据
		GnayeyUserLoginResVo responseVo = new GnayeyUserLoginResVo();
		responseVo.setToken(token);
		responseVo.setUserId(sysUserInfeoDo.getId());
		responseVo.setLoginName(sysUserInfeoDo.getLoginName());
		responseVo.setUserName(sysUserInfeoDo.getUserName());
		return responseVo;
	}
	@Override
	public void extendUserTokenTime(String token) {
		//延长token时间
		RedisClient redisClient = new RedisClient();
		Map<String, String> redisUserInfo = redisClient.getHash(token);
		redisClient.setHashAndTime(token, redisUserInfo, 36000);
		redisClient.closeResource();
	}
}
到这里,一个登陆的接口就完成了,其中包含了Controller交互层,Sercive业务层,Dao持久层,下来启动程序登陆swagger进行测试:

这是启动成功后显示的端口:

接下来,打开浏览器输入地址:localhost:8099/swagger-ui.html

注意,项目中用到了Base64加密,所以在swagger测试输入用户名和密码时要进行加密
base64加密解密链接:
http://tool.oschina.net/encrypt?type=3
然后点击按钮Try it out! 进行访问,结果如下:返回信息,成功

到这里就完成了用户登录接口。全部内容已经写完。
总结
SpringBoot能够快速的创建一个Spring项目,并通过注解的方式实现快速编程,易上手。同时也可以结合很多插件等功能进行业务实现,提高开发效率。
此次内容没有描述SpringBoot的全局异常捕获和事务,后面我会继续发文。