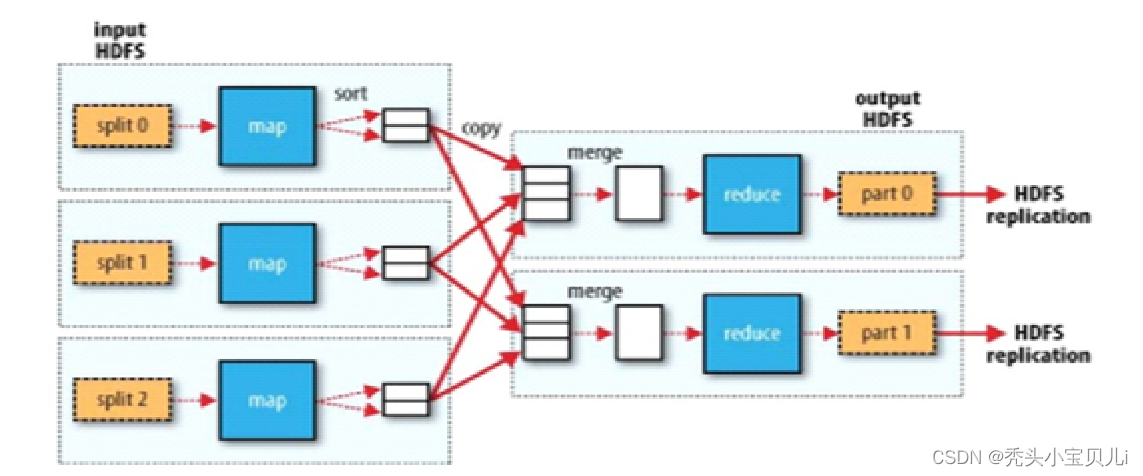
一、什么是MR?
• MapReduce将复杂的、运行于大规模集群上的并行计算过程高度地抽了两个函数:Map和Reduce。
二、为什么使用MR?(特点)
1、易于编程:只关心业务逻辑,它简单的实现一些接口,就可以完成一个分布式程序。
2、良好的扩展性:可动态的增加服务器,解决资源不够用问题。
3、高容错性:出错时转移到其他节点。
4、适合海量数据的计算。

架构总结:
数据预处理在任务开始前调用类库,将输入数据分为多个分片(split);Mapper读取自己所属的文件分片(split),将输入数据转换为kv键值对;然后根据排序将相同数据放在相同分片上,聚合得到最终结果。
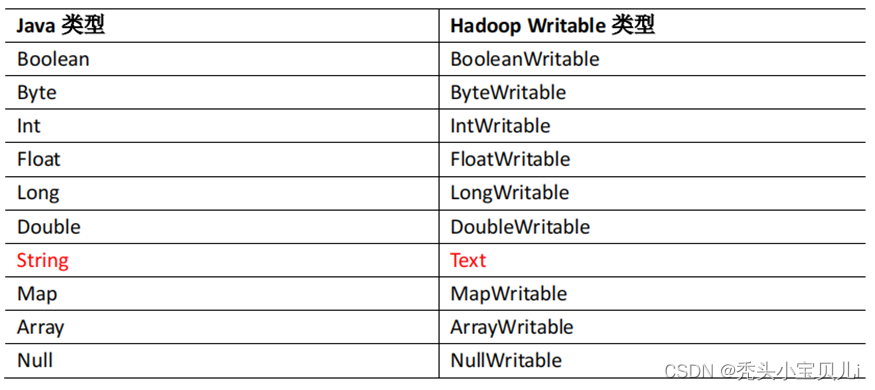
三、数据类型

四、编程规范
1、Mapper阶段
(1)用户自定义的Mapper要继承自己的父类
(2)Mapper输入的数据是k,v形式
(3)Mapper中的业务逻辑写在map中
(4)Mapper的输出数据是KV形式
(5)map()方法对每一次k,v调用一次
2、Reduce阶段
(1)用户自定义的reduce要继承自己的父类
(2)map输出的数据类型对应reduce输入的数据类型
(3)reduce的业务逻辑在reduce方法中
(4)reduceTadk进程对每一组相同k的<k,v>组调用一次reduce()方法
3、Driver阶段
相当于YARN集群的客户端,用于提交我们整个程序到YARN集群,提交的是封装了MapReduce程序相关运行参数的job对象
五、案例操作
1、mvn依赖
<dependencies>
        <dependency>
            <groupId>junit</groupId>
            <artifactId>junit</artifactId>
            <version>4.13</version>
        </dependency>
        <dependency>
            <groupId>org.apache.logging.log4j</groupId>
            <artifactId>log4j-core</artifactId>
            <version>2.8.2</version>
        </dependency>
        <!-- 辅助模块包 -->
        <dependency>
            <groupId>org.apache.hadoop</groupId>
            <artifactId>hadoop-common</artifactId>
            <version>2.7.2</version>
        </dependency>
        <!-- 包含mr -->
        <dependency>
            <groupId>org.apache.hadoop</groupId>
            <artifactId>hadoop-client</artifactId>
            <version>2.7.2</version>
        </dependency>
        <!-- hdfs -->
        <dependency>
            <groupId>org.apache.hadoop</groupId>
            <artifactId>hadoop-hdfs</artifactId>
            <version>2.7.2</version>
        </dependency>

    </dependencies>
2、log日志
log4j.rootLogger=INFO, stdout
log4j.appender.stdout=org.apache.log4j.ConsoleAppender
log4j.appender.stdout.layout=org.apache.log4j.PatternLayout
log4j.appender.stdout.layout.ConversionPattern=%d %p [%c] - %m%n
log4j.appender.logfile=org.apache.log4j.FileAppender
log4j.appender.logfile.File=target/spring.log
log4j.appender.logfile.layout=org.apache.log4j.PatternLayout
log4j.appender.logfile.layout.ConversionPattern=%d %p [%c] - %m%n
3、编写Mapper类
public class Mapper1 extends Mapper<LongWritable, Text, Text, IntWritable> {


    @Override
    protected void map(LongWritable key, Text value, Context context) throws IOException, InterruptedException {
        //获取一行字符串并用文件中所有的格式进行切割
        //试过\t和  |  切割都有问题
        String [] s = value.toString().split(",");
        //遍历数组
        for(String  str:s){
            //输出
            context.write(new Text(str),new IntWritable(1))
);
        }
    }
}
4、编写Reducer
public class Reduce1 extends Reducer<Text, IntWritable,Text,IntWritable> {
   private  IntWritable  out=new IntWritable();
    @Override
    protected void reduce(Text key, Iterable<IntWritable> values, Context context) throws IOException, InterruptedException {
        int sum=0;
        for (IntWritable value : values) {
            //把IntWritable转成int类型
            sum+=value.get();
        }

        out.set(sum);
        //key  就是map传来对的key
        context.write(key,out);
    }
}
5、编写Driver类
public class Driver1 {
    @Test
    public  void test() throws IOException, ClassNotFoundException, InterruptedException {
        //获取job
        Configuration conf=new  Configuration();

        Job job = Job.getInstance(conf);
        // 设置jar包
        job.setJarByClass(Driver1.class);
        // 关联mapper和reduce
        job.setMapperClass(Mapper1.class);
        job.setReducerClass(Reduce1.class);
        // 设置map输出出的kv类型
        job.setMapOutputKeyClass(Text.class);
        job.setMapOutputValueClass(IntWritable.class);
        //设置最终输出的kv类型
        job.setOutputKeyClass(Text.class);
        job.setOutputValueClass(IntWritable.class);
        //设置输入路径和输出路径
        FileInputFormat.setInputPaths(job,new Path("D:\\hadoop\\input"));
        FileOutputFormat.setOutputPath(job,new Path("D:\\hadoop\\output"));
        //提交job
        boolean result = job.waitForCompletion(true);
        System.exit(result ? 0 : 1);
    }
}
6、集群测试(添加build)
<build>
        <plugins>
            <plugin>
                <artifactId>maven-compiler-plugin</artifactId>
                <version>2.3.2</version>
                <configuration>
                    <source>1.8</source>
                    <target>1.8</target>
                </configuration>
            </plugin>
            <plugin>
                <artifactId>maven-assembly-plugin </artifactId>
                <configuration>
                    <descriptorRefs>
                        <descriptorRef>jar-with-dependencies</descriptorRef>
                    </descriptorRefs>
                    <archive>
                        <manifest>
     				 		<!--  这里是你自己的Driver的全路径   -->
                            <mainClass>com.lj.wordcount.DriverTest</mainClass>
                        </manifest>
                    </archive>
                </configuration>
                <executions>
                    <execution>
                        <id>make-assembly</id>
                        <phase>package</phase>
                        <goals>
                            <goal>single</goal>
                        </goals>
                    </execution>
                </executions>
            </plugin>
        </plugins>
    </build>
7、打成jar包集群运行
[
root
@hadoop
hadoop
–
2.7.2
]
sbin
/
start
–
dfs
.
sh
[
root
@hadoop
hadoop
–
2.7.2
]
$ sbin
/
start
–
yarn
.
sh
[root@hadoop hadoop-2.7.2]hadoop fs -put word.txt /input
[
root
@hadoop
hadoop
–
2.7.2
]
$ hadoop jar wc
.
jar
com
.
lj
.
wordcount
.
Driver1
/
input
/
output