Day77
ELK日志分析平台
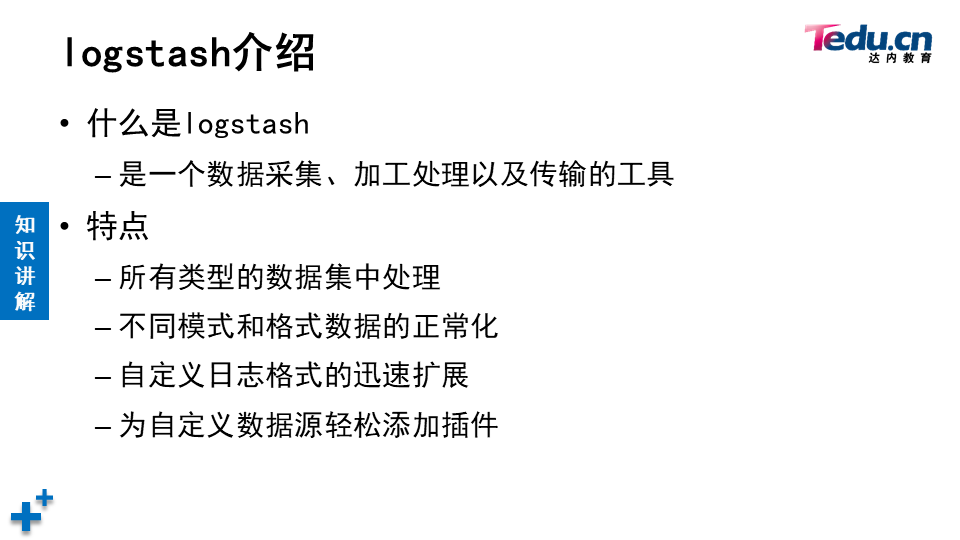

logstash安装
购买
云主机
| 主机 | IP地址 | 配置 |
|---|---|---|
| logstash | 192.168.1.47 | 最低配置2核2G |
| web | 192.168.1.48 | 最低配置1核1G |
web云主机安装
[root@web ~]# yum install -y httpd
[root@web ~]# systemctl enable --now httpd
[root@web ~]# echo "hello world" >/var/www/html/info.html
[root@web ~]# curl http://192.168.1.48/info.html
logstash云主机安装
[root@logstash ~]# vim /etc/hosts
192.168.1.41	es-0001
192.168.1.42	es-0002
192.168.1.43	es-0003
192.168.1.44	es-0004
192.168.1.45	es-0005
192.168.1.47	logstash
[root@logstash ~]# yum install -y java-1.8.0-openjdk logstash
[root@logstash ~]# touch /etc/logstash/logstash.conf
基础配置样例
[root@logstash ~]# vim /etc/logstash/logstash.conf
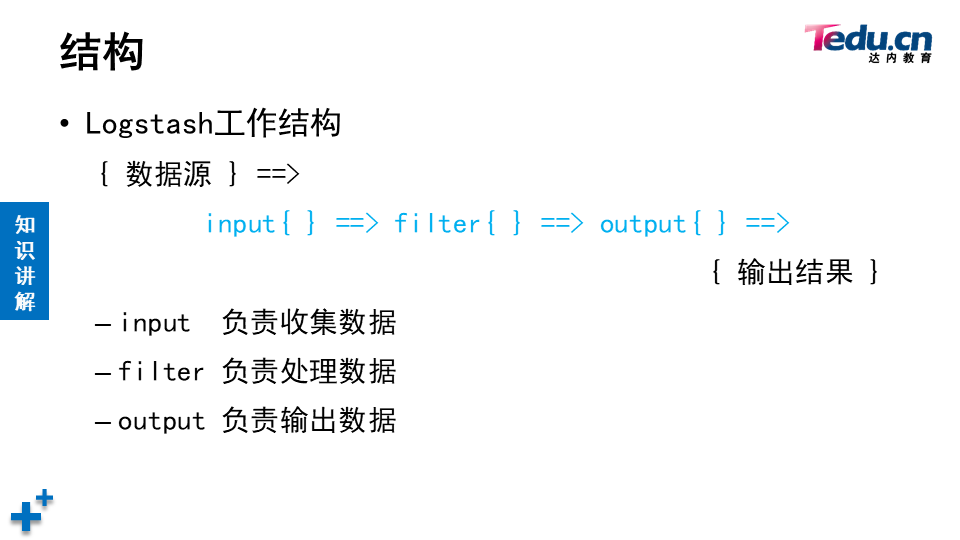
input {
stdin {}
}
filter{ }
output{
stdout{}
}
[root@logstash ~]# /opt/logstash/bin/logstash -f /etc/logstash/logstash.conf
插件与调试格式
使用json格式字符串测试 {“a”:“1”, “b”:“2”,“c”:“3”}
[root@logstash ~]# vim /etc/logstash/logstash.conf
input {
  stdin { codec => "json" }
}
filter{ }
output{
  stdout{ codec => "rubydebug" }
}
[root@logstash ~]# /opt/logstash/bin/logstash -f /etc/logstash/logstash.conf
官方手册地址
https://www.elastic.co/guide/en/logstash/current/index.html
input file插件
[root@logstash ~]# vim /etc/logstash/logstash.conf
input {
  file {
    path => ["/tmp/c.log"]
    type => "test"
    start_position => "beginning"
    sincedb_path => "/var/lib/logstash/sincedb"
  }
}
filter{ }
output{
  stdout{ codec => "rubydebug" }
}
[root@logstash ~]# rm -rf /root/.sincedb_*
[root@logstash ~]# /opt/logstash/bin/logstash -f /etc/logstash/logstash.conf
filter grok插件
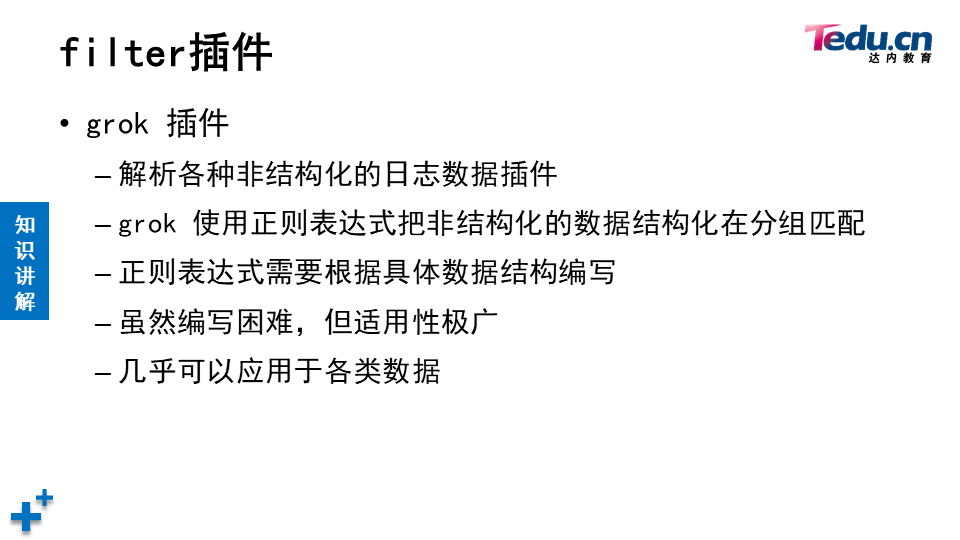
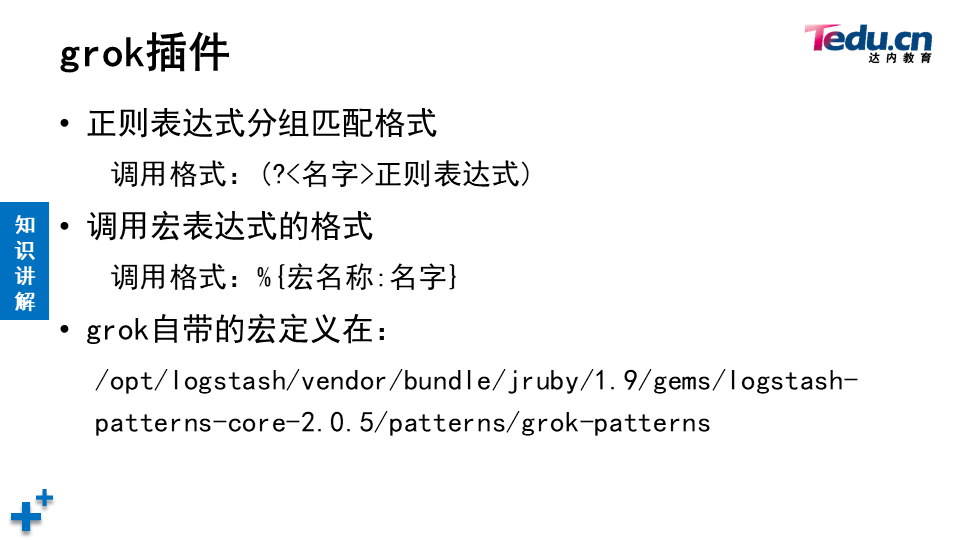
正则表达式分组匹配格式: (?<名字>正则表达式)
正则表达式宏调用格式: %{宏名称:名字}
宏文件路径
/opt/logstash/vendor/bundle/jruby/1.9/gems/logstash-patterns-core-2.0.5/patterns/grok-patterns
[root@logstash ~]# echo '192.168.1.252 - - [29/Jul/2020:14:06:57 +0800] "GET /info.html HTTP/1.1" 200 119 "-" "curl/7.29.0"' >/tmp/c.log
[root@logstash ~]# vim /etc/logstash/logstash.conf
input {
  file {
    path => ["/tmp/c.log"]
    type => "test"
    start_position => "beginning"
    sincedb_path => "/dev/null"
  }
}
filter{
  grok {
    match => { "message" => "%{COMBINEDAPACHELOG}" }
  }
}
output{
  stdout{ codec => "rubydebug" }
}
[root@logstash ~]# /opt/logstash/bin/logstash -f /etc/logstash/logstash.conf
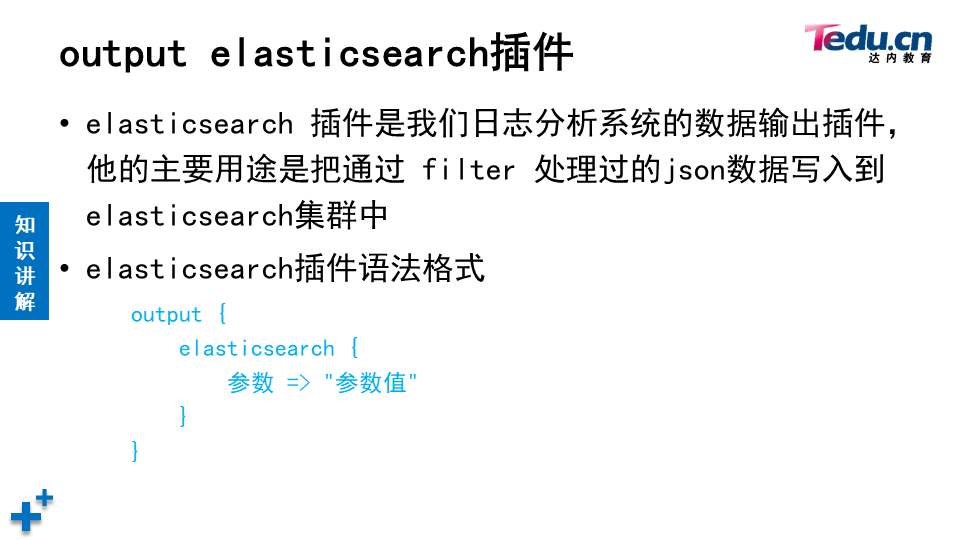
output elasticsearch插件
[root@logstash ~]# vim /etc/logstash/logstash.conf
input {
file {
path => ["/tmp/c.log"]
type => "test"
start_position => "beginning"
sincedb_path => "/dev/null"
}
}
filter{
grok {
match => { "message" => "%{COMBINEDAPACHELOG}" }
}
}
output{
stdout{ codec => "rubydebug" }
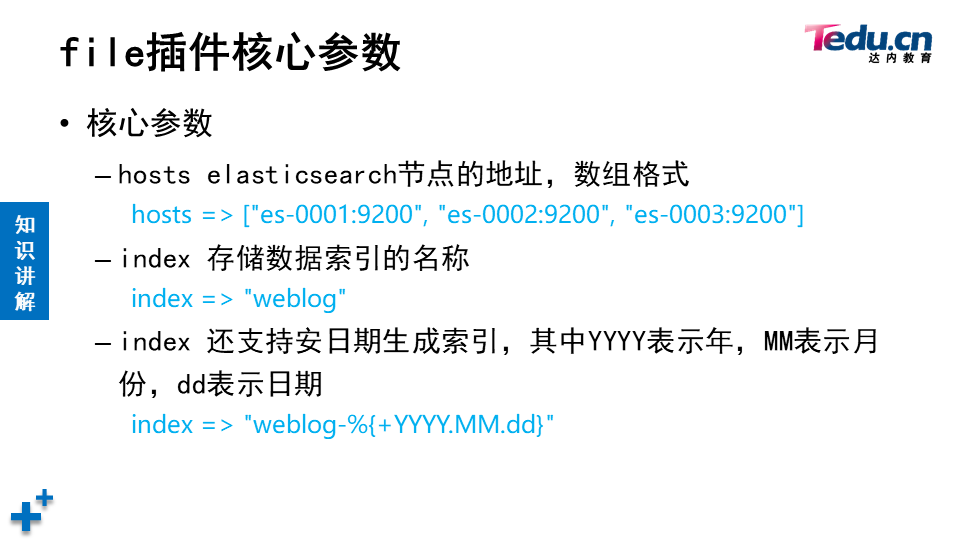
elasticsearch {
hosts => ["es-0001:9200", "es-0002:9200", "es-0003:9200"]
index => "weblog"
}
}
[root@logstash ~]# curl -XDELETE http://es-0001:9200/*
[root@logstash ~]# /opt/logstash/bin/logstash -f /etc/logstash/logstash.conf
浏览器打开 head 插件,通过 web 页面浏览验证
http://公网IP:9200/_plugin/head/
filebeat配置
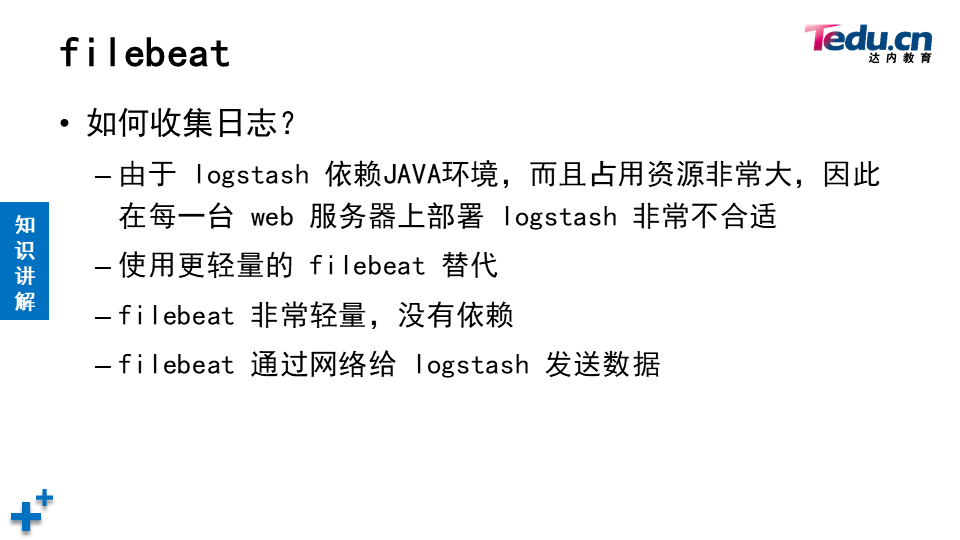
web服务安装filebeat
[root@web ~]# yum install -y filebeat
[root@web ~]# vim /etc/filebeat/filebeat.yml
15:    - /var/log/httpd/access_log
72:    document_type: apache_log
183:  #注释掉该行
188:   #注释掉该行
278: logstash:
280:   hosts: ["192.168.1.47:5044"]
[root@web ~]# grep -Pv "^\s*(#|$)" /etc/filebeat/filebeat.yml
[root@web ~]# systemctl enable --now filebeat
logstash beats插件
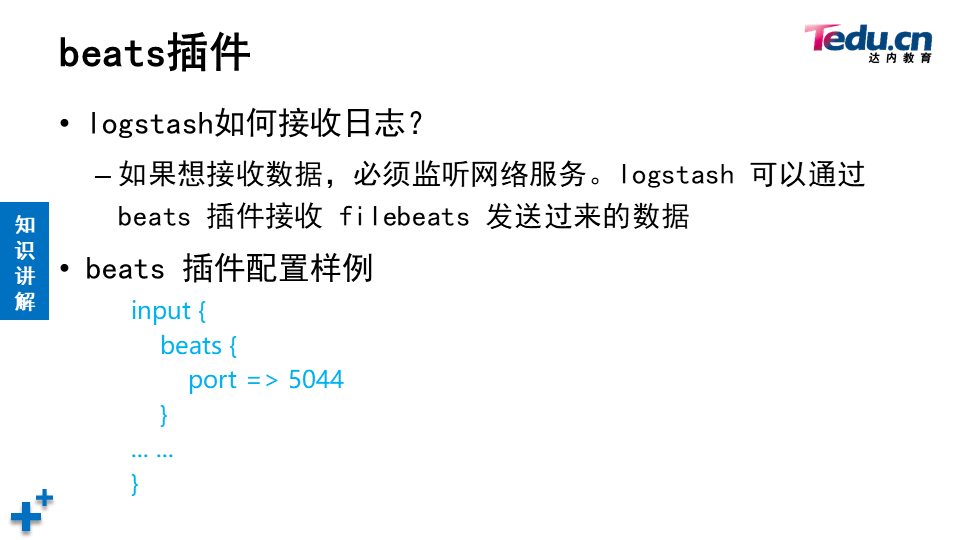
[root@logstash ~]# vim /etc/logstash/logstash.conf
input {
  file {
    path => ["/tmp/c.log"]
    type => "test"
    start_position => "beginning"
    sincedb_path => "/var/lib/logstash/sincedb"
  }
  beats {
    port => 5044
  }
}
filter{
  grok {
    match => { "message" => "%{COMBINEDAPACHELOG}" }
  }
}
output{
  stdout{ codec => "rubydebug" }
  elasticsearch {
    hosts => ["es-0001:9200", "es-0002:9200", "es-0003:9200"]
    index => "weblog"
  }
}
[root@logstash ~]# /opt/logstash/bin/logstash -f /etc/logstash/logstash.conf
访问 web 页面,浏览器打开 head 插件,通过 web 页面浏览验证
网站日志分析实战
1、停止 kibana 服务
[root@kibana ~]# systemctl stop kibana
2、清空 elasticsearch 中所有数据
[root@kibana ~]# curl -XDELETE http://es-0001:9200/*
3、配置 web 日志,获取用户真实IP 通过 ELB 把 web 服务发布公网 https://support.huaweicloud.com/elb_faq/elb_faq_0090.html
4、配置 filebeat 详见配置文件 filebeat.yml 重启服务
[root@web ~]# systemctl restart filebeat
5、配置 logstash 详见配置文件 logstash.conf 启动服务
[root@logstash ~]# /opt/logstash/bin/logstash -f /etc/logstash/logstash.conf
6、配置 kibana 启动服务,通过web页面配置 kibana
[root@kibana ~]# systemctl start kibana
常见错误
使用通配符删除报错
[root@es-0001 ~]# curl -XDELETE http://localhost:9200/*
{"error":{"root_cause":[{"type":"illegal_argument_exception","reason":"Wildcard expressions or all indices are not allowed"}],"type":"illegal_argument_exception","reason":"Wildcard expressions or all indices are not allowed"},"status":400}
# 由于设置了destructive_requires_name 参数,不允许使用通配符
# 查看及解决方式
[root@es-0001 ~]# curl -XGET http://es-0001:9200/_cluster/settings?pretty
{
  "persistent" : {
    "action" : {
      "destructive_requires_name" : "true"
    }
  },
  "transient" : { }
}
[root@es-0001 ~]# curl -XPUT http://localhost:9200/_cluster/settings -d '
{
  "persistent": {
      "action": {
        "destructive_requires_name": "false"
      }
   }
}'
[root@es-0001 ~]# curl -XDELETE http://localhost:9200/*
{"acknowledged":true}
  "transient" : { }
}
[root@es-0001 ~]# curl -XPUT http://localhost:9200/_cluster/settings -d '
{
  "persistent": {
      "action": {
        "destructive_requires_name": "false"
      }
   }
}'
[root@es-0001 ~]# curl -XDELETE http://localhost:9200/*
{"acknowledged":true}