目录
前言
交叉验证的由来:在机器学习的过程中,我们不能将全部数据都用于数据的模型训练,否则会导致我们没有数据集对该模型进行验证,无法评估模型的预测效果。
一、交叉验证(Cross-Validation)
众所周知,模型训练的数据量越大时,通常训练出来的模型效果会越好,所以如何充分利用我们手头的数据呢?
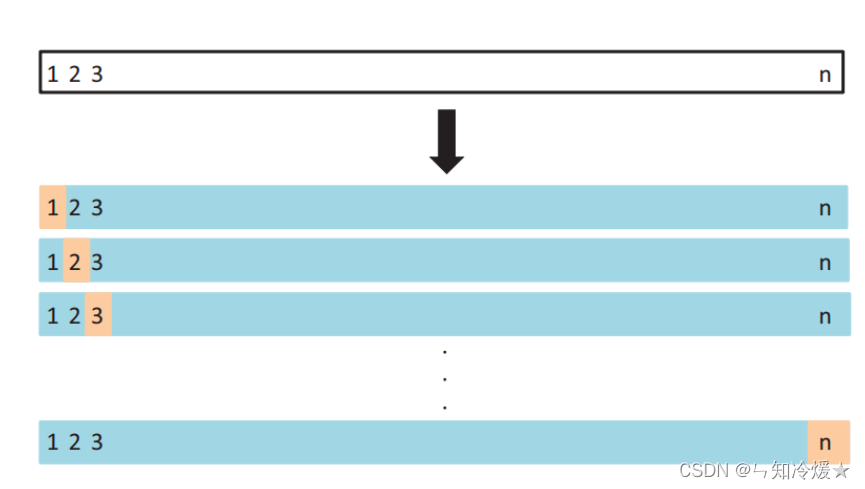
1-1、LOOCV(Leave-One-Out Cross Validation)(留一交叉验证)
这个方法是将数据集分为训练集和测试集,只用一个数据作为测试集,其它的数据都作为训练集,并将此步骤重复N次。

结果就是我们训练了n个模型,每次都得到一个MSE,计算最终的MSE就是将这n个MSE取平均。
缺点是计算量太大。
1-2、K-fold Cross Validation
为了解决LOOCV计算量太大的问题,我们提出了K折交叉验证,测试集不再只是包含一个数据,而是包含多个数据,具体数目根据K的选取而决定,比如说K=5。即:
1、将所有数据集分为5份。
2、不重复地每次取其中一份作为测试集,其它四份做训练集来训练模型,之后计算该模型在测试集上的MSE
3、5次的MSE取平均,就得到最后的MSE。
优点
:
1、相比于LOOCV,K折交叉验证的计算量小了很多,而且和LOOCV估计很相似,效果差不多
2、K折交叉验证可以有效的避免过拟合和欠拟合的发生。
1-3、k的选取
根据经验,k一般都选择为5或者是10。
也可以通过
网格搜索
来确定最佳的参数
1-4、k折交叉验证的作用
1、可以有效的避免过拟合的情况
2、在各种比赛的过程中,常常会遇到数据量不够大的情况,那么这种技巧可以帮助提高精度!
二、K折交叉验证实战。
2-1、K折交叉验证实战
# 导入包
from sklearn.model_selection import KFold
import numpy as np
# 构建数据集
X = np.arange(24).reshape(12,2)
print(X)
# KFold()
# 参数:
# n_splits: 分为几折交叉验证
# shuffle: 是否随机,设置为True后每次的结果都不一样。
# random_state: 设置随机因子,设置了这个参数之后,每次生成的结果是一样的,而且设置了random_state之后就没必要设置shuffle了。

kf = KFold(n_splits=3,shuffle=True)
for train,test in kf.split(X):
    # 返回值是元组,训练集和验证集组成的元组
    print('%s %s' % (train, test))
输出
:
[[ 0 1]
[ 2 3]
[ 4 5]
[ 6 7]
[ 8 9]
[10 11]
[12 13]
[14 15]
[16 17]
[18 19]
[20 21]
[22 23]]
[ 0 1 2 3 8 9 10 11] [4 5 6 7]
[ 0 4 5 6 7 8 9 10] [ 1 2 3 11]
[ 1 2 3 4 5 6 7 11] [ 0 8 9 10]
三、使用StratifiedKFold(分层K折交叉验证器)实现分层抽样
Tips
:使用StratifiedKFold可以实现分层抽样方法,StratifiedKFold是K-fold的变种。(解决训练集和测试集分布不一致的问题)
import numpy as np
from sklearn.model_selection import StratifiedKFold
X = np.array([[1, 2], [3, 4], [1, 2], [3, 4], [5, 6], [7, 8], [5, 6], [7, 8]])
y = np.array([0, 0, 1, 1, 2, 2, 3, 3])
skf = StratifiedKFold(n_splits=2).split(X, y)
#c= skf.get_n_splits(X, y)

for train_index, test_index in skf:
     print("TRAIN:", train_index, "TEST:", test_index)
     X_train, X_test = X[train_index], X[test_index]
     y_train, y_test = y[train_index], y[test_index]
# 注意:这里输出的是索引,想输出分割后的结果,直接输出X_train,X_test ,y_train,y_test 就可以。
# 可以看到分割后训练集和测试集的分布是相同的。
输出
:
TRAIN: [1 3 5 7] TEST: [0 2 4 6]
TRAIN: [0 2 4 6] TEST: [1 3 5 7]
直接使用KFold来输出
import numpy as np
from sklearn.model_selection import StratifiedKFold
X = np.array([[1, 2], [3, 4], [1, 2], [3, 4], [5, 6], [7, 8], [5, 6], [7, 8]])
y = np.array([0, 0, 1, 1, 2, 2, 3, 3])
skf = KFold(n_splits=2).split(X, y)
#c= skf.get_n_splits(X, y)

for train_index, test_index in skf:
     print("TRAIN:", train_index, "TEST:", test_index)
     X_train, X_test = X[train_index], X[test_index]
     y_train, y_test = y[train_index], y[test_index]
     print(X_train, y_train)
     print(X_test, y_test)
     # 可以看到分布是不均匀的。
输出
:
TRAIN: [4 5 6 7] TEST: [0 1 2 3]
[[5 6]
[7 8]
[5 6]
[7 8]] [2 2 3 3]
[[1 2]
[3 4]
[1 2]
[3 4]] [0 0 1 1]
TRAIN: [0 1 2 3] TEST: [4 5 6 7]
[[1 2]
[3 4]
[1 2]
[3 4]] [0 0 1 1]
[[5 6]
[7 8]
[5 6]
[7 8]] [2 2 3 3]
参考文章
【机器学习】Cross-Validation(交叉验证)详解
.
交叉验证(Cross Validation)
.
python 利用sklearn.cross_validation的KFold构造交叉验证数据集
.
K折交叉验证法原理及python实现
.
sklearn官方文档
.
总结
每天中午都睡不醒,很烦。