上一篇:
Spring源码解析(3)——register注册配置类
上一篇我们讲到执行完
register()
方法,
	public AnnotationConfigApplicationContext(Class<?>... annotatedClasses) {
		// 1. 首先初始化Spring的7个内置Bean后置处理器,并放到 DefaultListableBeanFactory 类型的对象 beanFactory 中
		// 2. 创建Spring的注解解析器 Component
		this();
		// 传入的配置类annotatedClasses,生成BeanDefinition,然后将BeanDefinition注册到DefaultListableBeanFactory 类型的对象 beanFactory 中
		register(annotatedClasses);
		// 刷新容器
		refresh();
	}
下面我们来进入到Spring非常重要的环节,进入
refresh()
方法。
1.
refresh
refresh
在进入
refresh()
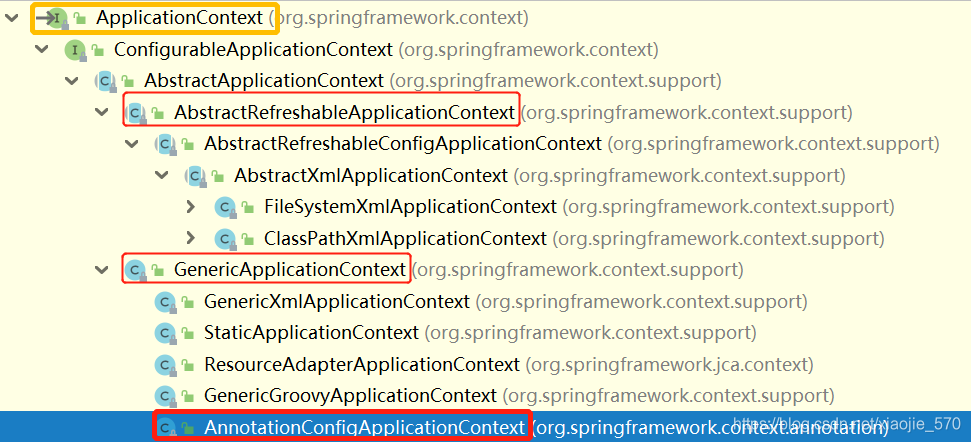
方法之前,我们先看看
AnnotationConfigApplicationContext
类的类结构

ApplicationContext
接口有12个实现类和一个子接口,这么多实现类中只有
AbstractApplicationConext
类中实现了
refresh
方法,其他子类没有重写该方法。因此,我们debug的时候会直接跳到到
AbstractApplicationConext
中。
	public void refresh() throws BeansException, IllegalStateException {
		synchronized (this.startupShutdownMonitor) {
			// 容器刷新前的预处理工作,初始化一些属性的设置:context、验证一些属性信息
			prepareRefresh();

			//  获取一个新的beanFactory(经过this()和register()处理的beanFactory),并给beanFactory设置Id。
			// obtainFreshBeanFactory()返回的beanFactory类型是DefaultListableBeanFactory,ConfigurableListableBeanFactory 是DefaultListableBeanFactory的接口
			ConfigurableListableBeanFactory beanFactory = obtainFreshBeanFactory();

			// 对beanFactory进行一些设置:设置类加载器、支持表达式解析器、添加BeanPostProcessor等
			prepareBeanFactory(beanFactory);

			try {
				// BeanFactory准备工作完成后进行的后置处理工作
				// 子类(比如web的ApplicationContext)通过重写这个方法来再BeanFactory创建并预准备完成后做进一步的设置,默认为空方法。.
				postProcessBeanFactory(beanFactory);

				// 解析@Configuration、@Component,@ComponentScan,@Import,@ImportResource等注解,将@Configuration注解对应的类注册到beanFactory中
				invokeBeanFactoryPostProcessors(beanFactory);

				// 注册beanFactory中扩展了BeanPostProcessor的bean.
				// AutowiredAnnotationBeanPostProcessor(处理被@Autowired注解修饰的bean并注入)
				// RequiredAnnotationBeanPostProcessor(处理被@Required注解修饰的方法)
				//CommonAnnotationBeanPostProcessor(处理@PreDestroy、@PostConstruct、@Resource等多个注解的作用)等。
				registerBeanPostProcessors(beanFactory);

				// 初始化MessageSource组件(做消息绑定、消息解析)
				initMessageSource();

				// 初始化事件派发器.
				initApplicationEventMulticaster();

				// 在容器刷新的时候可以自定义逻辑(子类自己去实现逻辑).
				onRefresh();

				// 给容器中所有项目里面的ApplicationListener 注册进来
				registerListeners();

				// 初始化所有剩下的非懒加载的单实例Bean
				// 实例化的过程各种BeanPostProcessor开始起作用
				finishBeanFactoryInitialization(beanFactory);

				// 清除上下文资源缓存,发布ContextRefreshedEvent事件告知对应的ApplicationListener进行响应的操作
				finishRefresh();
			}

			catch (BeansException ex) {
				if (logger.isWarnEnabled()) {
					logger.warn("Exception encountered during context initialization - " +
							"cancelling refresh attempt: " + ex);
				}

				// Destroy already created singletons to avoid dangling resources.
				destroyBeans();

				// Reset 'active' flag.
				cancelRefresh(ex);

				// Propagate exception to caller.
				throw ex;
			}

			finally {
				// Reset common introspection caches in Spring's core, since we
				// might not ever need metadata for singleton beans anymore...
				resetCommonCaches();
			}
		}
	}
以上就是
refresh
方法的整体流程,代码很清晰,一共有12个步骤,其中有三个步骤是非常重要的:
-
invokeBeanFactoryPostProcessors(beanFactory);
-
registerBeanPostProcessors(beanFactory);
-
finishBeanFactoryInitialization(beanFactory);
接下来,会具体的分析
refresh
中每一个方法的源码。
版权声明:本文为xiaojie_570原创文章,遵循 CC 4.0 BY-SA 版权协议,转载请附上原文出处链接和本声明。