wiringOP安装方法
- 下载wiringOP 的代码
apt update
apt -y install git
git clone https://github.com/orangepi-xunlong/wiringOP
- 编译wiringOP
cd wiringOP
./build clean
./build
-
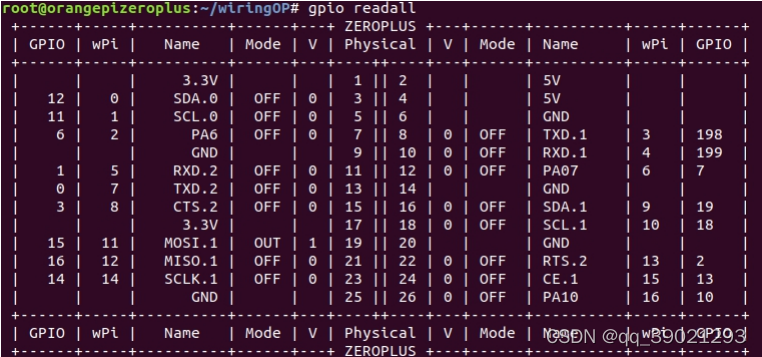
测试
gpio readall
命令的输出如下
OrangePi.GPIO安装方法
官方版本 OPi.GPIO-0.5.2
#明显看出来是python3.6
root@orangepi:~# whereis python
python: /usr/bin/python3.6 /usr/bin/python3.6m /usr/lib/python3.7 /usr/lib/python3.6 /usr/lib/python2.7 /etc/python3.6 /usr/local/lib/python3.6
#先安装python3.6对应的pip3
root@orangepi:~# sudo apt-get install python3-pip
#根据官方文档安装:
root@orangepi:~# sudo pip3 install --upgrade OPi.GPIO
#官方OPi.GPIO 版本为 OPi.GPIO-0.5.2
非官方版本 OPi.GPIO-0.6.6
1.安装python 开发包,和git ,安装过的可以忽略
sudo apt-get install python3-dev git
如果python3-dev安装失败,请参考:
https://www.cnblogs.com/ymjyqsx/p/6194968.html
2.下载代码
git clone https://github.com/Pako2/OrangePi.GPIO.git
cd ./OrangePi.GPIO
3.编译安装
sudo python3 setup.py install --force-h5 #使用此方式失败
# H6是芯片型号 需要指定
#如果编译失败,python 请试下
sudo python3 setup.py install_lib #可以编译成功
帮助文档
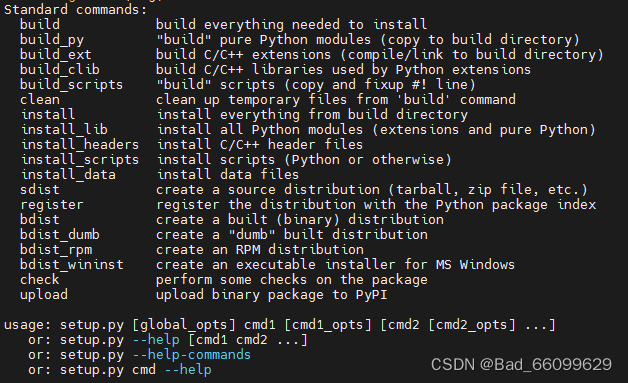
翻译后:
  build            (构建安装所需的一切) build everything needed to install
  build_py         “构建”纯Python模块(复制到构建目录)"build" pure Python modules (copy to build directory)
  build_ext        构建C/C++扩展(编译/链接到构建目录)build C/C++ extensions (compile/link to build directory)
  build_clib       构建Python扩展使用的C/C++库 build C/C++ libraries used by Python extensions
  build_scripts    “构建”脚本(复制和修复#!行)"build" scripts (copy and fixup #! line)
  clean            从“生成”命令清除临时文件 clean up temporary files from 'build' command
  install          从构建目录安装所有内容 install everything from build directory
  install_lib      安装所有Python模块(扩展和纯Python)install all Python modules (extensions and pure Python)
  install_headers  安装C/C++头文件 install C/C++ header files
  install_scripts  安装脚本(Python或其他)install scripts (Python or otherwise)
  install_data     安装数据文件 install data files
  sdist            创建源发行版(tarball、zip文件等)create a source distribution (tarball, zip file, etc.)
  register         使用Python包索引注册发行版 register the distribution with the Python package index
  bdist            创建一个内置(二进制)发行版 create a built (binary) distribution
  bdist_dumb       创建一个“哑”构建的发行版 create a "dumb" built distribution
  bdist_rpm        创建一个RPM发行版 create an RPM distribution
  bdist_wininst    为MS Windows创建可执行安装程序 create an executable installer for MS Windows
  check            对包执行一些检查 perform some checks on the package
  upload           将二进制软件包上载到 PyPIupload binary package to PyPI
python调用例子
blink_led.py
#!/usr/bin/env python
# -*- coding: utf-8 -*-

import OPi.GPIO as GPIO
from time import sleep          # this lets us have a time delay

GPIO.setboard(GPIO.PCPCPLUS)    # Orange Pi PC board
GPIO.setmode(GPIO.BOARD)        # set up BOARD BCM numbering
GPIO.setup(7, GPIO.OUT)         # set BCM7 (pin 26) as an output (LED)

try:
    print ("Press CTRL+C to exit")
    while True:
        GPIO.output(7, 1)       # set port/pin value to 1/HIGH/True
        sleep(0.1)
        GPIO.output(7, 0)       # set port/pin value to 0/LOW/False
        sleep(0.1)

        GPIO.output(7, 1)       # set port/pin value to 1/HIGH/True
        sleep(0.1)
        GPIO.output(7, 0)       # set port/pin value to 0/LOW/False
        sleep(0.1)

        sleep(0.5)

except KeyboardInterrupt:
    GPIO.output(7, 0)           # set port/pin value to 0/LOW/False
    GPIO.cleanup()              # Clean GPIO
    print ("Bye.")
并测试针脚电压变化后的响应情况
# !/usr/bin/env python3

import OPi.GPIO as GPIO #引入刚刚我们安装的GPIO包
import time

touchPin = 5 #测试的针脚

# 定义一个回调函数,当检测到指定口的电压出现变化时触发
def getResonse(self):
    print("getResonse")
    if GPIO.input(touchPin)==1:
        print("Rising")
    else:
        print("Falling")

GPIO.setboard(GPIO.LITE2) #指定开发板型号
GPIO.setmode(GPIO.BOARD) #指定使用 BOARD 编号系统
GPIO.setup(touchPin, GPIO.IN) #设置为输入模式

GPIO.add_event_detect(touchPin,GPIO.BOTH,callback=getResonse,bouncetime=300)  #注册一个检测电压改变事件

print('开始检测')

#开启循环防止进程结束
runTime=0
while True:
    time.sleep(4)  ##进行挂起4秒
    print("running")
    runTime=runTime+1
    if runTime>5:
        break

GPIO.cleanup() #脚本结束后进行清理
print('Finish')
例子:mode_soc.py
#!/usr/bin/env python
# -*- coding: utf-8 -*-

import OPi.GPIO as GPIO
from time import sleep          # this lets us have a time delay

GPIO.setboard(GPIO.ZERO)        # Orange Pi Zero board
GPIO.setmode(GPIO.SOC)          # set up SOC numbering

sled = GPIO.PA+17               # Status led is on PA17
GPIO.setup(sled, GPIO.OUT)      # set PA17 as an output (Status led of board)

try:
  while True:
    GPIO.output(sled, 1)        # set port/pin value to 1/HIGH/True
    sleep(0.1)
    GPIO.output(sled, 0)        # set port/pin value to 0/LOW/False
    sleep(0.1)
    GPIO.output(sled, 1)        # set port/pin value to 1/HIGH/True
    sleep(0.1)
    GPIO.output(sled, 0)        # set port/pin value to 0/LOW/False
    sleep(0.5)

except KeyboardInterrupt:
  GPIO.output(sled, 0)
  GPIO.cleanup()                # clean up after yourself
  print ("Bye.")
例子:opi_func.py
#!/usr/bin/env python
# -*- coding: utf-8 -*-

import OPi.GPIO as GPIO
from time import sleep

GPIO.setboard(GPIO.ZERO)
GPIO.setmode(GPIO.BOARD)

print(GPIO.gpio_function(3))
sleep(0.1)
GPIO.setup(3, GPIO.IN)
sleep(0.1)
print(GPIO.gpio_function(3))
sleep(0.1)
GPIO.cleanup()
例子:pull_up_down.py
#!/usr/bin/env python
# -*- coding: utf-8 -*-

import OPi.GPIO as GPIO
from time import sleep          # this lets us have a time delay

GPIO.setboard(GPIO.ZERO)        # Orange Pi Zero board
GPIO.setmode(GPIO.BOARD)        # set up BOARD GPIO numbering
GPIO.setup(15, GPIO.IN, pull_up_down=GPIO.PUD_OFF)    # set pin 15 as input (button)
GPIO.setup(11, GPIO.OUT)        # set pin 11 as an output (LED)

try:
    while True:                 # this will carry on until you hit CTRL+C
        if GPIO.input(15):      # if pin 15 == 1
            print "Port 15 is 1/HIGH/True - LED ON"
            GPIO.output(11, 1)  # set port/pin value to 1/HIGH/True
        else:
            print "Port 15 is 0/LOW/False - LED OFF"
            GPIO.output(11, 0)  # set port/pin value to 0/LOW/False
        sleep(0.1)              # wait 0.1 seconds

finally:                        # this block will run no matter how the try block exits
    print("Finally")
    GPIO.output(11, 0)
    GPIO.cleanup()              # clean up after yourself
例子:pwm_dutycycle.py
#!/usr/bin/env python
# -*- coding: utf-8 -*-

import OPi.GPIO as GPIO
from time import sleep

GPIO.setboard(GPIO.ZERO)
GPIO.setmode(GPIO.BOARD)    # set up BOARD BCM numbering
GPIO.setup(26, GPIO.OUT)    # set pin 26 as an output (LED)

p = GPIO.PWM(26, 10)        # new PWM on channel=26 frequency=10Hz
p.start(0)
try:
    while 1:
        for dc in range(0, 101, 5):
            p.ChangeDutyCycle(dc)
            sleep(0.1)
        for dc in range(100, -1, -5):
            p.ChangeDutyCycle(dc)
            sleep(0.1)
except KeyboardInterrupt:
    pass
p.stop()
GPIO.output(26, 0)
GPIO.cleanup()
例子:simple_pwm.py
#!/usr/bin/env python
# -*- coding: utf-8 -*-

import OPi.GPIO as GPIO
from time import sleep

GPIO.setboard(GPIO.ZERO)
GPIO.setmode(GPIO.BOARD)
GPIO.setup(26, GPIO.OUT)

p = GPIO.PWM(26, 0.5)               # channel=26 frequency=0.5Hz
p.start(1)
raw_input('Press return to stop:')  # use input for Python 3
p.stop()
GPIO.cleanup()
版权声明:本文为qq_39021293原创文章,遵循 CC 4.0 BY-SA 版权协议,转载请附上原文出处链接和本声明。