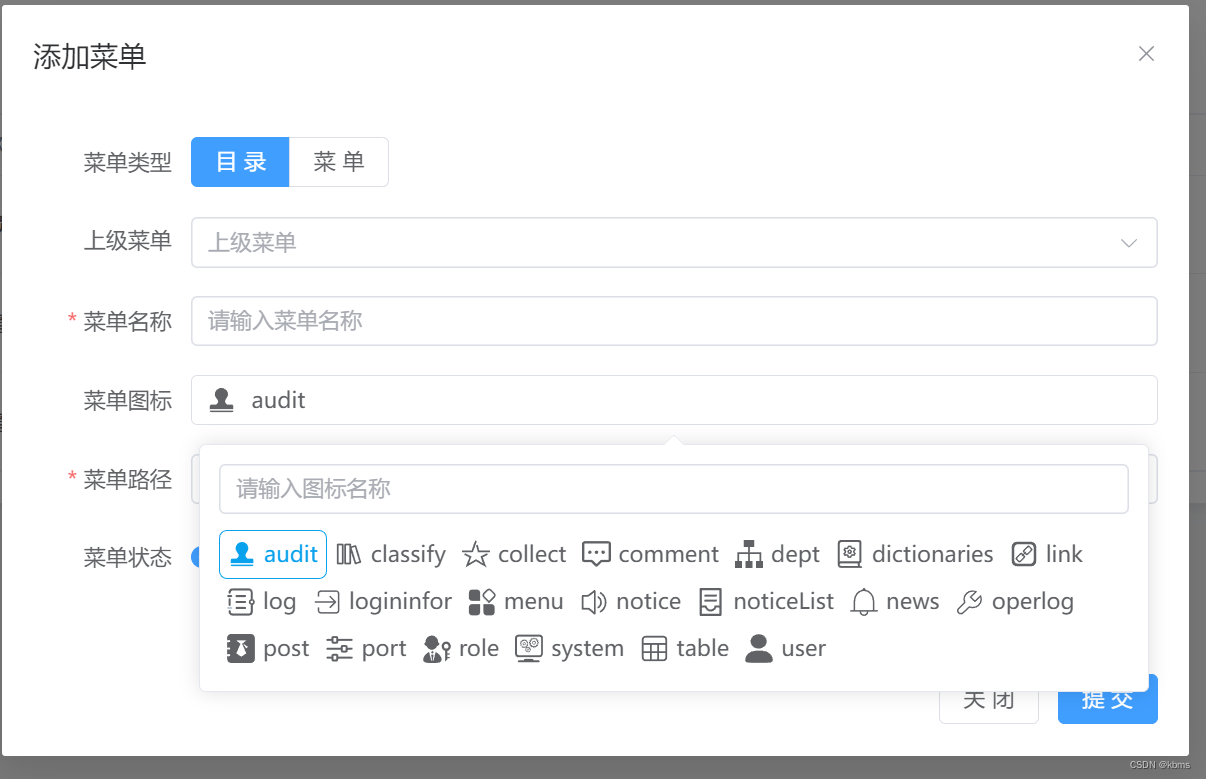
在日常的开发中,element plus中的icon图标可能无法满足开发需求,需要用到自定义图标,闲暇之际,封装了一个自定义图标选择器,如有不足欢迎指正~
一、效果展示

二、使用步骤
1.安装
vite
-plugin-svg-icons以使用svg图片
npm i vite-plugin-svg-icons -D
//或者
yarn add vite-plugin-svg-icons -D
2.在vite.config.ts中配置
import {resolve} from 'path'
import { createSvgIconsPlugin } from 'vite-plugin-svg-icons';

export default defineConfig({
    plugins: [
        vue(),
        createSvgIconsPlugin({
            // 指定需缓存的图标文件夹
            iconDirs: [resolve(process.cwd(), 'src/icons/svg')],
            // 指定symbolId格式
            symbolId: 'icon-[dir]-[name]'
        })
    ]
})
3.在main.ts中引入脚本
//引入vite-plugin-svg-icons的脚本
import 'virtual:svg-icons-register'
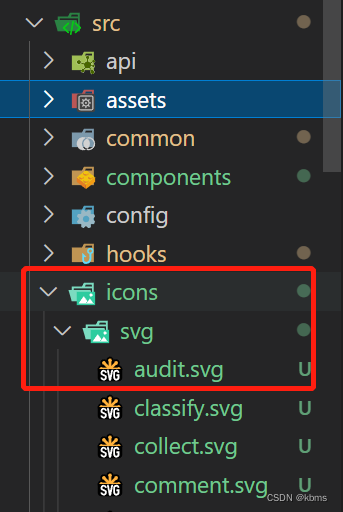
4.创建svg文件夹保存svg图标
我是从iconfont里面下载自己需要的svg图标,如图:

5.封装组件
参考路径:src\components\svgIcon\index.vue
<template>
    <svg
        aria-hidden="true"
        class="svg-icon"
        :style="`width:${size};height:${size}`">
        <use :xlink:href="symbolId" :fill="color"/>
    </svg>
</template>

<script setup lang="ts">
import {computed} from 'vue'

const props = defineProps({
    prefix: {
        type: String,
        default: 'icon'
    },
    iconClass: {
        type: String,
        default:''
    },
    color: {
        type: String,
        default:''
    },
    size: {
        type: String,
        default: '18px'
    }
})

const symbolId = computed(() => `#${props.prefix}-${props.iconClass}`)

</script>

<style lang="scss" scoped>
.svg-icon {
    fill: currentColor;//currentColor变量表示当前图标color值
}
</style>
6.使用组件
<template>
    <SvgIcon icon-class="user" :color="color">
</template>

<script setup lang="ts">
//如需要更改图标颜色,直接color传参即可
import { ref } from 'vue'
const color = ref<string>('#0aa1ed')
</script>
注意:如果需要更改图标颜色需要将下载的每个.svg图标中path路径里所有的“fill=’*****(颜色值)’”直接删除,传参绑定color即可,如上
。
7.创建图片选择器组件并使用
参考路径:src\view\system\menu\components\iconSelect.vue,子组件部分代码如下:
<template>
    <el-popover
        placement="bottom"
        width="40%"
        v-model:visible="showPopover"
        trigger="click">
        <template #reference>
            <div class="iconItem">
                <div v-if="icon">
                    <SvgIcon :icon-class="icon" class="svgIcon" />
                    <span class="colors">{{icon}}</span>
                </div>
                <div v-else>
                    <img src="../../../../icons/select.png" alt="">
                    <span>请选择图标</span>
                </div>
            </div>
        </template>
        <div class="search">
            <div class="search_input">
                <el-input
                     placeholder="请输入图标名称"
                    v-model="keyword"
                    @input="searchKw"
                    @blur="searchKw"
                    @clear="clearIconPpopver"
                    clearable >
                </el-input>
            </div>
            <div class="search_view" >
                <div v-for="(item,index) in menuIcons" :key="index" @click="changeIcons(item)">
                    <SvgIcon :icon-class="item"  />
                    <span>{{item}}</span>
                </div>
            </div>
        </div>
    </el-popover>
</template>


<script setup lang="ts">
import { ElPopover, formEmits } from 'element-plus'
import { computed, reactive, watch, ref, onMounted } from 'vue'
import { menuIcon } from '@/common/menuIcons'

const props = defineProps({
    icon:{
        type:String,
        default:''
    }
})

const menuIcons = ref([])
const icon = ref<string>()
const showPopover = ref<boolean>(false)
const keyword = ref<string>('')
// 搜索图标
const searchKw = () => {
    if(!menuIcons.value) return
    let list = menuIcons.value.filter(item => {
        return item.indexOf(keyword.value) >= 0
    })
    menuIcons.value = list
}

onMounted(() => {menuIcons.value = menuIcon})

const emit = defineEmits(['selected'])

// 选择图标
const changeIcons = ( item: string ) => {
    icon.value = item
    keyword.value = ''
    showPopover.value = false
    emit('selected',icon.value)
}

// 关闭
const clearIconPpopver = () => {
    keyword.value = ''
    menuIcons.value = []
}

watch([ keyword, ()=>props.icon],( newVal, oldVal ) => {
    icon.value = newVal[1]
    if(!keyword.value) menuIcons.value = menuIcon
    let list = menuIcons.value.filter(item => {
        return item.indexOf(keyword.value) >= 0
    })
    menuIcons.value = list
},{immediate:true})

</script>
menuIcons文件:
参考路径:src\common\menuIcons.js
//下载的svg图标名称
export const menuIcon = [
    'audit',
    'classify',
    'collect',
    'comment',
    'dept',
    'dictionaries',
    'link',
    'log',
    'logininfor',
    'menu',
    'notice',
    'noticeList',
    'news',
    'operlog',
    'post',
    'port',
    'role',
    'system',
    'table',
    'user',
     //.....
]
父组件使用:
参考路径:src\view\system\menu\index.vue
<template>
    <el-form>
        //....
        <el-form-item label="菜单图标" prop="icon">
           <IconSelect  :icon="formMsg.icon" @selected="selected" />
        </el-form-item>
        //...
    </el-form>
</template>

<script setup lang="ts">
import IconSelect from './iconSelect.vue'
import { reactive } from 'vue'

const formMsg = reactive({
    icon:'',//菜单图标
})
const selected = (val) => {formMsg.icon = val}
</script>
总结
以上就是自定义图标选择器封装的全部内容,下载图标后即可直接使用,第一次写文章,如有不足欢迎指正~。
版权声明:本文为m0_53582519原创文章,遵循 CC 4.0 BY-SA 版权协议,转载请附上原文出处链接和本声明。