项目说明:本项目通过esp8266向服务器发送post请求,格式为json,将得到的数据进行sha256加密成hash值,输出结果
前期试错:一开始用AIThinkerIDE_1.5版本的开发工具,各种报错,然后换0.5版本,跟着教程(参考https://blog.csdn.net/qq_38211182/article/details/104826934)执行demo,可以运行。之后写http请求,可以申请get请求,但是post请求格式2.2版本sdk没有相应例程。
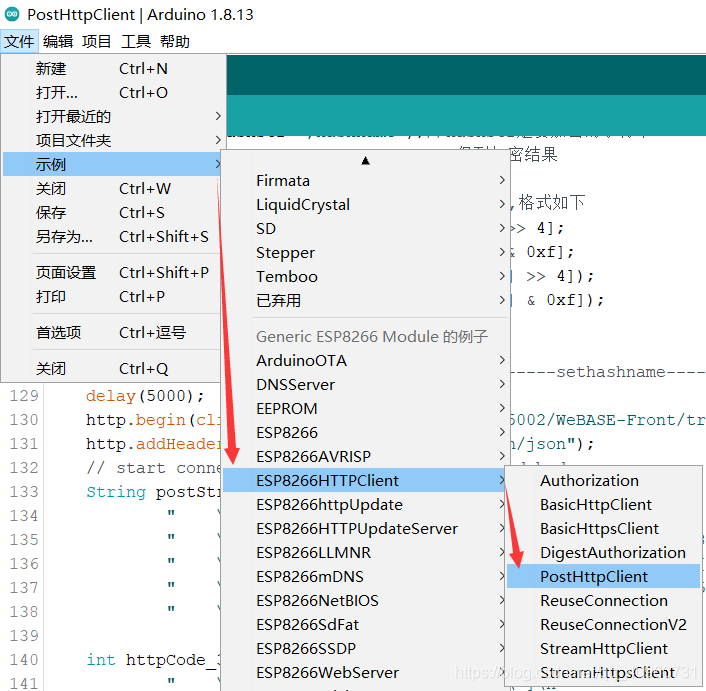
在他人推荐下(esp8266群:677728648)使用了arduino开发,过程是安装arduino,安装sep8266模板,选择示例,在此基础上开发。
1.安装arduino
-
安装esp8266模板支持
参考链接:https://blog.csdn.net/qq_33114231/article/details/53975421?ops_request_misc=&request_id=&biz_id=102&utm_term=arduino%25E7%2583%25A7%25E5%25BD%2595%25E7%25A8%258B%25E5%25BA%258F%25E5%2588%25B08266&utm_medium=distribute.pc_search_result.none-task-blog-2~all~sobaiduweb~default-2-53975421.nonecase -
安装sha256库支持(之后我会使用)
 下载链接: https://github.com/daknuett/cryptosuite2
 sha256使用手册:https://daknuett.github.io/cryptosuite2/usage.html
安装方法:项目->加载库->添加.zip库->选择下载的sha256库文件(如果已解压,选择文件夹)
2.打开项目模板
因为我要申请http的post请求,所以使用posthttpclient模板,开始魔改

3项目代码
loop()循环函数我没有设置什么。
setup()执行一次的函数执行我的代码
#include <ESP8266WiFi.h>
#include <ESP8266HTTPClient.h>
#include <String.h>
#include "sha256.h"
void setup() {


  Serial.begin(115200);//设置波特率
  WiFi.begin(STASSID, STAPSK);//STASSID是WiFi名,STAPSK是WiFi密码

  while (WiFi.status() != WL_CONNECTED) {
   //等待连接wifi
    delay(500);
    Serial.print(".");
  }
  Serial.print("Connected! IP address: ");
  Serial.println(WiFi.localIP());//打印被分配的地址
  httpPost();//httpPost()是我申请post请求的代码函数
}
void httpPost(){

    WiFiClient client;
    HTTPClient http;
    String hashStr;
    Serial.print
版权声明:本文为qq_40960731原创文章,遵循 CC 4.0 BY-SA 版权协议,转载请附上原文出处链接和本声明。