前端 Canvas 图像标记
作者:
@ 很菜的小白在分享
日期:2021年12月22日
介绍
为什么要做图像标记?我们开发过程可能会涉及到需要在一张图片上做记号,例如:
人脸识别
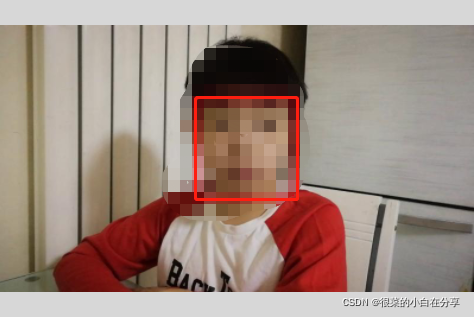
,我们可能需要将识别到的人脸框选起来,类似我们手机相机对焦人脸的效果。本文主要是记录下本人在开发智能AI教育平台时,实现图像标记。
方案选择
方案一
html + css + js
(放弃)
这里我只能说它是一种方案,但不是最优的,其次扩展性不是很强 (大家肯定都想写出一劳永逸的code),如果后期需要对标记后的图片入库这类操作时,这种方案就无法实现了。
方案二
canvas
canvas 较方案一扩展性就很强了,它不仅足够灵活,而且可以实现复杂的效果,例如绘制不规则图形时,重要的是绘制的内容可以更好的适配大小,并且也支持导出。
实现
获取图片信息
这里主要是需要通过图片尺寸信息来动态生成 canvas 画布大小,动态的目的就是确保我们可以更好的适配绘制样式,下文会继续提到。
/**
 * @description: 获取识别后的图像
 * @param  {Object} options 配置对象
 * @param  {Function} cb 回调函数
 * @return {*}
 * options {
 *  url: 图像地址,
 *  types: 'features,check,checkName', // features: 特征点 check: 人脸检测 checkName: 人脸识别
 *  data: 图像数据
 * }
 */
export const getRecognitImage = (options, cb) => {
  const types = options.types

  // 获取图片类型
  let outType = options.url.substring(options.url.lastIndexOf('.') + 1)
  if (outType == 'jpg') outType = 'jpeg'

  // 创建图片对象
  const img = new Image()
  img.src = options.url + '?tamp=' + new Date().getTime() // 此处添加时间戳防止因为缓存导致跨域问题
  img.crossOrigin = 'Anonymous'
  img.onload = () => {
    // 获取图片大小
    const width = img.width
    const height = img.height
  }
}
动态生成 canvas并绘制图片
// 此处省略之前的代码
img.onload = () => {
    // 创建画布
    const canvas = document.createElement('canvas')
    const ctx = canvas.getContext('2d')

    // 设置画布大小与图片大小一致
    const width = img.width
    const height = img.height
    canvas.width = width
    canvas.height = height

    // 绘制图片
    ctx.drawImage(img, 0, 0, width, height);

    // 绘制特征点
    if (types.includes('features')) {
      drawPoint(ctx, canvas, options)
    }
    // 绘制人脸区域
    if (types.includes('check') || types.includes('checkName')) {
      drawRect(ctx, 'check', types.includes('checkName'), canvas, options)
    }
  }
根据坐标信息进行标记
数据格式
// 这里点的信息按照 上-右-下-左 的顺序存储
[
	{
		"points": [
			{
				"x": 10,
				"y": 10
			}, {
				"x": 30,
				"y": 10
			}, {
				"x": 30,
				"y": 60
			}, {
				"x": 10,
				"y": 60
			}
		]
	}
]
这里做了很多适配处理,目的就是为了绘制出来的图片效果更自然些
效果图
/**
 * @description: 绘制框
 * @param  {*}
 * @return {*}
 * @param {*} ctx 画布上下文
 * @param {*} type 绘制类型
 * @param {*} checkName 是否绘制名称
 * @param {*} canvas canvas 信息
 * @param {*} options 绘制信息
 */
function drawRect(ctx, check, checkName, canvas, options) {
  let canvasW = canvas.width
  let lineWidth = 2;

  // 依据图片大控制框线的宽度,适配框线的粗细
  if (canvasW > 1000) {
    lineWidth = canvasW.toString().substring(0, 1) * 3
  }

  options.data.bbox.forEach((item, index) => {
    ctx.strokeStyle = "#FF0000";
    ctx.lineWidth = lineWidth;
    ctx.beginPath()

    // 获取第一个点和最后一个点
	let first = item.points[0]
    let last = item.points[item.points.length-1]
    // 初始化画笔的位置
    ctx.moveTo(first .x, first .y)

    // 根据点位绘制图像
    for (let i = 0, len=item.points.length; i < len; i++) {
      let that = item.points[i]
      let next = item.points[i+1]
      ctx.lineTo(next.x, next.y)
    }

    ctx.stroke();
    ctx.fillStyle = "#FFFFFF";

    // 绘制带名称的情况
    if (checkName) {
      ctx.fillStyle = "#FF0000";

      let name = item.text
      if (name == 'no name') name = '未知'

      // 计算字体大小,用于适配
      let fontSize = (last.y - first.y) / (lineWidth*4)
      ctx.font = fontSize+'px bold'

      // 获取该字体大小下文本的宽度
      let textWidth = ctx.measureText(name)
      /*
        设置文本框的宽度
          expression: textWidth.width + 文本绘制的 X 位置
      */
      let rectWidth = textWidth.width + (first.x + lineWidth*2)
      // 设置最小宽度值为框的宽度
      if (rectWidth < Math.abs(item.points[1].x - first.x)) {
        rectWidth = Math.abs(item.points[1].x - first.x)
      }

      // 这里除 6 就是将框的高度分为6等分,将文本置于框底部
      ctx.fillRect(first.x, last.y - (last.y / 6), rectWidth, (last.y / 6))

      ctx.fillStyle = "#FFFFFF"
      ctx.textBaseline  = 'bottom'

      ctx.fillText(name, first.x + lineWidth*2, last.y-lineWidth)
      ctx.fillStyle = "#FFFFFF"
    }
  })
}

在项目中还进行了人脸特征点的绘制,点的绘制就更简单了,直接上代码
/**
 * @description: 绘制点
 * @param  {*}
 * @return {*}
 * @param {*} ctx 画布上下文
 */
function drawPoint(ctx, canvas, options) {
  let canvasW = canvas.width
  let rang = 3;

  // 根据 canvas 大小适配点的大小
  if (canvasW > 1000) {
    rang = canvasW.toString().substring(0, 1) * 3
  } else if (canvasW<400) {
    rang = 1
  }
  options.data.landmark.forEach(item => {
    item.forEach(val => {
      ctx.beginPath()
      ctx.arc(val[0], val[1], rang, 0, 2*Math.PI)
      ctx.fill()
    })
  })
}
生成图片
通过
canvas.toDataURL()
生成base64的图片
export const getRecognitImage = (options, cb) => {
  const types = options.types

  // 获取图片类型
  let outType = options.url.substring(options.url.lastIndexOf('.') + 1)
  if (outType == 'jpg') outType = 'jpeg'

  // 创建图片对象
  const img = new Image()
  img.src = options.url + '?tamp=' + new Date().getTime() // 此处添加时间戳防止因为缓存导致跨域问题
  img.crossOrigin = 'Anonymous'
  img.onload = () => {
    // 创建画布
    const canvas = document.createElement('canvas')
    const ctx = canvas.getContext('2d')
    ctx.save()
    // 设置画布大小为图片大小
    const width = img.width
    const height = img.height
    canvas.width = width
    canvas.height = height
    // 绘制图片
    ctx.drawImage(img, 0, 0, width, height);
    // 设置绘制样式为白色
    ctx.fillStyle = '#FFFFFF'
    if (types.includes('features')) {
      drawPoint(ctx, canvas, options)
    }
    if (types.includes('check') || types.includes('checkName')) {
      drawRect(ctx, 'check', types.includes('checkName'), canvas, options)
    }

    ctx.save()
    // 生成图片
    cb(canvas.toDataURL("image/" + outType, 1))
  }
}
(完)
版权声明:本文为weixin_43809685原创文章,遵循 CC 4.0 BY-SA 版权协议,转载请附上原文出处链接和本声明。