语义分割-地表建筑物识别的一种解决方案
一,前言
该篇博客是用于记录阿里天池上的一个比赛——
语义分割-地表建筑物识别
的整个学习,编程的过程,由于是该比赛是我做的第一个机器学习的项目,因此记录的比较详细,细致到每一个函数的用法,和学习时参考的博客。该篇博客的目的主要是供自己作为笔记使用,其次是给对语义分割感兴趣,或者正在参加相关比赛的同学提供一个参考。博客较长,难免有错误,欢迎留言指正,同时欢迎相互交流学习!(另外在此尤其感谢
Bubbliiiing
的分享,这位大佬分享了大量的课程,代码,博客,非常详细)
二,参考博客
1,
为什么卷积核为四维
2,
MobileNet模型的复现详解
3,
基于Mobile模型的segnet讲解
4,
阿里天池比赛地表建筑物识别(点击获取比赛详情)
5,
深度可分离卷积Depthwise Separable Convolution
6,
相关课程
7,
Moblie_Unet——主要参考
三,函数
- MonlieNet及SegNet部分函数
1,Conv2D 卷积
keras.layers.Conv2D(filters, kernel_size,
 strides=(1, 1),
 padding='valid',
 data_format=None,
 dilation_rate=(1, 1),
 activation=None,
 use_bias=True,
 kernel_initializer='glorot_uniform',
 bias_initializer='zeros',
 kernel_regularizer=None,
 bias_regularizer=None,
 activity_regularizer=None,
 kernel_constraint=None,
 bias_constraint=None)
-
参数(这里主要会用到下面四个参数)
filter:整数,卷积输出滤波器的数量。
kernel_size:2个整数或2个整数构成的元组/列表,指定2-dim卷积窗口的高度和宽度。可以是单个整数,以指定具有相同值的所有空间维度。
strides:2个整数或2个整数构成的元组/列表,指定沿着高度和宽度卷积的步长,如果是单个整数则指定所有的空间维度具有相同的值。
padding:有“valid”或“same”
这里对padding作进一步解释
点击查看
, - 在此项目中padding都是用valid即不填充,而是在Conv2D之前使用ZeroPadding2d来手动填充0
2, ZeroPadding2d 2D 输入的零填充层
官方解释
一个博客的解释
keras.layers.ZeroPadding2D(padding=(1, 1), data_format=None)
2D 输入的零填充层(例如图像)。
该图层可以在图像张量的顶部、底部、左侧和右侧添加零表示的行和列。
参数
padding: 整数,或 2 个整数的元组,或 2 个整数的 2 个元组。
如果为整数:将对宽度和高度运用相同的对称填充。
如果为 2 个整数的元组:
如果为整数:: 解释为高度和高度的 2 个不同的对称裁剪值: (symmetric_height_pad, symmetric_width_pad)。
如果为 2 个整数的 2 个元组: 解释为 ((top_pad, bottom_pad), (left_pad, right_pad))。
data_format: 字符串, channels_last (默认) 或 channels_first 之一, 表示输入中维度的顺序。channels_last 对应输入尺寸为 (batch, height, width, channels), channels_first 对应输入尺寸为 (batch, channels, height, width)。 它默认为从 Keras 配置文件 ~/.keras/keras.json 中 找到的 image_data_format 值。 如果你从未设置它,将使用 “channels_last”。
输入尺寸
如果 data_format 为 “channels_last”, 输入 4D 张量,尺寸为 (batch, rows, cols, channels)。
如果 data_format 为 “channels_first”, 输入 4D 张量,尺寸为 (batch, channels, rows, cols)。
输出尺寸
如果 data_format 为 “channels_last”, 输出 4D 张量,尺寸为 (batch, padded_rows, padded_cols, channels)。
如果 data_format 为 “channels_first”, 输出 4D 张量,尺寸为 (batch, channels, padded_rows, padded_cols)。
3,BatchNormalization批量标准化层
keras.layers.BatchNormalization(axis=-1, momentum=0.99, epsilon=0.001, center=True, scale=True, beta_initializer='zeros', gamma_initializer='ones', moving_mean_initializer='zeros', moving_variance_initializer='ones', beta_regularizer=None, gamma_regularizer=None, beta_constraint=None, gamma_constraint=None)
在每一个批次的数据中标准化前一层的激活项, 即,应用一个维持激活项平均值接近 0,标准差接近 1 的转换。
参数
axis: 整数,需要标准化的轴 (通常是特征轴)。 例如,在 data_format=“channels_first” 的 Conv2D 层之后, 在 BatchNormalization 中设置 axis=1。
momentum: 移动均值和移动方差的动量。
epsilon: 增加到方差的小的浮点数,以避免除以零。
center: 如果为 True,把 beta 的偏移量加到标准化的张量上。 如果为 False, beta 被忽略。
scale: 如果为 True,乘以 gamma。 如果为 False,gamma 不使用。 当下一层为线性层(或者例如 nn.relu), 这可以被禁用,因为缩放将由下一层完成。
beta_initializer: beta 权重的初始化方法。
gamma_initializer: gamma 权重的初始化方法。
moving_mean_initializer: 移动均值的初始化方法。
moving_variance_initializer: 移动方差的初始化方法。
beta_regularizer: 可选的 beta 权重的正则化方法。
gamma_regularizer: 可选的 gamma 权重的正则化方法。
beta_constraint: 可选的 beta 权重的约束方法。
gamma_constraint: 可选的 gamma 权重的约束方法。
输入尺寸
可以是任意的。如果将这一层作为模型的第一层, 则需要指定 input_shape 参数 (整数元组,不包含样本数量的维度)。
输出尺寸
与输入相同。
4,Activation 激活函数
见博客
以上四个函数通常是一个卷积层的基本结构,即一个卷积层通常是先ZeroPadding2d零填充,再Conv2D 卷积,再BatchNormalization批量标准化层,最后Activation 激活函数
5,UpSampling2D 2D 输入的上采样层
官方文档
沿着数据的行和列分别重复 size[0] 和 size[1] 次。
参数
size: 整数,或 2 个整数的元组。 行和列的上采样因子。
data_format: 字符串, channels_last (默认) 或 channels_first 之一, 表示输入中维度的顺序。channels_last 对应输入尺寸为 (batch, height, width, channels), channels_first 对应输入尺寸为 (batch, channels, height, width)。 它默认为从 Keras 配置文件 ~/.keras/keras.json 中 找到的 image_data_format 值。 如果你从未设置它,将使用 “channels_last”。
interpolation: 字符串,nearest 或 bilinear 之一。 注意 CNTK 暂不支持 bilinear upscaling, 以及对于 Theano,只可以使用 size=(2, 2)。
输入尺寸
如果 data_format 为 “channels_last”, 输入 4D 张量,尺寸为 (batch, rows, cols, channels)。
如果 data_format 为 “channels_first”, 输入 4D 张量,尺寸为 (batch, channels, rows, cols)。
输出尺寸
如果 data_format 为 “channels_last”, 输出 4D 张量,尺寸为 (batch, upsampled_rows, upsampled_cols, channels)。
如果 data_format 为 “channels_first”, 输出 4D 张量,尺寸为 (batch, channels, upsampled_rows, upsampled_cols)。
6, DepthwiseConv2D深度可分离 2D 卷积
-
这个函数与Pointwise Convolution(逐点卷积)搭配食用构成MobileNet的核心,可参考这篇博客,讲的非常详细
点击前往
keras.layers.DepthwiseConv2D(kernel_size, strides=(1, 1), padding='valid', depth_multiplier=1, data_format=None, activation=None, use_bias=True, depthwise_initializer='glorot_uniform', bias_initializer='zeros', depthwise_regularizer=None, bias_regularizer=None, activity_regularizer=None, depthwise_constraint=None, bias_constraint=None)
官方文档
深度可分离 2D 卷积。
深度可分离卷积包括仅执行深度空间卷积中的第一步(其分别作用于每个输入通道)。 depth_multiplier 参数控制深度步骤中每个输入通道生成多少个输出通道。
Arguments
kernel_size: 一个整数,或者 2 个整数表示的元组或列表, 指明 2D 卷积窗口的高度和宽度。 可以是一个整数,为所有空间维度指定相同的值。
strides: 一个整数,或者 2 个整数表示的元组或列表, 指明卷积沿高度和宽度方向的步长。 可以是一个整数,为所有空间维度指定相同的值。 指定任何 stride 值 != 1 与指定 dilation_rate 值 != 1 两者不兼容。
padding: “valid” 或 “same” (大小写敏感)。
depth_multiplier: 每个输入通道的深度方向卷积输出通道的数量。 深度方向卷积输出通道的总数将等于 filterss_in * depth_multiplier。
data_format: 字符串, channels_last (默认) 或 channels_first 之一,表示输入中维度的顺序。 channels_last 对应输入尺寸为 (batch, height, width, channels), channels_first 对应输入尺寸为 (batch, channels, height, width)。 它默认为从 Keras 配置文件 ~/.keras/keras.json 中 找到的 image_data_format 值。 如果你从未设置它,将使用「channels_last」。
activation: 要使用的激活函数 (详见 activations)。 如果你不指定,则不使用激活函数 (即线性激活: a(x) = x)。
use_bias: 布尔值,该层是否使用偏置向量。
depthwise_initializer: 运用到深度方向的核矩阵的初始化器 详见 initializers)。
bias_initializer: 偏置向量的初始化器 (详见 initializers)。
depthwise_regularizer: 运用到深度方向的核矩阵的正则化函数 (详见 regularizer)。
bias_regularizer: 运用到偏置向量的正则化函数 (详见 regularizer)。
activity_regularizer: 运用到层输出(它的激活值)的正则化函数 (详见 regularizer)。
depthwise_constraint: 运用到深度方向的核矩阵的约束函数 (详见 constraints)。
bias_constraint: 运用到偏置向量的约束函数 (详见 constraints)。
输入尺寸
如果 data_format=‘channels_first’, 输入 4D 张量,尺寸为 (batch, channels, rows, cols)。
如果 data_format=‘channels_last’, 输入 4D 张量,尺寸为 (batch, rows, cols, channels)。
输出尺寸
如果 data_format=‘channels_first’, 输出 4D 张量,尺寸为 (batch, filters, new_rows, new_cols)。
如果 data_format=‘channels_last’, 输出 4D 张量,尺寸为 (batch, new_rows, new_cols, filters)。
由于填充的原因, rows 和 cols 值可能已更改。
7,reshape
keras.backend.reshape(x, shape)
将张量重塑为指定的尺寸。
参数
x: 张量或变量。
shape: 目标尺寸元组。
返回
一个张量。
- train部分函数
8,np.random.shuffle打乱数据
9, img.resize图像变换大小
博客解释
这个函数img.resize((width, height),Image.ANTIALIAS)
第一个参数为目标图像的大小
第二个参数:
Image.NEAREST :低质量
Image.BILINEAR:双线性
Image.BICUBIC :三次样条插值
Image.ANTIALIAS:高质量
10,np.array(img)/255 将标签图片转换为数组
博客解释
此处除以255是将数据归一化处理,因为RGB最大的数值为255,处以255可以将RGB值缩小到0-1的范围
11,.append(img)在末尾增加新的对象
12, one_hot_label = np.eye(NCLASSES)[np.array(label, np.int32)]
one-hot编码,将像素分成两类
博客解释
此处NCLASSES是一个全局变量2,(背景+建筑物=2)表示对应的类别号为2,这一步的作用是将图片的数据转化成用0和1表示的两列的one-hot向量(下面是一个直观的效果展示)
a=np.eye(2)[[1,0,0,0,1,0,0,1]]
print(a)
[[0. 1.]
 [1. 0.]
 [1. 0.]
 [1. 0.]
 [0. 1.]
 [1. 0.]
 [1. 0.]
 [0. 1.]]
13, yield (np.array(X_train), np.array(Y_train))
菜鸟教程
简单地讲,yield 的作用就是把一个函数变成一个 generator(生成器),带有 yield 的函数不再是一个普通函数,Python 解释器会将其视为一个 generator,调用 fab(5) 不会执行 fab 函数,而是返回一个 iterable 对象!在 for 循环执行时,每次循环都会执行 fab 函数内部的代码,执行到 yield b 时,fab 函数就返回一个迭代值,下次迭代时,代码从 yield b 的下一条语句继续执行,而函数的本地变量看起来和上次中断执行前是完全一样的,于是函数继续执行,直到再次遇到 yield。(其功能相当于一个用来保存X-train,Y-train的数组,但优点在于它不会占用太多的内存,内存的占用始终为一个常数,并且使用起来非常的简洁,具体的解释参考菜鸟教程)
14,np.random.shuffle(lines)将图片打乱,更有利于训练
- 训练参数的设置
15,深度学习三个概念Epoch, Batch, Iteration
- 训练参数的设置
16,ModelCheckpoint用于设置权值保存的细节
 checkpoint = ModelCheckpoint(log_dir + 'ep{epoch:03d}-loss{loss:.3f}-val_loss{val_loss:.3f}.h5',
                                    monitor='val_loss', save_weights_only=True, save_best_only=False, period=2)
                                    #将训练好的参数保存到logs文件中
log_dir为权值保存的文件夹路径
理解loss和val_loss
monitor=’val_loss’用于指定保存损失还是准确率,因为损失的感受不是很直观,而准确率为0到1,且越高越好,因此这里用val_loss,保存准确率
save_best_only=False指定每次保存是否都是比上次好,这里为False,不管是否比上次好都保存
save_weights_only=True是否只保存模型的权重还是将整个模型的结构也保存下来,一般在保持权重,模型结构没什么用,且占用空间
period=2:CheckPoint之间的间隔的epoch数,即训练多少轮保存一次权重,此处训练2轮保存一次权重
17, ReduceLROnPlateau设置学习率下降的方式
reduce_lr = ReduceLROnPlateau(monitor='val_loss', factor=0.5, patience=3, verbose=1)
monitor=’val_loss’指定监测的指标,这里指定的是val_loss,即测试集的损失率,当损失率不再下降时,改变学习率。
factor=0.5 指定学习率下降的比例,此处表示变为原来的一半
patience=3即忍受多少代损失率不下降后调整学习率
verbose=1即是否在终端打印出学习率改变的信息,此处为显示
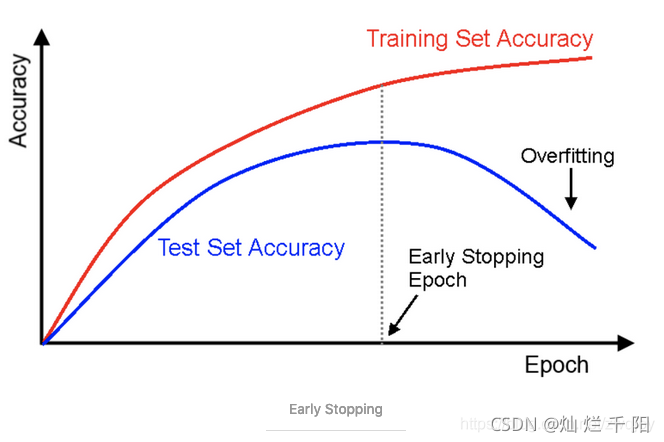
18,EarlyStopping早停
early_stopping = EarlyStopping(monitor='val_loss', min_delta=0, patience=10, verbose=1)
原理
将数据分为训练集和验证集
每个epoch结束后(或每N个epoch后): 在验证集上获取测试结果,随着epoch的增加,如果在验证集上发现测试误差上升,则停止训练;
将停止之后的权重作为网络的最终参数。
这种做法很符合直观感受,因为精度都不再提高了,在继续训练也是无益的,只会提高训练的时间。那么该做法的一个重点便是怎样才认为验证集精度不再提高了呢?并不是说验证集精度一降下来便认为不再提高了,因为可能经过这个Epoch后,精度降低了,但是随后的Epoch又让精度又上去了,所以不能根据一两次的连续降低就判断不再提高。一般的做法是,在训练的过程中,记录到目前为止最好的验证集精度,当连续10次Epoch(或者更多次)没达到最佳精度时,则可以认为精度不再提高了。

EarlyStopping的参数:
monitor: 监控的数据接口,有’acc’,’val_acc’,’loss’,’val_loss’等等。正常情况下如果有验证集,就用’val_acc’或者’val_loss’。此处笔者使用的是val_loss即测试集损失率。
min_delta:增大或减小的阈值,只有大于这个部分才算作improvement。这个值的大小取决于monitor,也反映了你的容忍程度。此处笔者的为0,表示一旦减少就算超过阀值。
patience:能够容忍多少个epoch内都没有improvement。这个设置其实是在抖动和真正的准确率下降之间做tradeoff。如果patience设的大,那么最终得到的准确率要略低于模型可以达到的最高准确率。如果patience设的小,那么模型很可能在前期抖动,还在全图搜索的阶段就停止了,准确率一般很差。patience的大小和learning rate直接相关。在learning rate设定的情况下,前期先训练几次观察抖动的epoch number,比其稍大些设置patience。在learning rate变化的情况下,建议要略小于最大的抖动epoch number。此处笔者设置的为10,即检测到有10次损失率下降就停止训练。
mode: 就’auto’, ‘min’, ‘,max’三个可能。如果知道是要上升还是下降,建议设置一下。
min_delta和patience都和“避免模型停止在抖动过程中”有关系,所以调节的时候需要互相协调。通常情况下,min_delta降低,那么patience可以适当减少;min_delta增加,那么patience需要适当延长;反之亦然。
verbose=1即是否在终端打印出相关的信息,此处为显示。
19,model.compile用于配置训练模型
 model.compile(loss = 'categorical_crossentropy',
                optimizer = Adam(lr=lr),
                metrics = ['accuracy'])
loss定义损失函数,此处为交叉熵损失函数
optimizer:选择优化器
optimizer
Adam
此处lr=lr是指定习效率为lr
metrics:评价函数,与损失函数类似,只不过评价函数的结果不会用于训练过程中,可以传递已有的评价函数名称,或者传递一个自定义的theano/tensorflow函数来使用
20,model.fit_generator 使用 Python 生成器(或 Sequence 实例)逐批生成的数据,按批次训练模型(这一步是前面的准备好后开始训练了)
model.fit_generator(generate_arrays_from_file(lines[:num_train], batch_size),
                steps_per_epoch=max(1, num_train//batch_size),
                validation_data=generate_arrays_from_file(lines[num_train:], batch_size),
                validation_steps=max(1, num_val//batch_size),
                epochs=50,
                initial_epoch=0,
                callbacks=[checkpoint, reduce_lr,early_stopping])
生成器与模型并行运行,以提高效率。 例如,这可以让你在 CPU 上对图像进行实时数据增强,以在 GPU 上训练模型。
generate_arrays_from_file(lines[:num_train], batch_size)定义的一个生成器函数,所谓的生成器函数就是用来读取原图和标签图的一个函数,,lines[:num_train],这里lines是指用于存放train.txt的文件,即用于保存原图与标签图的对应关系的文件,数据类似于‘131.jpg;131.png’;[:num_train]是用来界定训练集和测试集数据的,设置的是90%为训练集,num_train,为90%图片数量的界线;batch_size用于设定每一批训练图片的数量,此处设置为4,可以根据电脑的性能调高或降低
steps_per_epoch=max(1, num_train//batch_size) 在声明一个 epoch 完成并开始下一个 epoch 之前从 generator 产生的总步数(批次样本)。 它通常应该等于你的数据集的样本数量除以批量大小。 对于 Sequence,它是可选的:如果未指定,将使用len(generator) 作为步数。总结来讲就是训练的批次数。
validation_data: 它可以是以下之一:
验证数据的生成器或 Sequence 实例一个 (inputs, targets) 元组一个 (inputs, targets, sample_weights) 元组。在每个 epoch 结束时评估损失和任何模型指标。该模型不会对此数据进行训练。在这里validation_data=generate_arrays_from_file(lines[num_train:], batch_size)。用来指定验证集的位置。(validation:验证)
validation_steps: 仅当 validation_data 是一个生成器时才可用。 在停止前 generator 生成的总步数(样本批数)。 对于 Sequence,它是可选的:如果未指定,将使用 len(generator) 作为步数。
epochs: 整数。训练模型的迭代总轮数。一个 epoch 是对所提供的整个数据的一轮迭代,如 steps_per_epoch 所定义。注意,与 initial_epoch 一起使用,epoch 应被理解为「最后一轮」。
initial_epoch: 开始训练的轮次(有助于恢复之前的训练),这里为0.
callbacks: keras.callbacks.Callback 实例的列表。在训练时调用的一系列回调函数。这里指定的是callbacks=[checkpoint, reduce_lr,early_stopping]),即前面的
checkpoint用于设置权值保存的细节,period用于修改多少epoch保存一次 reduce_lr用于设置学习率下降的方式
early_stopping用于设定早停,val_loss多次不下降自动结束训练,表示模型基本收敛
- 以下为predict部分的函数
21,相对路径
在使用相对路径时要导入os库:import os
directory = r'C:\Users\Administrator\Desktop\data'
用于指定根路径
os.chdir(directory)
用于改变当前工作目录到指定的路径
print(os.getcwd())
打印当前路径
train_mask = pd.read_csv(’./train_mask.csv’, sep=’\t’, names=[‘name’, ‘mask’])
“.“一个点表当前路径,”…”两个点表示当前路径的上一个目录,上面的代码就的 用于获取当前目录下的train_mask.csv文件
(注意目录中斜杠的方向,有时并不需要人为的指定根路径,系统会默认代码文件所在的路径就是根路径,但当根路径混乱时可以通过上面的方式来指定根路径)
关于路径更多的用法参见菜鸟:
菜鸟链接
22,keras.utils.get_file用于从网络上下载数据
tf.keras.utils.get_file(
    fname, origin, untar=False, md5_hash=None,
    file_hash=None,cache_subdir='datasets',
    hash_algorithm='auto', extract=False,
    archive_format='auto', cache_dir=None
)
参数说明--
fname:文件名,如果指定了绝对路径"/path/to/file.txt",则文件将会保存到该位置

origin:文件的URL

untar:boolean,文件是否需要解压缩

md5_hash:MD5哈希值,用于数据校验,支持sha256和md5哈希

cache_subdir:用于缓存数据的文件夹,若指定绝对路径"/path/to/folder"则将存放在该路径下

hash_algorithm:选择文件校验的哈希算法,可选项有'md5', 'sha256', 和'auto'.
默认'auto'自动检测使用的哈希算法

extract:若为True则试图提取文件,例如tar或zip

archive_format:试图提取的文件格式,可选为'auto', 'tar', 'zip',
和None. 'tar' 包括tar, tar.gz, tar.bz文件. 默认'auto'是['tar', 'zip']. None或空列表将返回没有匹配

cache_dir:文件缓存后的地址,若为None,则默认存放在根目录的.keras文件夹中
origin="https://github.com/TommyZihao/zihaopython.git"
path=tf.keras.utils.get_file(
    "wzx", origin, untar=False,md5_hash=None, file_hash=None,
    cache_subdir='datasets', hash_algorithm='auto',
    extract=False,archive_format='auto', cache_dir=None
)
print(path)
C:\Users\Alex\.keras\datasets\wzx
函数返回的是本地存放文件的路径,
23, model.compile ()
参考博客
模型在喂数据进行训练前常会用到compile函数进行训练时所使用优化器、损失函数等的配置
lr = 1e-3
        batch_size = 4                                        #用于设定每一批训练的数量
        model.compile(loss = 'categorical_crossentropy',      #指定损失函数
                optimizer = Adam(lr=lr),                      #指定习率为1e-3
                metrics = ['accuracy'])
参数:
optimizer: 优化器
optimizer:参数
lr:大或等于0的浮点数,学习率
momentum:大或等于0的浮点数,动量参数
decay:大或等于0的浮点数,每次更新后的学习率衰减值
nesterov:布尔值,确定是否使用Nesterov动量
loss:损失函数,可以用自带的,也可以自定义.如果模型有多个输出,可以传入一个字典或者损失列表,模型降会把这些损失加在一起,这里用的是交叉熵损失
metrics: 评价函数,与损失函数类似,只不过评价函数的结果不会用于训练过程中,可以传递已有的评价函数名称,或者传递一个自定义的theano/tensorflow函数来使用,自带的评价函数有:binary_accuracy(y_true,y_pred), categorical_accuracy(y_true,y_pred),sparse_categorical_accuracy(y_true,y_pred), top_k_categorical_accuracy(y_true,y_pred,k=5).自定义评价函数应该在编译的时候compile传递进去,该函数需要以(y_true,y_pred)作为输入参数,并返回一个张量作为输出结果.
24,im.flatten()将图片的RGB数组变成一维数组
25, np.concatenate()拼接数组,将多个数组拼接成一个数组
26,np.where()返回满足条件的元素的坐标
27,loss函数的选择
博客解释
loss函数的选择十分重要,本项目属于二分类的语义分割,只要将每个像素分成是建筑物和不是建筑物的两类,因此可以选择二值交叉熵(binary cross-entropy),顾名思义,该交叉熵专门用于分成两类的情况。和常用的交叉熵(categorical_crossentropy)相比,效果提升显著,在本项目中提升了大概3个百分点。当然在多分类情景中还是用交叉熵或者其它的损失函数。
28,关于数据增强
(在此针对本项目提出两种数据增强的思路)
(1)随机缩放
博客解释
常见的图片数据增强方式主要有随机翻转,镜像翻转,色彩偏移,加噪声点等,但注意以上这些数据增强的方式主要是针对于图像分类防止过拟合或者是数据集较小用来扩大数据集的方法,图像分类是粗粒度分类,语义分割是稠密分类,针对图像中每一个像素分类。在语义分割的情形下以上提到的数据增强几乎没有效果,博客推荐的数据增强是随机缩放,其原理大概是这一句“同一个物体的不同尺度,对于卷积核来讲,那就是感受视野的不同,我们的卷积核不仅需要能在大的感受视野中获得好的分类能力,也得具备在小的感受视野中获得很好的分类能力”。
(2)增强图像的清晰度
这个是我自己的想法,目前还未找到博客来直接“赞同”我的想法。我认为对于这种语义分割的问题图片的清晰度十分重要,和人一样,要分辨出图片上的物体是什么,一张清晰的图片当然要比一张模糊的图片要好,在此可以看几个例子

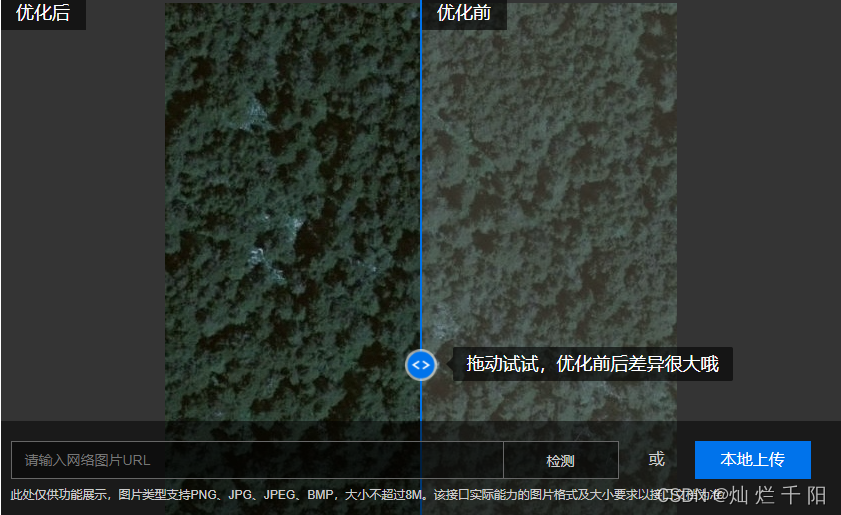
上面是一个图像去雾的效果展示,假设你要识别中间图片的灯笼,是没去雾之前更容易识别,还是去雾后更好识别?不言自明。针对本项目,因为都是遥感图片,通过卫星在太空中拍摄,因为光线穿过了厚厚的大气层,导致图片看起来就像蒙了一层雾一样,使用图片去雾可以很好的增加图片的清晰度,对比度,在此展示一下效果。


以上是使用百度的图片去雾的效果,
可以点击体验一下
,上面的链接里有API的调用方法,此外知乎上搜索“图片去雾”有一大堆文章教你做事,可以这篇博客
了解
一下,博客里提供了实现代码,该代码是实现了大神何凯明的论文,可以说效果直接拉满。
四,网络Unet_Mobilenet
1、主干模型Mobilenet。
该部分用于特征提取,实际上就是常规的mobilenet结构,想要了解mobilenet结构的朋友们可以看看另一篇博客
神经网络学习小记录23——MobileNet模型的复现详解
import keras
import keras.backend as K
from keras.layers import *
from keras.models import *

def relu6(x):
	return K.relu(x, max_value=6)

def _conv_block(inputs, filters, alpha, kernel=(3, 3), strides=(1, 1)):
	filters = int(filters * alpha)
	x = ZeroPadding2D(padding=(1, 1), name='conv1_pad')(inputs)
	x = Conv2D(filters, kernel, padding='valid',
								use_bias=False,
								strides=strides,
								name='conv1')(x)
	x = BatchNormalization(name='conv1_bn')(x)
	return Activation(relu6, name='conv1_relu')(x)

def _depthwise_conv_block(inputs, pointwise_conv_filters, alpha, depth_multiplier=1, strides=(1, 1), block_id=1):
	pointwise_conv_filters = int(pointwise_conv_filters * alpha)

	x = ZeroPadding2D((1, 1), name='conv_pad_%d' % block_id)(inputs)
	x = DepthwiseConv2D((3, 3), padding='valid',
						depth_multiplier=depth_multiplier,
						strides=strides,
						use_bias=False,
						name='conv_dw_%d' % block_id)(x)
	x = BatchNormalization(name='conv_dw_%d_bn' % block_id)(x)
	x = Activation(relu6, name='conv_dw_%d_relu' % block_id)(x)

	x = Conv2D(pointwise_conv_filters, (1, 1),
						padding='same',
						use_bias=False,
						strides=(1, 1),
						name='conv_pw_%d' % block_id)(x)
	x = BatchNormalization(name='conv_pw_%d_bn' % block_id)(x)
	return Activation(relu6, name='conv_pw_%d_relu' % block_id)(x)

def get_mobilenet_encoder(input_height=224, input_width=224):
	alpha=1.0
	depth_multiplier=1

	img_input = Input(shape=(input_height, input_width, 3))

	# 416,416,3 -> 208,208,32 -> 208,208,64
	x = _conv_block(img_input, 32, alpha, strides=(2, 2))
	x = _depthwise_conv_block(x, 64, alpha, depth_multiplier, block_id=1)
	f1 = x

	# 208,208,64 -> 104,104,128
	x = _depthwise_conv_block(x, 128, alpha, depth_multiplier, strides=(2, 2), block_id=2)
	x = _depthwise_conv_block(x, 128, alpha, depth_multiplier, block_id=3)
	f2 = x

	# 104,104,128 -> 52,52,256
	x = _depthwise_conv_block(x, 256, alpha, depth_multiplier, strides=(2, 2), block_id=4)
	x = _depthwise_conv_block(x, 256, alpha, depth_multiplier, block_id=5)
	f3 = x

	# 52,52,256 -> 26,26,512
	x = _depthwise_conv_block(x, 512, alpha, depth_multiplier, strides=(2, 2), block_id=6)
	x = _depthwise_conv_block(x, 512, alpha, depth_multiplier, block_id=7)
	x = _depthwise_conv_block(x, 512, alpha, depth_multiplier, block_id=8)
	x = _depthwise_conv_block(x, 512, alpha, depth_multiplier, block_id=9)
	x = _depthwise_conv_block(x, 512, alpha, depth_multiplier, block_id=10)
	x = _depthwise_conv_block(x, 512, alpha, depth_multiplier, block_id=11)
	f4 = x

	# 26,26,512 -> 13,13,1024
	x = _depthwise_conv_block(x, 1024, alpha, depth_multiplier, strides=(2, 2), block_id=12)
	x = _depthwise_conv_block(x, 1024, alpha, depth_multiplier, block_id=13)
	f5 = x

	return img_input, [f1 , f2 , f3 , f4 , f5]
2、Unet的Decoder解码部分
这一部分对应模型中的解码部分。
其关键就是把获得的特征重新映射到比较大的图中的每一个像素点,用于每一个像素点的分类。
from keras.layers import *
from keras.models import *

from nets.mobilenet import get_mobilenet_encoder

def _unet(n_classes, encoder, input_height=416, input_width=608):

	img_input , levels = encoder(input_height=input_height, input_width=input_width)
	[f1 , f2 , f3 , f4 , f5] = levels

	o = f4
	# 26,26,512 -> 26,26,512
	o = ZeroPadding2D((1,1))(o)
	o = Conv2D(512, (3, 3), padding='valid')(o)
	o = BatchNormalization()(o)

	# 26,26,512 -> 52,52,512
	o = UpSampling2D((2,2))(o)
	# 52,52,512 + 52,52,256 -> 52,52,768
	o = concatenate([o, f3])
	o = ZeroPadding2D((1,1))(o)
	# 52,52,768 -> 52,52,256
	o = Conv2D(256, (3, 3), padding='valid')(o)
	o = BatchNormalization()(o)

	# 52,52,256 -> 104,104,256
	o = UpSampling2D((2,2))(o)
	# 104,104,256 + 104,104,128-> 104,104,384
	o = concatenate([o,f2])
	o = ZeroPadding2D((1,1) )(o)
	# 104,104,384 -> 104,104,128
	o = Conv2D(128, (3, 3), padding='valid')(o)
	o = BatchNormalization()(o)

	# 104,104,128 -> 208,208,128
	o = UpSampling2D((2,2))(o)
	# 208,208,128 + 208,208,64 -> 208,208,192
	o = concatenate([o,f1])

	# 208,208,192 -> 208,208,64
	o = ZeroPadding2D((1,1))(o)
	o = Conv2D(64, (3, 3), padding='valid')(o)
	o = BatchNormalization()(o)

	# 208,208,64 -> 208,208,n_classes
	o = Conv2D(n_classes, (3, 3), padding='same')(o)

	# 将结果进行reshape
	o = Reshape((int(input_height/2)*int(input_width/2), -1))(o)
	o = Softmax()(o)
	model = Model(img_input,o)

	return model

def mobilenet_unet(n_classes, input_height=224, input_width=224):
	model =  _unet(n_classes, get_mobilenet_encoder, input_height=input_height, input_width=input_width)
	model.model_name = "mobilenet_unet"
	return model
五,训练,预测,数据生成,及编码部分代码
1,train.py训练部分
import keras
import numpy as np
import tensorflow as tf
from keras import backend as K
from keras.callbacks import (EarlyStopping, ModelCheckpoint, ReduceLROnPlateau,TensorBoard)
from keras.optimizers import Adam
from PIL import Image
import math

#from nets.segnet import mobilenet_segnet
from nets.unet import mobilenet_unet
#-------------------------------------------------------------#
#   定义了一个生成器,用于读取datasets2文件夹里面的图片与标签
#   lines=>train.txt
#-------------------------------------------------------------#
def generate_arrays_from_file(lines,batch_size):                  #batch_size用于设定每一批训练的数量,设定的为4
    n = len(lines)                                                #lines=>train.txt
    i = 0
    while 1:
        X_train = []                                              #X_train用于存放输入图片数据
        Y_train = []                                              #Y_train用于存放标签图片数据
        for _ in range(batch_size):
            if i==0:
                np.random.shuffle(lines)                          #第一次取数据的时候打乱数据,便于更好的训练,后面不再打乱
            #-------------------------------------#
            #   读取输入图片并进行归一化和resize
            #-------------------------------------#
            name = lines[i].split(';')[0]                         #获取jpg图像名(即原图)
            img = Image.open("./dataset2/jpg/" + name)
            img = img.resize((WIDTH,HEIGHT), Image.BICUBIC)       #变换图像大小
            img = np.array(img)/255                               #将标签图片转换为数组,并做归一化处理(RGB值为0-255)
            X_train.append(img)                                   #在末尾增加新的对象

            #-------------------------------------#
            #   读取标签图片并进行归一化和resize
            #-------------------------------------#
            name = lines[i].split(';')[1].split()[0]                                 #读取对应的png标签图片
            label = Image.open("./dataset2/png/" + name)
            label = label.resize((int(WIDTH/2),int(HEIGHT/2)), Image.NEAREST)        #改变图像大小,输出为低质量
            if len(np.shape(label)) == 3:                                            #取RGB最后一层
                label = np.array(label)[:,:,0]
            label = np.reshape(np.array(label), [-1])
            one_hot_label = np.eye(NCLASSES)[np.array(label, np.int32)]              #one-hot编码,将像素分成两类,NCLASSES=2,图片+斑马线
            Y_train.append(one_hot_label)                                            # #在末尾增加新的对象

            i = (i+1) % n                                                            #i小于n时i是多少就是多少,超出n后又会从0开始
        yield (np.array(X_train), np.array(Y_train))

if __name__ == "__main__":
    #---------------------------------------------#
    #   定义输入图片的高和宽,以及种类数量
    #---------------------------------------------#
    HEIGHT = 416
    WIDTH = 416
    #---------------------------------------------#
    #   背景 + 斑马线 = 2
    #---------------------------------------------#
    NCLASSES = 2

    log_dir = "logs/"
    model = mobilenet_unet(n_classes=NCLASSES,input_height=HEIGHT, input_width=WIDTH)
    #---------------------------------------------------------------------#
    #   这一步是获得主干特征提取网络的权重、使用的是迁移学习的思想
    #   如果下载过慢,可以复制连接到迅雷进行下载。
    #   之后将权值复制到目录下,根据路径进行载入。
    #   如:
    #   weights_path = "xxxxx.h5"
    #   model.load_weights(weights_path,by_name=True,skip_mismatch=True)
    #---------------------------------------------------------------------#

    BASE_WEIGHT_PATH = 'https://github.com/fchollet/deep-learning-models/releases/download/v0.6/'   #获取主干网络的权重
    model_name = 'mobilenet_%s_%d_tf_no_top.h5' % ('1_0', 224)
    weight_path = BASE_WEIGHT_PATH + model_name
    weights_path = keras.utils.get_file(model_name, weight_path)   #用于从网络下载数据
    model.load_weights(weights_path, by_name=True, skip_mismatch=True)


    # 打开数据集的txt
    with open("./dataset2/train.txt","r") as f:
        lines = f.readlines()

    #---------------------------------------------#
    #   打乱的数据更有利于训练
    #   90%用于训练,10%用于估计。
    #---------------------------------------------#
    np.random.seed(10101)                                               #用随机数种子将数据打乱
    np.random.shuffle(lines)
    np.random.seed(None)
    num_val = int(len(lines)*0.1)                                       #测试集的数量
    num_train = len(lines) - num_val                                    #训练集的数量

    #-------------------------------------------------------------------------------#
    #   训练参数的设置
    #   checkpoint用于设置权值保存的细节,period用于修改多少epoch保存一次
    #   reduce_lr用于设置学习率下降的方式
    #   early_stopping用于设定早停,val_loss多次不下降自动结束训练,表示模型基本收敛
    #-------------------------------------------------------------------------------#
    checkpoint = ModelCheckpoint(log_dir + 'ep{epoch:03d}-loss{loss:.3f}-val_loss{val_loss:.3f}.h5',
                                    monitor='val_loss', save_weights_only=True, save_best_only=False, period=2)
                                    #将训练好的参数保存到logs文件中
    reduce_lr = ReduceLROnPlateau(monitor='val_loss', factor=0.5, patience=3, verbose=1)
    early_stopping = EarlyStopping(monitor='val_loss', min_delta=0, patience=30, verbose=1)

    #-------------------------------------------------------------------------------#
    #   这里使用的是迁移学习的思想,主干部分提取出来的特征是通用的
    #   所以我们可以不训练主干部分先,因此训练部分分为两步,分别是冻结训练和解冻训练
    #   冻结训练是不训练主干的,解冻训练是训练主干的。
    #   由于训练的特征层变多,解冻后所需显存变大
    #   在此解释一下下面的过程:
    #   首先是将前60层冻结不参与训练,前六十层是mobilenet部分,冻结期间使用的是上面从网上下载的权重
    #   训练50轮后进行解冻,让整个网络都参与训练,此时计算量变大,计算时间边长,解冻时将学习率该成一
    #   个更小的数,防止“跳出去”
    #-------------------------------------------------------------------------------#
    trainable_layer = 60#冻结训练,前60层mobilenet的部分,可直接使用参数,不参加训练
    for i in range(trainable_layer):
        model.layers[i].trainable = False
    print('freeze the first {} layers of total {} layers.'.format(trainable_layer, len(model.layers)))


    #-------------------------------------------------------------------------------#
    #   定义损失函数
    #-------------------------------------------------------------------------------#
    def loss(y_true, y_pred):
        crossloss = K.binary_crossentropy(y_true,y_pred)
        loss = 4 * K.sum(crossloss)/HEIGHT/WIDTH
        return loss

    if True:
        lr = 1e-3
        batch_size = 2                                                              #用于设定每一批训练的数量
        model.compile(loss = 'categorical_crossentropy',                            #指定损失函数
                optimizer = Adam(lr=lr),                                            #指定习率为1e-3
                metrics = ['accuracy'])

        print('Train on {} samples, val on {} samples, with batch size {}.'.format(num_train, num_val, batch_size))
        model.fit_generator(generate_arrays_from_file(lines[:num_train], batch_size),           #定义一个生成器,即上方写的生成器函数
                steps_per_epoch=max(1, num_train//batch_size),
                validation_data=generate_arrays_from_file(lines[num_train:], batch_size),
                validation_steps=max(1, num_val//batch_size),
                epochs=50,
                initial_epoch=0,
                callbacks=[checkpoint, reduce_lr,early_stopping])

    for i in range(len(model.layers)):
        model.layers[i].trainable = True

    if True:                                                   #这个玩意儿和上面一样,不同的地方是学习率,并且是用于训练50到100轮的
        lr = 1e-3
        batch_size = 2
        #交叉熵
        model.compile(loss = loss,
                optimizer = Adam(lr=lr),
                metrics = ['accuracy'])

        print('Train on {} samples, val on {} samples, with batch size {}.'.format(num_train, num_val, batch_size))
        model.fit_generator(generate_arrays_from_file(lines[:num_train], batch_size),
                steps_per_epoch=max(1, num_train//batch_size),
                validation_data=generate_arrays_from_file(lines[num_train:], batch_size),
                validation_steps=max(1, num_val//batch_size),
                epochs=100,
                initial_epoch=50,
                callbacks=[checkpoint, reduce_lr,early_stopping])
2,predict.py预测部分
from nets.segnet import mobilenet_segnet
import copy
import os
import random

import numpy as np
from PIL import Image

if __name__ == "__main__":
    #---------------------------------------------------#
    #   定义了输入图片的颜色,当我们想要去区分两类的时候
    #   我们定义了两个颜色,分别用于背景和斑马线
    #   [0,0,0], [0,255,0]代表了颜色的RGB色彩
    #---------------------------------------------------#
    class_colors = [[0,0,0],[0,255,0]]
    #---------------------------------------------#
    #   定义输入图片的高和宽,以及种类数量
    #---------------------------------------------#
    HEIGHT = 416
    WIDTH = 416
    #---------------------------------------------#
    #   背景 + 斑马线 = 2
    #---------------------------------------------#
    NCLASSES = 2
    directory1 = r'C:\Users\Administrator\Desktop\MY-SegNet_Mobile'
    os.chdir(directory1)     #设定当前工作路径
    #---------------------------------------------#
    #   载入模型
    #---------------------------------------------#
    model = mobilenet_segnet(n_classes=NCLASSES,input_height=HEIGHT, input_width=WIDTH)
    #--------------------------------------------------#
    #   载入权重,训练好的权重会保存在logs文件夹里面
    #   我们需要将对应的权重载入
    #   修改model_path,将其对应我们训练好的权重即可
    #   下面只是一个示例
    #--------------------------------------------------#
    model.load_weights("logs/ep002-loss0.290-val_loss0.457.h5")        #及时更新损失小的权重

    #--------------------------------------------------#
    #   对imgs文件夹进行一个遍历
    #--------------------------------------------------#
    imgs = os.listdir("./img/")                                        #读取文件的目录
    for jpg in imgs:
        #--------------------------------------------------#
        #   打开imgs文件夹里面的每一个图片
        #--------------------------------------------------#
        img = Image.open("./img/"+jpg)

        old_img = copy.deepcopy(img)
        orininal_h = np.array(img).shape[0]                            #获取图片的高和宽
        orininal_w = np.array(img).shape[1]

        #--------------------------------------------------#
        #   对输入进来的每一个图片进行Resize
        #   resize成[HEIGHT, WIDTH, 3]
        #--------------------------------------------------#
        img = img.resize((WIDTH,HEIGHT), Image.BICUBIC)
        img = np.array(img) / 255
        img = img.reshape(-1, HEIGHT, WIDTH, 3)

        #--------------------------------------------------#
        #   将图像输入到网络当中进行预测
        #--------------------------------------------------#
        pr = model.predict(img)[0]
        pr = pr.reshape((int(HEIGHT/2), int(WIDTH/2), NCLASSES)).argmax(axis=-1)

        #------------------------------------------------#
        #   创建一副新图,并根据每个像素点的种类赋予颜色
        #------------------------------------------------#
        seg_img = np.zeros((int(HEIGHT/2), int(WIDTH/2),3))
        for c in range(NCLASSES):
            seg_img[:, :, 0] += ((pr[:,: ] == c) * class_colors[c][0]).astype('uint8')
            seg_img[:, :, 1] += ((pr[:,: ] == c) * class_colors[c][1]).astype('uint8')
            seg_img[:, :, 2] += ((pr[:,: ] == c) * class_colors[c][2]).astype('uint8')

        seg_img = Image.fromarray(np.uint8(seg_img)).resize((orininal_w,orininal_h))
        #------------------------------------------------#
        #   将新图片和原图片混合
        #------------------------------------------------#
        image = Image.blend(old_img,seg_img,0.3)

        image.save("./img_out/"+jpg)
3,RLE.py 用于生成数据集(图片,标签图,及对应的txt文件)
import numpy as np
from numpy.core.numeric import NaN
from numpy.lib.type_check import nan_to_num
import pandas as pd
import cv2
import matplotlib.pyplot as plt
from PIL import Image
import os
import sys
import tensorflow as tf
# 将图片编码为rle格式
def rle_encode(im):
    '''
    im: numpy array, 1 - mask, 0 - background
    Returns run length as string formated
    '''
    pixels = im.flatten(order = 'F')
    pixels = np.concatenate([[0], pixels, [0]])
    runs = np.where(pixels[1:] != pixels[:-1])[0] + 1
    runs[1::2] -= runs[::2]
    return ' '.join(str(x) for x in runs)

# 将rle格式进行解码为图片
def rle_decode(mask_rle, shape=(512, 512)):
    '''
    mask_rle: run-length as string formated (start length)
    shape: (height,width) of array to return
    Returns numpy array, 1 - mask, 0 - background

    '''
    s = mask_rle.split()
    starts, lengths = [np.asarray(x, dtype=int) for x in (s[0:][::2], s[1:][::2])]
    starts -= 1
    ends = starts + lengths
    img = np.zeros(shape[0]*shape[1], dtype=np.uint8)
    for lo, hi in zip(starts, ends):
        img[lo:hi] = 1
    return img.reshape(shape, order='F')
if __name__ == "__main__":
    #directory1 = r'C:\Users\Administrator\Desktop\data'
    #os.chdir(directory1)     #设定当前工作路径
    #去除mask为空的行
    train_mask = pd.read_csv('./data5.csv', sep='\t', names=['name', 'mask'])
    train_mask = train_mask.dropna(subset=['mask'])
    i=0
    while(i!=10):
        # 读取标签图片,并将对于的rle解码为mask矩阵i
        if train_mask['mask'].iloc[i] is not None:
            png_dir = ("C:\\Users\\Administrator\\Desktop\\data\\dataset2\\png\\"+train_mask['name'].iloc[i].split(".")[0]+".png")#png保存路径

            #获取并保存png图片
            mask = rle_decode(train_mask['mask'].iloc[i])
            new_im = Image.fromarray(mask)
            #print(tf.shape(new_im))
            t=tf.shape(new_im)
            with tf.Session() as sess:
                print(sess.run(t))
            print("看看")
            new_im.save(png_dir)

            directory = r'C:\\Users\\Administrator\\Desktop\\data\\dataset2\\jpg'   #当前工作路径
            os.chdir(directory)
            jpg_dir=("C:\\Users\\Administrator\\Desktop\\data\\train\\"+train_mask['name'].iloc[i].split(".")[0]+".jpg") #jpg读取路径
            img_cv= cv2.imread(jpg_dir)#读取数据
            img_name=train_mask['name'].iloc[i].split(".")[0]+".jpg"
            cv2.imwrite(img_name,img_cv)

            directory1 = r'C:\Users\Administrator\Desktop\data\dataset2'
            os.chdir(directory1)
            fo = open("train.txt", "a+")
            str=train_mask['name'].iloc[i].split(".")[0]+".jpg"+";"+train_mask['name'].iloc[i].split(".")[0]+".png"+'\n'
            fo.write(str)
        i=i+1
        fo.close()
4,test.py用于查看网络的结构
#---------------------------------------------#
#   该部分用于查看网络结构
#---------------------------------------------#
from nets.unet import mobilenet_unet

if __name__ == "__main__":
    model = mobilenet_unet(2, 416, 416)
    model.summary()
5,make_mask.py用于将掩模图进行rle编码
#from nets.segnet import mobilenet_segnet
from tensorflow.python.ops.gen_math_ops import segment_max
from nets.unet import mobilenet_unet
import copy
import os
import random
import cv2
import tensorflow as tf
import numpy as np
from PIL import Image
import pandas as pd
import csv
# 将图片编码为rle格式
def rle_encode(im):
    '''
    im: numpy array, 1 - mask, 0 - background
    Returns run length as string formated
    '''
    pixels = im.flatten(order = 'F')
    pixels = np.concatenate([[0], pixels, [0]])
    runs = np.where(pixels[1:] != pixels[:-1])[0] + 1
    runs[1::2] -= runs[::2]
    return ' '.join(str(x) for x in runs)


if __name__ == "__main__":
    #---------------------------------------------------#
    #   定义了输入图片的颜色,当我们想要去区分两类的时候
    #   我们定义了两个颜色,分别用于背景和斑马线
    #   [0,0,0], [0,255,0]代表了颜色的RGB色彩
    #---------------------------------------------------#

    #---------------------------------------------#
    #   定义输入图片的高和宽,以及种类数量
    #---------------------------------------------#
    HEIGHT = 416
    WIDTH = 416
    #---------------------------------------------#
    #   背景 + 斑马线 = 2
    #---------------------------------------------#
    NCLASSES = 2

    #---------------------------------------------#
    #   载入模型
    #---------------------------------------------#
    model = mobilenet_unet(n_classes=NCLASSES,input_height=HEIGHT, input_width=WIDTH)
    #--------------------------------------------------#
    #   载入权重,训练好的权重会保存在logs文件夹里面
    #   我们需要将对应的权重载入
    #   修改model_path,将其对应我们训练好的权重即可
    #   下面只是一个示例
    #--------------------------------------------------#
    directory1 = r'C:\Users\Administrator\Desktop\Unet_Mobile'
    os.chdir(directory1)     #设定当前工作路径
    model.load_weights("logs/ep028-loss0.349-val_acc0.914.h5")
    tf=pd.read_csv('test_a_samplesubmit.csv',sep='\t',names=['name'])
    # 1. 创建文件对象
    f = open('data6.csv','w',encoding='utf-8',newline='')

    # 2. 基于文件对象构建 csv写入对象
    csv_writer = csv.writer(f)

    # 3. 构建列表头
    #csv_writer.writerow(["name","mask"])
    for i in range(2500):
        jpg=tf['name'].iloc[i]
        img = Image.open("./test_a/"+jpg)
        old_img = copy.deepcopy(img)
        orininal_h = np.array(img).shape[0]
        orininal_w = np.array(img).shape[1]

        #--------------------------------------------------#
        #   对输入进来的每一个图片进行Resize
        #   resize成[HEIGHT, WIDTH, 3]
        #--------------------------------------------------#
        img = img.resize((WIDTH,HEIGHT), Image.BICUBIC)
        img = np.array(img) / 255
        img = img.reshape(-1, HEIGHT, WIDTH, 3)

        #--------------------------------------------------#
        #   将图像输入到网络当中进行预测
        #--------------------------------------------------#
        pr = model.predict(img)[0]
        pr = pr.reshape((int(HEIGHT/2), int(WIDTH/2), NCLASSES)).argmax(axis=-1) #[208,208]

        class_colors = [[0,0,0],[1,1,1]]
        #------------------------------------------------#
        #   创建一副新图,并根据每个像素点的种类赋予颜色
        #------------------------------------------------#
        seg_img = np.zeros((int(HEIGHT/2), int(WIDTH/2)))             #制作底片

        for c in range(NCLASSES):                                     #上色
            seg_img[:, :] += ((pr[:,: ] == c) * class_colors[c][0]).astype('uint8')


        seg_img = Image.fromarray(np.uint8(seg_img)).resize((orininal_w,orininal_h))
        seg_img = np.asarray(seg_img)
        mask=rle_encode(seg_img)
        csv_writer.writerow([jpg,mask])


        # 5. 关闭文件
    f.close()
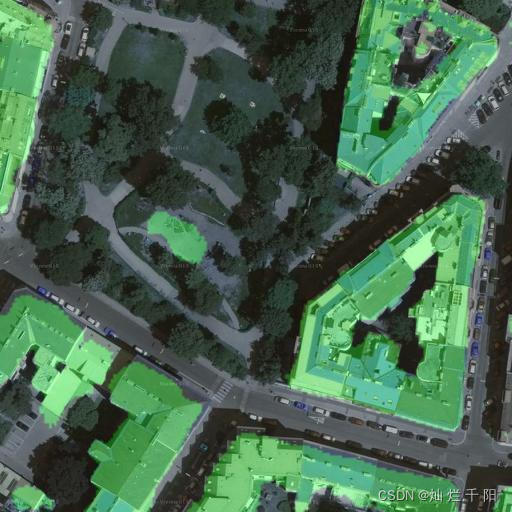
六,效果展示
(此处为了能有一个直观的展示就不用掩模图片)
效果还是可以的,边缘部分的效果也还理想


