一. 写保护
1. 目的
将Flash设置为写保护的目的,是为了防止其他人通过J-Link,ULINK2等仿真器,将Flash中的程序读取出来(设想一下,你辛辛苦苦研发的产品,别人通过仿真器将程序读取出来,再copy一下产品的硬件,就可以生产)。
可以通过将Flash设置为读保护来保护自己的程序。
2. 开发环境
适用于STM32F1和F4系列(其他系列没有用过);
F1系列的库:STM32F10x_StdPeriph_Lib_V3.5.0
F4系列的库:STM32F4xx_DSP_StdPeriph_Lib_V1.8.0
开发环境使用的MDK,版本5.25
3. 程序
通过flash_if.c源程序中的FLASH_If_EnableReadProtection()函数来加密Flash。函数代码如下:
  /**
    * @brief  Enable the read protection of user flash area.
    * @param  None
    * @retval 1: Read Protection successfully enable
    *         2: Error: Flash read unprotection failed
    */

    uint32_t FLASH_If_EnableReadProtection(void)
    {
      /* Returns the FLASH Read Protection level. */
      if( FLASH_OB_GetRDP() == RESET )
      {
        /* Unlock the Option Bytes */
        FLASH_OB_Unlock();

        /* Sets the read protection level. */
        FLASH_OB_RDPConfig(OB_RDP_Level_1);

        /* Start the Option Bytes programming process. */
        if (FLASH_OB_Launch() != FLASH_COMPLETE)
        {
          /* Disable the Flash option control register access (recommended to protect
             the option Bytes against possible unwanted operations) */
          FLASH_OB_Lock();

          /* Error: Flash read unprotection failed */
          return (2);
        }

        /* Disable the Flash option control register access (recommended to protect
           the option Bytes against possible unwanted operations) */
        FLASH_OB_Lock();

        /* Read Protection successfully enable */
        return (1);
      }

      /* Read Protection successfully enable */
      return (1);
    }
- 1
- 2
- 3
- 4
- 5
- 6
- 7
- 8
- 9
- 10
- 11
- 12
- 13
- 14
- 15
- 16
- 17
- 18
- 19
- 20
- 21
- 22
- 23
- 24
- 25
- 26
- 27
- 28
- 29
- 30
- 31
- 32
- 33
- 34
- 35
- 36
- 37
- 38
- 39
- 40
一般在BootLoader的主函数里,加入FLASH_If_EnableReadProtection()函数调用,加密Flash。
加密后,无法再通过仿真器来Debug或烧写程序,只能通过串口等IAP方式来烧写用户程序。
工程需要添加flash_if.h和flash_if.c文件。

二. 解除写保护
有两种方法可以解除Flash的写保护。
1. 建立MDK工程,程序设置为SRAM启动,在程序中解除Flash的锁定。
以作者最近使用的STM32F412为例,新建MDK工程,设置Target选项卡:

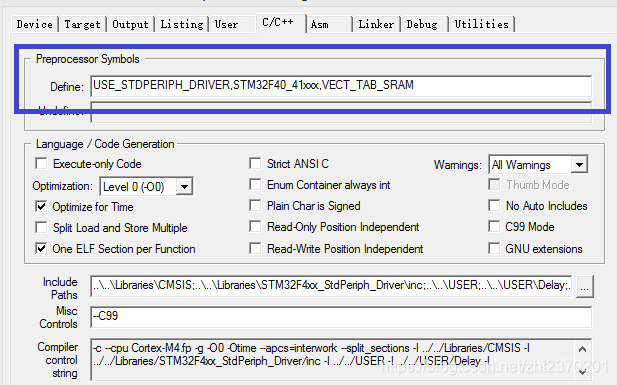
配置C/C++选项卡,根据芯片型号,包含对应宏定义;预编译宏VECT_TAB_SRAM为必添加项。

添加初始化文件路径:G:\ProgrammeFiles\Keil5\ARM\Pack\Keil\STM32F4xx_DFP\2.13.0\MDK\Boards\Keil\MCBSTM32F400\Blinky\Debug_RAM.ini (MDK的安装路径不同这里有所不同)

在main函数中调用Flash_DisableReadProtection()函数,函数代码如下:
/****************************************************************
 * Function:    Flash_DisableReadProtection
 * Description: Disable the read protection of user flash area.
 * Input:
 * Output:
 * Return:      1: Read Protection successfully disable
 *              2: Error: Flash read unprotection failed
*****************************************************************/
uint32_t Flash_DisableReadProtection(void)
{
  /* Returns the FLASH Read Protection level. */
  if( FLASH_OB_GetRDP() != RESET )
  {
    /* Unlock the Option Bytes */
    FLASH_OB_Unlock();

/* Sets the read protection level. */
FLASH_OB_RDPConfig(OB_RDP_Level_0);

/* Start the Option Bytes programming process. */
if (FLASH_OB_Launch() != FLASH_COMPLETE)
{
  /* Disable the Flash option control register access (recommended to protect
     the option Bytes against possible unwanted operations) */
  FLASH_OB_Lock();

  /* Error: Flash read unprotection failed */
  return (2);
}

/* Disable the Flash option control register access (recommended to protect
   the option Bytes against possible unwanted operations) */
FLASH_OB_Lock();

/* Read Protection successfully disable */
return (1);
  }

  /* Read Protection successfully disable */
  return (1);
}
- 1
- 2
- 3
- 4
- 5
- 6
- 7
- 8
- 9
- 10
- 11
- 12
- 13
- 14
- 15
- 16
- 17
- 18
- 19
- 20
- 21
- 22
- 23
- 24
- 25
- 26
- 27
- 28
- 29
- 30
- 31
- 32
- 33
- 34
- 35
- 36
- 37
- 38
- 39
- 40
- 41
该函数调用完成后,Flash芯片也已经解锁成功。
Flash芯片内的程序会被清除。
2. 通过J-Flash解锁
1中的方法需要自己新建MDK工程,比较繁琐。
可以通过JFlash软件,配合JLink仿真器来解锁。
JFlash软件的下载网址为:
https://www.segger.com/downloads/jlink/JLink_Windows.exe
下载安装后,在安装目录下会看到JFlash软件

打开JFlash,选择Create a new project

注意:在弹出的Create New Project对话框中,Speed(kHz)默认是4000,即4MH在,一定要选择200k以下。
因为SWD总线布线太长或者不规范,若使用默认的下载速度(4MHZ),下载或者擦除芯片时会导致出现下述错误。

在Target Device中选择对应要解锁的芯片。
以本人所用的STM32F412CE为例,Flash size为512KB,本应选择STM32F411CE,由于STM32F411CE的Flash size为512KB+16MB,因此,选择STM32F411VE。
只要Flash size大小与要解锁的芯片的Flash大小一致,Device可以不一致。

通过SWD将芯片与JLink连接后,选择Target-Connect即可连接成功。

再选择Target-Manual Programming-Erase Chip,即可解除芯片的Flash锁定状态。
不过Flash内的所有数据都会被清除。

参考网上文章《STM32-读保护功能和清除读保护功能设置》,根据自己操作。如有侵权,请联系我删除
1、STM32对内部Flash的保护措施
所有STM32的芯片都提供对Flash的保护,防止对Flash的非法访问 – 写保护和读保护。
1)、读保护即大家通常说的“加密”,是作用于整个Flash存储区域。一旦设置了Flash的读保护,内置的Flash存储区只能通过程序的正常执行才能读出,而不能通过下述任何一种方式读出:
通过调试器(JTAG或SWD);
从RAM中启动并执行的程序;
2)、写保护是以四页(1KB/页) Flash存储区为单位提供写保护,对被保护的页实施编程或擦除操作将不被执行,同时产生操作错误标志。
读与写设置的效果见下表:
读保护写保护 对Flash的操作功能
有效有效 CPU只能读,禁止调试和非法访问。
有效无效 CPU可以读写,禁止调试和非法访问,页0~3为写保护。
无效有效 CPU可读,允许调试和非法访问。
无效无效 CPU可以读写,允许调试和非法访问。
2、当Flash读保护生效时,CPU执行程序可以读受保护的Flash区,但存在两个例外情况:
1)、调试执行程序时;
2)、从RAM启动并执行程序时
STM32还提供了一个特别的保护,即对Flash存储区施加读保护后,即使没有启用写保护,Flash的第 0 ~ 3 页也将处于写保护状态,这是为了防止修改复位或中断向量而跳转到RAM区执行非法程序代码。
3、Flash保护相关函数
FLASH_Unlock(); //Flash解锁
FLASH_ReadOutProtection(DISABLE); //Flash读保护禁止
FLASH_ReadOutProtection(ENABLE); //Flash读保护允许
4、stm32置读保护跟清读保护操作
功能:读保护设置后将不能读出flash 的内容;当解除读保护的时候stm32 会自动擦出整篇flash;
读保护设置:在程序的开头加入“读保护”代码,即实现了读保护功能;(每次程序运行先开保护)
解除读保护:解除读保护可以设置在按键里面,方便实现解锁,也不可不设按键在RAM中执行程序再清除读保护;
(1)设置读保护:
int main(void)
{
….
if(FLASH_GetReadOutProtectionStatus() != SET)
{
//FLASH_Unlock();不解锁FALSH也可设置读保护???
FLASH_ReadOutProtection(ENABLE);
}
……
while(1)
{
…..
}
}
这个写到程序当中并执行过后,使用j-link就不能‘读出’程序了,就是‘读保护’了!没有使用此程序可以读出下载到芯片中的程序,但是如果使用了此程序就无法读出程序了。但是也无法再次烧写新的程序到芯片中了(要测试请慎重!!!!!!)
可以在主程序当中设置一按键专门清除“读保护”,一旦按下按键则清除“读保护”时芯片可以重新被烧写。
(2)解除读保护:在程序中的某个操作中(如按键等)加入如下代码,执行后
代码自己杀死了自己!
if(FLASH_GetReadOutProtectionStatus() != RESET)
{
FLASH_Unlock();
FLASH_ReadOutProtection(DISABLE);
}
这些函数在stm32f10x_flash 里面,注意:调用上面这个库的时候需在#include “stm32f10x_flash.h”前加#define _FLASH_PROG;否则报(没有定义)错。
如果你没有做按键清除读保护这一步还有方法二补救:专门写一个清除“读保护”程序,使用RAM中运行程序的方法,运行此程序解锁“读保护”,执行后,FLASH会自动全部擦除。代码如下:
int main(void)
{
FLASH_Unlock();
FLASH_ReadOutProtection(DISABLE);
while (1)
{
};
}
※对于在RAM中运行程序,说明如下:
(1)我使用IAR + J-Link,
不用把Boot0和boot1脚设置成从RAM启动也可在RAM中调试(我使用IAR没有RAM中运行选项)
。
(2)在IAR环境中设置Link文件为lnkarm_ram.xcl或者自己修改STM32F10x_FLASH.icf文件
//define symbol __ICFEDIT_region_ROM_start__ = 0x080000F0; //修改为如下:
define symbol __ICFEDIT_region_ROM_start__ = 0x200000F0;
//define symbol __ICFEDIT_region_ROM_end__ = 0x0803FFFF; //修改为如下
define symbol __ICFEDIT_region_ROM_end__ = 0x20001FFF;
//define symbol __ICFEDIT_region_RAM_start__ = 0x20000000; //修改为如下
define symbol __ICFEDIT_region_RAM_start__ = 0x20002000;
(3)Debuger选项Download tab中勾全部去掉。
按上面设置完成后,按Debug按钮,执行上面程序,读保护可解除。
(4)点击下载运行时。可能会提示错误(有时不提示)
当下载时,提示 CRC校验失败,选择 NO(右边)。
当下载时,提示无法擦除 sector 0,选择NO(右边)
(5)运行前使用J-Flash ARM”工具,Target->unsercure chip 解除了芯片的读保护。不然会出现上述各种报错。
if (FLASH_GetReadOutProtectionStatus() == RESET)
{
FLASH_Unlock();
FLASH_ReadOutProtection(ENABLE);
}
if (FLASH_GetReadOutProtectionStatus() == SET)
{
FLASH_Unlock();
FLASH_ReadOutProtection(DISABLE);
}
CPU Flash读保护使能后,仿真器调试会失败。J-LINK有个解锁菜单,需要解锁才能正常再次烧写程序。当然解锁会导致Flash内容被全部擦出。 运行
启动”J-Flash ARM”工具,Target->unsercure chip 就解除了芯片的读保护。Target->unsercure chip 后一定要上电复位,系统不复位是不行的。