Shiro的简介
Shiro是一款轻量级的安全框架,核心是过滤器。
-
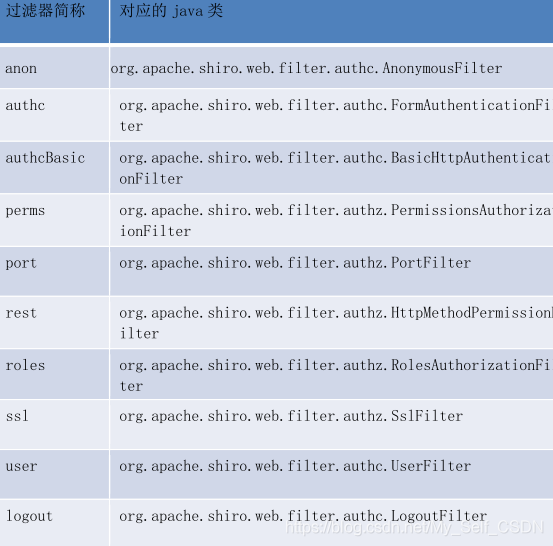
内置的十个过滤器
-
shiro 的核心功能
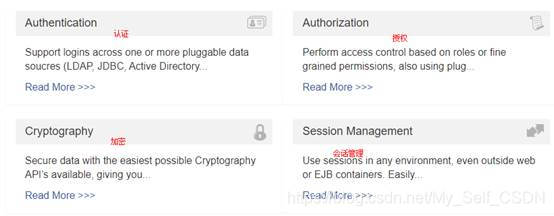
认证
:登录
授权
:前提一定是登录后 判断登录人是否有相关权限
加密
:MD5Hash
会话管理
:shiro框架有它自己的一套session管理,此session不是HTTPSession
shiro的使用步骤
Shiro 框架的使用
- 第一步:对工程导入依赖
<!--shiro和spring整合-->
        <dependency>
            <groupId>org.apache.shiro</groupId>
            <artifactId>shiro-spring</artifactId>
            <version>1.3.2</version>
        </dependency>
        <!--shiro核心包-->
        <dependency>
            <groupId>org.apache.shiro</groupId>
            <artifactId>shiro-core</artifactId>
            <version>1.3.2</version>
        </dependency>
- 第二部:在web.xml中添加一个过滤器DelegatingFilterProxy
<filter>
    <filter-name>shiroFilter</filter-name>
    <filter-class>org.springframework.web.filter.DelegatingFilterProxy</filter-class>
    <init-param>
        <param-name>targetFilterLifecycle</param-name>
        <param-value>true</param-value>
    </init-param>
</filter>
<filter-mapping>
    <filter-name>shiroFilter</filter-name>
    <url-pattern>/*</url-pattern>
</filter-mapping>
- 第三步:在表现层的resources下的spring文件夹下添加一个配置文件
名称applicationContext-shiro.xml
<?xml version="1.0" encoding="UTF-8"?>
<beans xmlns="http://www.springframework.org/schema/beans"
	xmlns:xsi="http://www.w3.org/2001/XMLSchema-instance" xmlns:aop="http://www.springframework.org/schema/aop"
	xmlns:context="http://www.springframework.org/schema/context"
	xmlns:jdbc="http://www.springframework.org/schema/jdbc" xmlns:tx="http://www.springframework.org/schema/tx"
	xmlns:jpa="http://www.springframework.org/schema/data/jpa" xmlns:task="http://www.springframework.org/schema/task"
	xsi:schemaLocation="
		http://www.springframework.org/schema/beans http://www.springframework.org/schema/beans/spring-beans.xsd
		http://www.springframework.org/schema/aop http://www.springframework.org/schema/aop/spring-aop.xsd
		http://www.springframework.org/schema/context http://www.springframework.org/schema/context/spring-context.xsd
		http://www.springframework.org/schema/jdbc http://www.springframework.org/schema/jdbc/spring-jdbc.xsd
		http://www.springframework.org/schema/tx http://www.springframework.org/schema/tx/spring-tx.xsd
		http://www.springframework.org/schema/data/jpa
		http://www.springframework.org/schema/data/jpa/spring-jpa.xsd">

	<description>Shiro与Spring整合</description>
	<bean id="securityManager" class="org.apache.shiro.web.mgt.DefaultWebSecurityManager">
        <!-- Single realm app.  If you have multiple realms, use the 'realms' property instead. -->
        <property name="realm" ref="authRealm"/><!-- 引用自定义的realm -->
    </bean>

    <!-- 自定义Realm域的编写 -->
    <bean id=" 自己定义的" class=" 文件的层级 ">
        <!-- 注入自定义的密码比较器 -->
        <property name="credentialsMatcher" ref="customerCredentialsMatcher" ></property>
    </bean>

    <!-- 自定义的密码比较器 -->
    <bean id="customerCredentialsMatcher" class="cn.itcast.shiro.CustomerCredentialsMatcher"></bean>

     <!-- filter-name这个名字的值来自于web.xml中filter的名字 -->
    <bean id="shiroFilter" class="org.apache.shiro.spring.web.ShiroFilterFactoryBean">
        <property name="securityManager" ref="securityManager"/>
        <!--登录页面  -->
        <property name="loginUrl" value="/index.jsp"></property>

        <!-- 登录成功后 -->
        <!-- <property name="successUrl" value="/home.action"></property> -->

        <property name="filterChainDefinitions">
            <!-- /**代表下面的多级目录也过滤 -->
            <value>
				/index.jsp* = anon
				/home* = anon
				/sysadmin/login/login.jsp* = anon
				/sysadmin/login/loginAction_logout* = anon
				/login* = anon
				/logout* = anon
				/components/** = anon
				/css/** = anon
				/img/** = anon
				/js/** = anon
				/plugins/** = anon
				/images/** = anon
				/js/** = anon
				/make/** = anon
				/skin/** = anon
				/stat/** = anon
				/ufiles/** = anon
				/validator/** = anon
				/resource/** = anon
				/** = authc
				/*.* = authc
            </value>
        </property>
    </bean>

    <!-- 保证实现了Shiro内部lifecycle函数的bean执行 -->
    <bean id="lifecycleBeanPostProcessor" class="org.apache.shiro.spring.LifecycleBeanPostProcessor"/>

    <!-- 生成代理,通过代理进行控制 -->
    <bean class="org.springframework.aop.framework.autoproxy.DefaultAdvisorAutoProxyCreator"
          depends-on="lifecycleBeanPostProcessor">
        <property name="proxyTargetClass" value="true"/>
    </bean>

    <!-- 安全管理器 -->
    <bean class="org.apache.shiro.spring.security.interceptor.AuthorizationAttributeSourceAdvisor">
        <property name="securityManager" ref="securityManager"/>
    </bean>
</beans>
- 第四步:后台进行登陆认证
后台认证
- shiro认证的三大步骤:
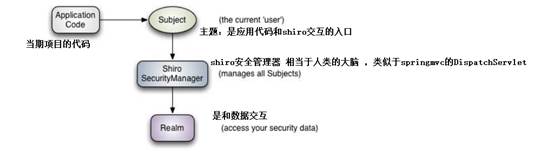
- 获取主题:
Subject subject = SecurityUtils.getSubject();
- 创建令牌,存有个人信息(username,加密后的password)
UsernamePasswordToken token = new UsernamePasswordToken(username,password);
3.开始认证
subject.login(token);//AuthenticationToken
- 自定义Realm并在Realm中进行认证
public class SaaSRealm extends AuthorizingRealm {

    @Autowired
    private UserService userService;

    /**
     * 认证
     * @param authenticationToken
     * @return
     * @throws AuthenticationException
     */
    @Override
    protected AuthenticationInfo doGetAuthenticationInfo(AuthenticationToken authenticationToken) throws AuthenticationException {
//        判断email和password是否正确
        UsernamePasswordToken token = (UsernamePasswordToken) authenticationToken;
        String email = token.getUsername();
        User user = userService.findByUsername(username);
        if(user!=null){
            String password = new String(token.getPassword()); //页面上传过来的明文的
            String password_page = new Md5Hash(password, user.getUserName(),2).toString();
            if(user.getPassword().equals(password_page)){
//                p1: 主角   p2: 密码  p3:当前类名
                return new SimpleAuthenticationInfo(user,password,getName());
            }
        }
        return null;  //如果一旦return null,在登录方法那里就会跑异常
    }

    /**
     * 授权
     * @param principalCollection
     * @return
     */
    @Override
    protected AuthorizationInfo doGetAuthorizationInfo(PrincipalCollection principalCollection) {

        return null;
    }
}
- 把realm交给spring容器,并且注入到securityManager中
<bean id="自己的定义 " class=" Realm的位置层级"/>

    <bean id="securityManager" class="org.apache.shiro.web.mgt.DefaultWebSecurityManager">
      <property name="realm" ref="saasRealm"/>
        <property name="cacheManager" ref="cacheManager"/>
    </bean>
    <bean id="cacheManager" class="org.apache.shiro.cache.MemoryConstrainedCacheManager"/>
## 授权-判断登录人是否有权限访问相关的方法 #### xml方式 – 第一步 :在xml中添加一个过滤器
/login.do = anon
<!-- 当前登陆人是否又该权限-->
/login/list.do=["企业管理"]
- 第二步:在realm中告诉框架当前登录人的权限
  /**
     * 授权
     * @param principalCollection
     * @return
     */
    @Override
    protected AuthorizationInfo doGetAuthorizationInfo(PrincipalCollection principalCollection) {
//         在此方法中告诉shiro框架当前登录人的权限
        SimpleAuthorizationInfo info = new SimpleAuthorizationInfo();
//        查询当前登录人的权限(菜单)

//        Subject subject = SecurityUtils.getSubject();
//        User user = (User) subject.getPrincipal();
//        获取当前登录人user
        User user = (User) principalCollection.getPrimaryPrincipal();
        List<Module> moduleList = moduleService.findByUser(user);
        for (Module module : moduleList) {
//            一个一个地添加进去(告诉shiro框架的权限)
            info.addStringPermission(module.getName());
        }
        return info;
    }
注解方式
- 第一步:把shiro配置文件中的perms过滤器去掉
/login.do = anon
- 第二步:在相关的方法上添加注解
@RequiresPerissions("权限")
使用shiro的标签控制按钮的显隐

版权声明:本文为My_Self_CSDN原创文章,遵循 CC 4.0 BY-SA 版权协议,转载请附上原文出处链接和本声明。