现在大部分 react 项目都是基于
create-react-app
初始化的,对于普通的项目,使用默认的 webpack 配置完全够用。今天讲讲 create-react-app 的使用技巧和源码分析。
如何加速构建
代码写多了会发现 webpack 每次启动都很慢,可以通过删除配置、添加多线程处理来优化体验。
去除
eslint-loader
eslint-loader
eslint-loader
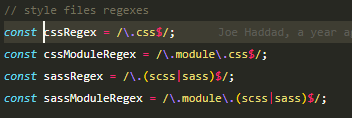
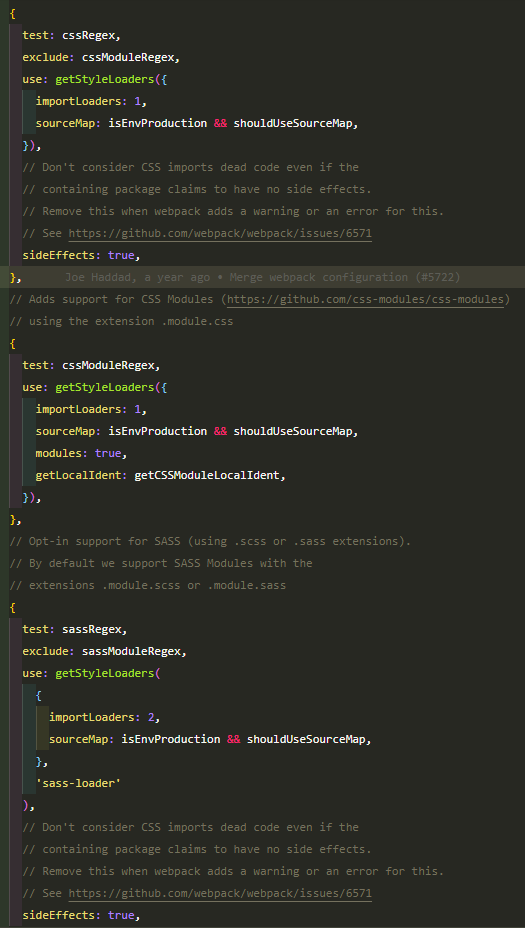
的功能是将 eslint 检测的内容显示到命令行,如果确保写的代码没有问题,可以去除掉。去除之后
webpack-dev-server
开启速度明显提升。

去除上面的代码
使用
thread-loader
或者
happypack
thread-loader
happypack
thread-loader
[1]
会将后面的 loader 放置在一个 worker 池里面运行,以达到多线程构建。每个 worker 都是一个单独的有 600ms 限制的 node.js 进程。同时跨进程的数据交换也会被限制,请在高开销的 loader 中使用。
{
  test: /\.(js|ts)x?$/i,
  use: [
    'thread-loader',
    {
      loader: 'babel-loader',
      options: {
        cacheDirectory: true,
      },
    },
  ],
  exclude: /node_modules/,
},
happypack
[2]
通过多线程并发加速构建过程,不过包作者现在很少维护了,推荐用 thread-loader。配置略微复杂,而且对复杂的 js less 配置不太友好。
**exports.plugins = [
  new HappyPack({
    id: 'jsx',
    threads: 4,
    loaders: [ 'babel-loader' ]
  }),

  new HappyPack({
    id: 'styles',
    threads: 2,
    loaders: [ 'style-loader', 'css-loader', 'less-loader' ]
  })
];

exports.module.rules = [
  {
    test: /\.js$/,
    use: 'happypack/loader?id=jsx'
  },

  {
    test: /\.less$/,
    use: 'happypack/loader?id=styles'
  },
]**
偷懒的话选择 thread-loader 就好了,加一行代码。
react-app-rewired 和 customize-cra
如果不想 eject 项目怎么办?
react-app-rewired
[3]
可以在不 eject 也不创建额外 react-scripts 的情况下修改 create-react-app 内置的 webpack 配置,然后你将拥有 create-react-app 的一切特性,且可以根据你的需要去配置 webpack 的 plugins, loaders 等,推荐配合 customize-cra 一起使用。
使用方法
yarn add react-app-rewired customize-cra -D
更改 package.json
"scripts": {
-   "start": "react-scripts start",
+   "start": "react-app-rewired start",
-   "build": "react-scripts build",
+   "build": "react-app-rewired build",
-   "test": "react-scripts test --env=jsdom",
+   "test": "react-app-rewired test --env=jsdom",
    "eject": "react-scripts eject"
}
在根目录下创建 config-overrides.js 文件,然后改成你想要的的配置
const {
  override,
  addDecoratorsLegacy,
  disableEsLint,
  addBundleVisualizer,
  addWebpackAlias,
  adjustWorkbox
} = require("customize-cra");
const path = require("path");

module.exports = override(
  // enable legacy decorators babel plugin
  addDecoratorsLegacy(),

  // disable eslint in webpack
  disableEsLint(),

  // add webpack bundle visualizer if BUNDLE_VISUALIZE flag is enabled
  process.env.BUNDLE_VISUALIZE == 1 && addBundleVisualizer(),

  // add an alias for "ag-grid-react" imports
  addWebpackAlias({
    ["ag-grid-react$"]: path.resolve(__dirname, "src/shared/agGridWrapper.js")
  }),

  // adjust the underlying workbox
  adjustWorkbox(wb =>
    Object.assign(wb, {
      skipWaiting: true,
      exclude: (wb.exclude || []).concat("index.html")
    })
  )
);
定制化使用
添加 less
create-react-app 中默认开启了 sass 预处理器编译,想使用 less 需要手工添加。另外对于 css modules ,其内置的做法是对这类文件使用
/\.module\.(scss|sass)$/
或者
/\.module\.css$/
检测。如果想要直接对
.css
或
.less
开启 css modules ,需要针对 src 和 node_modules 写两套 loader 处理规则,原因是 node_modules 下的文件不需要开启 css modules。
create-react-app 内置规则


安装 less 相关依赖
yarn add less less-loader -D
对 src 文件夹下面的 less、css 文件进行处理,并开启 css modules,这里要注意下,这个配置不针对 node_modules 下的样式文件,node_modules 下的不需要开启 css modules,否则会出问题。
// webpack.config.js
{
  test: /\.(le|c)ss$/i,
  use: [
    isProd
      ? {
          loader: MiniCssExtractPlugin.loader,
        }
      : 'style-loader',
    {
      loader: 'css-loader',
      options: {
        modules: {
          localIdentName: isProd ? '[hash:base64]' : '[path][name]__[local]--[hash:base64:5]',
        },
      },
    },
    {
      loader: 'less-loader',
      options: {
        javascriptEnabled: true,
      },
    },
  ].filter(Boolean),
  include: srcPath,
},
对 node_modules 的配置
{
  test: /\.(le|c)ss$/i,
  use: [
    isProd
      ? {
          loader: MiniCssExtractPlugin.loader,
        }
      : 'style-loader',
    'css-loader',
    { loader: 'less-loader', options: { javascriptEnabled: true } },
  ].filter(Boolean),
  include: [/node_modules/],
},
源码分析总结
terser-webpack-plugin
较新版本的脚手架中使用
terser-webpack-plugin
[4]
压缩 js 代码,uglifyjs 已经不再推荐使用。
terser 这样介绍:uglify-es 不再维护,并且 uglify-js 不支持 ES6+ 语法。

简单使用
const TerserPlugin = require('terser-webpack-plugin');

module.exports = {
  optimization: {
    minimize: true,
    minimizer: [new TerserPlugin()],
  },
};
file-loader 置于末尾,文件会被自动编译到
static/media
目录下
static/media
在 webpack.config.js 中,file-loader 是在 oneOf 的数组中的最后一个,表示任何一个文件如果没有命中前面的任何一个 loader,则归 file-loader 接管了。exclude 表示除了这些它都会处理,默认会重命名文件,并复制到
build/static/media/
目录下。
另外代码中也给出了提示,不要在 file-loader 后面添加 loader,因为所有的剩余文件都会被 file-loader 处理掉
// "file" loader makes sure those assets get served by WebpackDevServer.
// When you `import` an asset, you get its (virtual) filename.
// In production, they would get copied to the `build` folder.
// This loader doesn't use a "test" so it will catch all modules
// that fall through the other loaders.
{
  loader: require.resolve('file-loader'),
  // Exclude `js` files to keep "css" loader working as it injects
  // its runtime that would otherwise be processed through "file" loader.
  // Also exclude `html` and `json` extensions so they get processed
  // by webpacks internal loaders.
  exclude: [/\.(js|mjs|jsx|ts|tsx)$/, /\.html$/, /\.json$/],
  options: {
    name: 'static/media/[name].[hash:8].[ext]',
  },
},
// ** STOP ** Are you adding a new loader?
// Make sure to add the new loader(s) before the "file" loader.
file-loader 和 url-loader 的区别
看看 use-loader 的配置,会发现
options.name
和 file-loader 一致,其实 file-loader 是 url-loader 的退化版本,也就是当文件大小是小于 10000 byte 时,url-loader 会将文件转换成 base64 编码插入到 html 中,不作为独立的一个文件,这样可以减少页面发起的请求数,如果超过这个大小,则使用 file-loader 将文件重命名并复制到
build/static/media
目录下。
// "url" loader works like "file" loader except that it embeds assets
// smaller than specified limit in bytes as data URLs to avoid requests.
// A missing `test` is equivalent to a match.
{
  test: [/\.bmp$/, /\.gif$/, /\.jpe?g$/, /\.png$/],
  loader: require.resolve('url-loader'),
  options: {
    limit: imageInlineSizeLimit, // 内置的是 10000 byte
    name: 'static/media/[name].[hash:8].[ext]',
  },
},
momentjs 冗余多语言文件
如果有用到 ant design 或直接使用了 momentjs,默认会把多语言的包
(node_modules/moment/local/*.js)
全部打进来,导致包体积增加,但是我们不会用到这么多语言,所以需要排除掉。
plugins:[
    ...,
    new webpack.IgnorePlugin(/^\.\/locale$/, /moment$/),
]
env
create-react-app 可以通过
.env.xxx
来预置一些参数到
process.env
中。具体源码在
`react-scripts/config/env.js`
[5]
中。
核心代码
// 从以下文件中加载配置
const dotenvFiles = [
  `${paths.dotenv}.${NODE_ENV}.local`, // 推荐本地使用
  `${paths.dotenv}.${NODE_ENV}`, // .env.production 或者 .env.development
  NODE_ENV !== 'test' && `${paths.dotenv}.local`, // 推荐本地使用
  paths.dotenv, // .env
].filter(Boolean);
// 将 .env 文件的设置应用到 process.env 中
dotenvFiles.forEach(dotenvFile => {
  if (fs.existsSync(dotenvFile)) {
    require('dotenv-expand')(
      require('dotenv').config({
        path: dotenvFile,
      })
    );
  }
});
以
REACT_APP_
开头的将会通过
new webpack.DefinePlugin(env.stringified)
注入到全局的
process.env
中。
// env.js
const REACT_APP = /^REACT_APP_/i;

function getClientEnvironment(publicUrl) {
  const raw = Object.keys(process.env)
    .filter(key => REACT_APP.test(key))
    .reduce(
      (env, key) => {
        env[key] = process.env[key];
        return env;
      },
      {
        // 预置的两个
        NODE_ENV: process.env.NODE_ENV || 'development',
        PUBLIC_URL: publicUrl,
      }
    );
  // Stringify all values so we can feed into Webpack DefinePlugin
  const stringified = {
    'process.env': Object.keys(raw).reduce((env, key) => {
      env[key] = JSON.stringify(raw[key]);
      return env;
    }, {}),
  };
  return { raw, stringified };
}
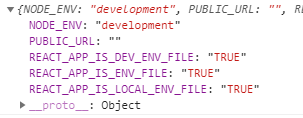
所以你可以愉快的设置一些变量
// .env
REACT_APP_IS_ENV_FILE=TRUE

// .env.development
REACT_APP_IS_DEV_ENV_FILE=TRUE

// .env.local
REACT_APP_IS_LOCAL_ENV_FILE=TRUE
浏览器中打印

babel-preset-react-app
babel-preset-react-app
[6]
是 create-react-app 下面的一个包,它是 create-react-app 默认的 babel preset,可以用来处理 js 和 ts 。这样就不需要额外的配置 ts-loader,另外它内置支持了 ts 的一些功能(装饰器等),可以很方便的使用。


在我们的 webpack 配置中引入 babel-preset-react-app 可以简化配置。
欢迎大家关注我的掘金和公众号,算法、TypeScript、React 及其生态源码定期讲解。

参考资料
[1]
thread-loader:
https://github.com/webpack-contrib/thread-loader
[2]
happypack:
https://github.com/amireh/happypack
[3]
react-app-rewired:
https://github.com/timarney/react-app-rewired
[4]
terser-webpack-plugin:
https://github.com/webpack-contrib/terser-webpack-plugin
[5]
react-scripts/config/env.js
:
https://github.com/facebook/create-react-app/blob/master/packages/react-scripts/config/env.js
[6]
babel-preset-react-app:
https://github.com/facebook/create-react-app/tree/master/packages/babel-preset-react-app