github软件包怎么用
TL; DR
(
TL;DR
)
An example Android project and walk-through of how to publish and consume libraries via
GitHub Packages
, along with features and tips such as achieving transitive dependencies through Gradle API dependency, source code availability in published package and local publishing through custom repo or MavenLocal.
一个Android项目示例,以及如何通过
GitHub软件包
发布和使用库的
演练
以及功能和技巧,例如通过Gradle API依赖关系实现传递依赖关系,已发布包中的源代码可用性以及通过自定义repo或MavenLocal进行本地发布。
GitHub软件包
(
GitHub Packages
)
GitHub Packages
is a new package repository, a.k.a artifactory, service from Github. According to its
documentation
, they support a list of common package standards such as
Maven, npm, Docker, RubyGems and NuGet
. Android uses
Maven
to manage library packages. Compared to other Maven solutions, such as
Nexus, JitPack & JFrog
,
Github Packages
has become my favorite pick for the following reasons:
GitHub Packages
是来自Github的新软件包存储库,又名人工制品。 根据其
文档
,它们支持一系列常见的软件包标准,例如
Maven,npm,Docker,RubyGems和NuGet
。 Android使用
Maven
来管理库包。 与
Nexus,JitPack和JFrog
等其他Maven解决方案相比,
Github Packages
已成为我最喜欢的选择,原因如下:
-
Packages live in one place with their source code repository(Github). Easier for navigation and lookup between the two.
软件包及其源代码存储库(Github)放在一个地方。 两者之间的导航和查找更加容易。
-
Share the same authentication credential(
Personal Access Token
) and permission system on Github.在Github上共享相同的身份验证凭据(
个人访问令牌
)和权限系统。 -
Straightforward setup and we don’t need DevOps support.
简单的设置,我们不需要DevOps支持。
-
Large
free data quota
for Enterprise accounts.企业帐户的大量
免费数据配额
。
为什么在工作中使用软件包存储库?
(
Why do I use package repositories at work?
)
As an
Application-Platform
engineer, my recent work has been to abstract common layers of application architectures(e.g. MVI base classes, View component layer) into central repositories, publish them into libraries then consume them by client apps through Gradle dependencies. Example:
作为一名
应用程序平台
工程师,我最近的工作是将应用程序体系结构的常见层(例如MVI基类,视图组件层)抽象到中央存储库中,将其发布到库中,然后由客户端应用程序通过Gradle依赖项使用它们。 例:

一个示例项目
(
An Example Project
)
Let me use an example project to demo how to leverage
Github Packages
as an artifactory to publish and consume Android libraries.
让我使用一个示例项目来演示如何利用
Github软件包
作为发布和使用Android库的工件。
Goals
目标
This is what we would like to achieve with the project:
这是我们希望通过该项目实现的目标:

-
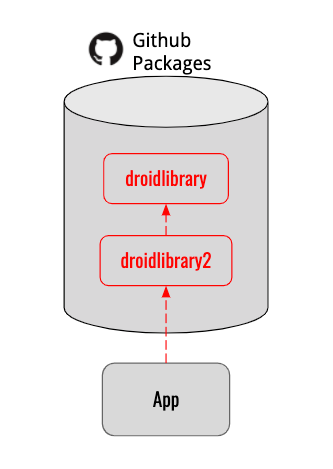
droidlibrary
published
as an
Android library
droidlibrary
发布
为
Android库
-
droidlibrary2
depends on
droidlibrary,
and itself is published
as
another Android library
droidlibrary2
取决于
droidlibrary,
其本身
作为
另一个Android库发布
-
Application
declared to depend on
droidlibrary2
only but
transitively
depends
on
droidlibrary
声明仅依赖
droidlibrary2的
应用程序
,但可
传递地
依赖
droidlibrary
-
All
source code
of dependency libraries(
droidlibrary
&
droidlibrary2
) are available for client(app) to navigate into依赖库的所有
源代码
(
droidlibrary
和
droidlibrary2
)可供客户端(应用程序)导航到
Nuance of Gradle Dependency : API vs. implementation
Gradle依赖性的细微差别:API与实现
In the example,
droidlibrary2
library depends on
droidlibrary
with Gradle
API
declaration, so it can expose
droidlibrary
as
transitive dependency
(we will see how so in the later Publishing section)
.
Here is the
official doc
to explain
API vs implementation
for Gradle.
在该示例中,
droidlibrary2
库依赖于具有Gradle
API
声明的
droidlibrary
,因此它可以将
droidlibrary
公开为
传递依赖项
(我们将在后面的Publishing部分中了解如何实现)
。
这是解释Gradle的
API与实现
的
官方文档
。
api 'com.chenzhang2006.libraries:droidlib:x.x.x'
But
app
simply declared
implementation
dependency to consume droidlibrary2:
但是
应用程序
只是声明
实现
依赖来消耗droidlibrary2:
implementation 'com.chenzhang2006.libraries:droidlib2:x.x.x'
解释发布脚本
(
Explaining Publishing Script
)
Single Gradle Script For Publishing
用于发布的单一Gradle脚本
The best way to compose your publishing script is to aggregate all publishing related script into one single file, called
publish.gradle
:
撰写发布脚本的最佳方法是将所有与发布相关的脚本聚合到一个名为
publish.gradle的
文件中:
apply plugin: 'maven-publish'


def LIB_GROUP_ID = 'com.chenzhang2006.libraries'
def LIB_ARTIFACT_ID = 'droidlib2'
def LIB_VERSION = '3.0.1'


task sourceJar(type: Jar) {
    from android.sourceSets.main.java.srcDirs
    classifier "sources"
}


publishing {
    repositories {
        maven {
            name = "GithubPackages"
            url = uri("https://maven.pkg.github.com/chenzhang2006/AndroidLibForArtifactory")
            credentials {
                username = System.getenv('GITHUB_USER') ?: project.properties['GITHUB_USER']
                password = System.getenv('GITHUB_PERSONAL_ACCESS_TOKEN') ?: project.properties['GITHUB_PERSONAL_ACCESS_TOKEN']
            }
        }
        maven {
            name = 'CustomMavenRepo'
            url = "file://${buildDir}/repo"
        }
    }
    publications {
        droidlib2(MavenPublication) {
            groupId LIB_GROUP_ID
            artifactId LIB_ARTIFACT_ID
            version LIB_VERSION
            artifact("$buildDir/outputs/aar/droidlibrary2-release.aar")
            artifact(sourceJar)


            pom.withXml {
                def dependenciesNode = asNode().appendNode('dependencies')


                //Iterate over the compile dependencies (we don't want the test ones), adding a <dependency> node for each
                configurations.api.allDependencies.each {
                    def dependencyNode = dependenciesNode.appendNode('dependency')
                    dependencyNode.appendNode('groupId', it.group)
                    dependencyNode.appendNode('artifactId', it.name)
                    dependencyNode.appendNode('version', it.version)
                }
            }
        }
    }
}
Then in
build.gradle
, you can simply add a 1-liner in the beginning:
然后在
build.gradle中
,您只需在开头添加一个1-liner:
apply from: file('publish.gradle')
There are a few points in
publish.gradle
that are worth calling out:
publish.gradle
中有几点值得一提:
-
Use Maven Publish Gradle Plugin
使用Maven Publish Gradle插件
apply plugin: 'maven-publish'
2. Declare Maven Repositories & Credentials
2.声明Maven存储库和凭据
We declared 2 maven repositories in the example: one for
Github Packages
(named “GithubPackages
”
), the other in local directory(named “CustomMavenRepo” for verification/debugging purpose). I will explain how to use the local custom repository in later
Perform Publishing
section.
在示例中,我们声明了2个Maven存储库:一个用于
Github软件包
(名为“ GithubPackages
”
),另一个在本地目录中(用于验证/调试的名称为“ CustomMavenRepo”)。 我将在稍后的“
执行发布”
部分中说明如何使用本地自定义存储库。
repositories {
        maven {
            name = "GithubPackages"
            url = uri("https://maven.pkg.github.com/chenzhang2006/AndroidLibForArtifactory")
            credentials {
                username = System.getenv('GITHUB_USER') ?: project.properties['GITHUB_USER']
                password = System.getenv('GITHUB_PERSONAL_ACCESS_TOKEN') ?: project.properties['GITHUB_PERSONAL_ACCESS_TOKEN']
            }
        }
        maven {
            name = 'CustomMavenRepo'
            url = "file://${buildDir}/repo"
        }
    }
There are a few ways to set credentials as Gradle properties or system environment variables. For example, you can simply set
GITHUB_USER & GITHUB_PERSONAL_ACCESS_TOKEN
in gradle properties under your home directory:
~/.gradle/gradle.properties
有几种方法可以将凭据设置为Gradle属性或系统环境变量。 例如,您可以仅在主目录下的gradle属性中设置
GITHUB_USER和GITHUB_PERSONAL_ACCESS_TOKEN
:
〜/ .gradle / gradle.properties
Refer to
this document
for details of credential configuration for GitHub Packages.
有关GitHub软件包的凭证配置的详细信息,请参阅
此文档
。
3. Declare Publications
3.声明出版物
In this example, each library only has one publication:
在此示例中,每个库只有一个出版物:
publications {
        droidlib2(MavenPublication) {
            groupId LIB_GROUP_ID
            artifactId LIB_ARTIFACT_ID
            version LIB_VERSION
            artifact("$buildDir/outputs/aar/droidlibrary2-release.aar")
            artifact(sourceJar)


            pom.withXml {
                def dependenciesNode = asNode().appendNode('dependencies')


                //Iterate over the compile dependencies (we don't want the test ones), adding a <dependency> node for each
                configurations.api.allDependencies.each {
                    def dependencyNode = dependenciesNode.appendNode('dependency')
                    dependencyNode.appendNode('groupId', it.group)
                    dependencyNode.appendNode('artifactId', it.name)
                    dependencyNode.appendNode('version', it.version)
                }
            }
        }
}-
Note that
configurations.api.allDependencies
is the part that carried out the magic of
exposing API dependencies as transitive dependency
and manifest the transitive dependencies in Maven pom.xml(will show in later
Perform Publishing
section):请注意,
configurations.api.allDependencies
是实现
将API依赖
项
公开为传递性依赖关系
并在Maven pom.xml中显示传递性依赖关系的部分(将在以后的
Perform Publishing
部分中显示):
pom.withXml {
    def dependenciesNode = asNode().appendNode('dependencies')


    configurations.api.allDependencies.each {
        def dependencyNode = dependenciesNode.appendNode('dependency')
        dependencyNode.appendNode('groupId', it.group)
        dependencyNode.appendNode('artifactId', it.name)
        dependencyNode.appendNode('version', it.version)
    }
}-
Note that this is what makes the
source code jar
available in the published package:请注意,这就是使
源代码jar
在已发布的程序包中可用的原因:
task sourceJar(type: Jar) {
    from android.sourceSets.main.java.srcDirs
    classifier "sources"
}
//...
artifact(sourceJar)
执行发布
(
Perform Publishing
)
Publish with Android Studio UI
使用Android Studio UI发布
In
Gradle
panel of
Android Studio
, each module that is configured with publishing plugin would display the
publishing
tasks as available actions. Because we declared 2 maven repositories in the publish script in the example, there are multiple publishing tasks available:
* publish[Publication]To
CustomMavenRepo
Repository* publish[Publication]To
GithubPackages
Repository
在
Android Studio的
Gradle
面板中,配置有发布插件的每个模块都将
发布
任务显示为可用操作。 因为在示例中,我们在发布脚本中声明了2个maven存储库,所以有多个发布任务可用:
* publish [Publication]到
CustomMavenRepo
Repository * publish [Publication]到
GithubPackages
Repository

-
Clicking on those
publish[Publication]To
CustomMavenRepo
Repository tasks
would result in publishing to the local directory, which is a great way to examine locally what artifacts are actually in the package before publishing them to the remote repository.单击
发布到
CustomMavenRepo信息
库的任务
将导致发布到本地目录,这是在将它们发布到远程信息库之前在本地检查包中实际存在哪些工件的好方法。

** If you open
pom.xml
, note that
transitive dependencies
are manifested here for maven to understand that
droidlib2
transitively depends on
droidlib
. Finally, that explained why we wanted
API
Gradle dependency in earlier section.
**如果打开
pom.xml
,请注意,
传递的依赖关系
在此处显示,供maven理解
droidlib2的
传递依赖于
droidlib
。 最后,这解释了为什么在前面的部分中我们想要
API
Gradle依赖性。
<?xml version="1.0" encoding="UTF-8"?>
<project xmlns="http://maven.apache.org/POM/4.0.0" xsi:schemaLocation="http://maven.apache.org/POM/4.0.0 http://maven.apache.org/xsd/maven-4.0.0.xsd" xmlns:xsi="http://www.w3.org/2001/XMLSchema-instance">
  <modelVersion>4.0.0</modelVersion>
  <groupId>com.chenzhang2006.libraries</groupId>
  <artifactId>droidlib2</artifactId>
  <version>3.0.1</version>
  <packaging>aar</packaging>
  <dependencies>
    <dependency>
      <groupId>com.chenzhang2006.libraries</groupId>
      <artifactId>droidlib</artifactId>
      <version>2.0.1</version>
    </dependency>
  </dependencies>
</project>
** Please note that droidlib2-xxx-
sources.jar
is also generated in the package along with the binary artifact(aar). That is why client app would be able to navigate into source code of the libraries.
**请注意,droidlib2-xxx-
sources.jar
也会与二进制工件(aar)一起在软件包中生成。 这就是为什么客户端应用程序能够导航到库的源代码的原因。
-
Clicking on those
publish[Publication]To
GithubPackages
Repository
tasks would post the package to the remote
Github Packages
.单击
发布到
GithubPackages
存储库的
[Publication]
任务会将其发布到远程
Github Packages
。 -
Clicking on
publish
task would trigger both local and remote publishings.单击
发布
任务将触发本地和远程发布。
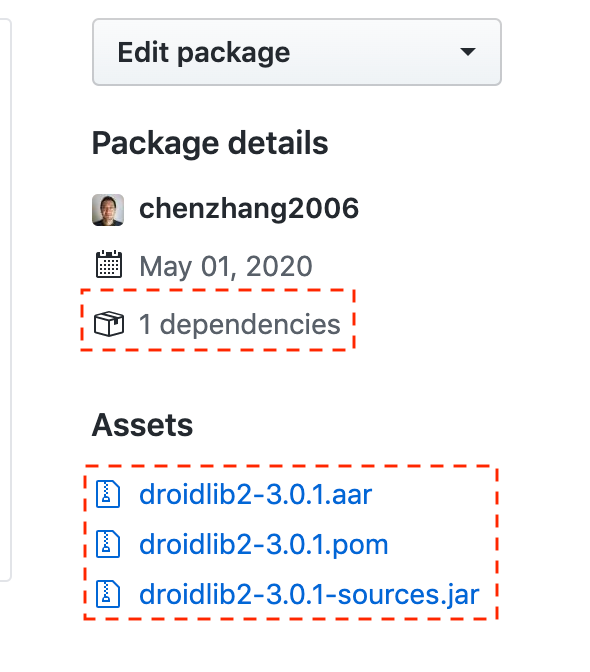
Now if you navigate to
Github Packages UI
for
droidlib2
, you should see its transitive dependency and 3 artifacts in its published package.
现在,如果您导航到
droidlib2的
Github Packages UI
,您应该在其发布的包中看到其传递依赖关系和3个工件。


Command Line or CI/CD Automation
命令行或CI / CD自动化
You can achieve the same result as from
Android Studio
by running Gradle commands for manual publishing. For example:
您可以通过运行Gradle命令进行手动发布来获得与
Android Studio
相同的结果。 例如:
gradlew :droidlibrary:publish
gradlew:droidlibrary:publish
This command can be run in your CI/CD to achieve automation, if that is desired.
如果需要,可以在CI / CD中运行此命令以实现自动化。
Publish SNAPSHOTs To MavenLocal For Local Integration
将SNAPSHOT发布到MavenLocal进行本地集成
This is a very common practice to integrate libraries locally with client apps and verify library functionalities before publishing to remote repositories. In that case,
publishToMavenLocal
comes to rescue.
在本地将库与客户端应用程序集成并在发布到远程存储库之前验证库功能是一种非常普遍的做法。 在这种情况下,
publishToMavenLocal
可以解救。

Note that in convention, locally published library should be versioned with “-SNAPSHOT” as suffix. E.g.
LIB_VERSION =
‘3.0.1-SNAPSHOT’
. The client side should match the same version to consume.
请注意,按照惯例,本地发布的库应使用“ -SNAPSHOT”作为后缀。 例如
LIB_VERSION =
‘3.0.1-SNAPSHOT’
。 客户端应匹配使用相同的版本。
客户端Gradle设置和运行
(
Client Side Gradle Setup and Run
)
In client
app
, we configured Maven repositories in
build.gradle
in project root, so clients can access
both Github Packages and MavenLocal repositories
:
在客户端
应用程序中
,我们在项目根目录的
build.gradle
中配置了Maven存储库,因此客户端可以访问
Github软件包和MavenLocal存储库
:
allprojects {
    repositories {
        // google(), jcenter()...


        mavenLocal()
        maven {
            name = "AndroidLibForArtifactory"
            url = uri("https://maven.pkg.github.com/chenzhang2006/AndroidLibForArtifactory")
            credentials {
                username = System.getenv('GITHUB_USER') ?: project.properties['GITHUB_USER']
                password = System.getenv('GITHUB_PERSONAL_ACCESS_TOKEN') ?: project.properties['GITHUB_PERSONAL_ACCESS_TOKEN']
            }
        }
    }
}
For Github Maven repo setup:
对于Github Maven回购设置:
-
Hostname of
url
always
starts with
maven.pkg.github.com
for
Github Packages
网址的
主机名始终
从
maven.pkg.github.com
开始以获取
Github软件包
-
Path of
url
matches the library project(source code)name on Github
网址
路径与Github上的库项目(源代码)名称匹配
Dependency declaration:
依赖声明:
implementation 'com.chenzhang2006.libraries:droidlib2:x.x.x'
Now you can spin up the app and verify that it can access both libraries and navigate into source code as described in our
Goals
section earlier.
现在,您可以启动该应用程序,并验证它可以访问两个库并导航到源代码,如前面“
目标”
部分所述。
Hope the demo and the walk-through helps if the topic fits your need. Feel free to fork repo as playground. Let me know if you hit snags somewhere and I will try my best to answer.
如果主题适合您,希望演示和演练对您有所帮助。 随意叉回购作为游乐场。 让我知道您是否在某处碰到障碍物,我会尽力回答。
翻译自:
https://proandroiddev.com/android-libraries-on-github-packages-21f135188d58
github软件包怎么用