目录
1. DNAT 将对10.101.231.134的访问分别以50%的概率转发到两个nginx pod上
3. centos100的flannel.1 网卡为vxlan网卡,vni号为1.
4. centos103收到发来的UDP包,拿出载荷中的MAC数据包释放到协议栈中
准备安装包
kubernetscentosansibleplaybook安装国内镜像源-kubernetes文档类资源-CSDN下载
[root@centos100 ~]# tree k8s
k8s
├── conf
│   ├── 10-kubeadm.conf
│   ├── daemon.json
│   ├── k8s.conf
│   ├── kubeadm-flags.env
│   ├── kube-flannel.yml
│   ├── master_addr
│   ├── sysctl.conf
│   └── token
├── example.yaml
├── hosts
├── init.yaml
├── install.sh
├── install.yaml
├── nginx
│   ├── nginx-deployment.yaml
│   ├── nginx-namespace.yaml
│   ├── nginx-service.yaml
│   ├── remove_nginx.sh
│   └── start_nginx.sh
└── README.md

2 directories, 19 file
准备vmware虚拟机环境
网络拓扑
centos100可以ssh免密码登录centos101, centos102, centos103。
centos100安装ansible: yum install ansible

每台机器的/etc/hosts文件修改为如下:
[root@centos100 ~]# cat /etc/hosts
127.0.0.1   localhost localhost.localdomain localhost4 localhost4.localdomain4
::1         localhost localhost.localdomain localhost6 localhost6.localdomain6
192.168.0.100 centos100
192.168.0.101 centos101
192.168.0.102 centos102
192.168.0.103 centos103
集群规划
ansible hosts inventory
[k8s_cluster]
centos101
centos102
centos103
centos100

[k8s_master]
centos100

[k8s_nodes]
centos101
centos102
centos103
初始化环境
init.yaml
初始化sysctl, swap, docker镜像源,关闭selinux
---
- hosts: k8s_cluster
  remote_user: root
  handlers:
  - name: update_yum
    shell: 'yum clean all && yum makecache -y'
  tasks:
  - name: add_docker_ce_repo
    yum_repository:
      name:  docker-ce-repo
      description: docker ce repo
      file: docker-ce
      baseurl: https://mirrors.aliyun.com/docker-ce/linux/centos/7/$basearch/stable
      gpgkey: https://mirrors.aliyun.com/docker-ce/linux/centos/gpg
      enabled: 1
      gpgcheck: 1
    notify: update_yum

  - name: add_k8s_repo
    yum_repository:
      name: kubernetes
      description: k8s repo
      file: kubernetes
      baseurl: https://mirrors.aliyun.com/kubernetes/yum/repos/kubernetes-el7-x86_64/
      enabled: 1
      gpgcheck: 1
      repo_gpgcheck: 1
      gpgkey: https://mirrors.aliyun.com/kubernetes/yum/doc/yum-key.gpg https://mirrors.aliyun.com/kubernetes/yum/doc/rpm-package-key.gpg
    notify: update_yum

  - name: copy_sysctl_conf
    copy: src=./conf/sysctl.conf dest=/etc/sysctl.conf

  - name: copy_sysctl_k8s_conf
    copy: src=./conf/k8s.conf dest=/etc/sysctl.d/k8s.conf

  - name: disable swap
    command: 'swapoff -a'

  - name: refresh_sysctl_system
    shell: 'sysctl --system'

  - name: refresh_sysctl
    shell: 'sysctl -p /etc/sysctl.conf'

  - name: disable_firewalld
    shell: 'systemctl disable firewalld && systemctl stop firewalld'

  - name: disable SELinux
    selinux:
      state: disabled
  - name: disable SElinux in config file1
    replace: path=/etc/sysconfig/selinux regexp='SELINUX=permissive' replace='SELINUX=disabled'
  - name: disable SElinux in config file2
    replace: path=/etc/sysconfig/selinux regexp='SELINUX=enforcing' replace='SELINUX=disabled'
安装k8s
安装kubectl kubeadm, docker-ce
在centos100上安装k8s master结点
其他机器上安装node结点
---
- hosts: k8s_cluster
  remote_user: root
  handlers:
    - name: enable_start_docker
      shell: 'systemctl enable docker && systemctl restart docker'
  tasks:
  - name: Install kubectl
    yum:
      name: kubectl
      state: present

  - name: Install kubeadm
    yum:
      name: kubeadm
      state: present

  - name: Install kubelet
    yum:
      name: kubelet
      state: present

  - name: Install docker
    yum:
      name: docker-ce
      state: present
    notify: enable_start_docker

  - name: "make config file dir"
    shell: "mkdir -p /etc/docker/ && mkdir -p /usr/lib/systemd/system/kubelet.service.d/ && mkdir -p /var/lib/kubelet/"
  - name: Replace docker images source
    copy: src=./conf/daemon.json dest=/etc/docker/daemon.json
  - name: kublet use systemd in kubeadm.conf
    copy: src=./conf/10-kubeadm.conf dest=/usr/lib/systemd/system/kubelet.service.d/10-kubeadm.conf
  - name: kublet use systemd in kubeadm-flags
    copy: src=./conf/kubeadm-flags.env dest=/var/lib/kubelet/kubeadm-flags.env

  - name: Start service docker
    service:
      name: docker
      state: restarted
      enabled: true
  - name: copy_flannel_config
    copy: src=./conf/kube-flannel.yml dest=/etc/kubernetes/kube-flannel.yml

  - name: kubeadm reset all
    shell: 'kubeadm reset -f'

- hosts: k8s_master
  remote_user: root
  tasks:
  - name: kubeadm init master
    shell: 'kubeadm reset -f && kubeadm init --pod-network-cidr 10.21.0.0/16 --image-repository registry.aliyuncs.com/google_containers'

  - name: Start service kubelet
    service:
      name: kubelet
      state: restarted
      enabled: true

  - name: Copy config to ~/.kube
    shell: 'unalias cp; mkdir -p $HOME/.kube && cp -f /etc/kubernetes/admin.conf $HOME/.kube/config && chown $(id -u):$(id -g) $HOME/.kube/config'

  - name: Install flannel
    command: 'kubectl apply -f /etc/kubernetes/kube-flannel.yml'

  - name: Create Token
    shell: 'kubeadm token create > /etc/kubernetes/token'
  - name: Create Master Address
    shell: 'hostname > /etc/kubernetes/master_addr'

  - name: Fetch Token To Local
    fetch: src=/etc/kubernetes/token dest=./conf/token force=yes flat=yes
  - name: Fetch Master Addr To Local
    fetch: src=/etc/kubernetes/master_addr dest=./conf/master_addr force=yes flat=yes

- hosts: k8s_nodes
  remote_user: root
  tasks:
  - name: kublet use systemd in kubeadm-flags
    copy: src=./conf/token dest=/etc/kubernetes/token
  - name: kublet use systemd in kubeadm-flags
    copy: src=./conf/master_addr dest=/etc/kubernetes/master_addr
  - name: join master
    shell: 'kubeadm join --token `cat /etc/kubernetes/token` --discovery-token-unsafe-skip-ca-verification `cat /etc/kubernetes/master_addr`:6443'
安装命令
在centos100中执行如下命令。
ansible-playbook -i hosts init.yaml
ansible-playbook -i hosts install.yaml
重启各机器后发现集群不能自动启动
原因是kubelet没有启动。原因是交换分区在系统启动后又打开,在每一台机器上
vi /etc/fstab 中注释或者删除swap那行。然后执行如下命令
#启动kubelet,并设置开机自启动
ansible -i hosts k8s_cluster -m shell -a 'systemctl restart kubelet'
ansible -i hosts k8s_cluster -m shell -a 'systemctl enable kubelet'
如有需要,删除已经停止的docker容器
docker ps -a|grep Exited|awk '{print $1}' |xargs -i docker rm {}
nginx服务部署与网络包路径分析
搭建好k8s后,我们启动两个nginx pod,并用service作负载均衡
启动nginx集群
nginx-namespace.yaml
apiVersion: v1 #类型为Namespace
kind: Namespace  #类型为Namespace
metadata:
  name: ns-test  #命名空间名称
  labels:
    name: label-test  #pod标签
nginx-deployment.yaml
apiVersion: apps/v1
kind: Deployment
metadata:
  namespace: ns-test
  name: nginx-deployment
spec:
  selector:
    matchLabels:
      app: nginx
  replicas: 2
  template:
    metadata:
      labels:
        app: nginx
    spec:
      containers:
      - name: nginx
        image: nginx:alpine
        ports:
        - containerPort: 80
nginx-service.yaml
apiVersion: v1
kind: Service
metadata:
  namespace: ns-test
  name: nginx-service
spec:
  selector:
    app: nginx
  ports:
  - protocol: TCP
    port: 80
    targetPort: 80
start_nginx.sh
#!/bin/bash
set -e
#创建
kubectl create -f nginx-namespace.yaml
#查询
kubectl get namespace

#创建
kubectl create -f nginx-deployment.yaml
#查询
kubectl get deployment  -n ns-test

kubectl create -f nginx-service.yaml
kubectl get svc nginx-service -o wide  -n ns-test

#测试
echo "sleep 15 wait nginx start"
sleep 15
curl `kubectl get svc nginx-service -o wide  -n ns-test|grep nginx-service|awk '{print $3}'`
执行结果
[root@centos100 nginx]# kubectl get svc -n ns-test
NAME            TYPE        CLUSTER-IP       EXTERNAL-IP   PORT(S)   AGE
nginx-service   ClusterIP   10.101.231.134   <none>        80/TCP    22h
[root@centos100 nginx]# kubectl get pods -o wide -n ns-test
NAME                              READY   STATUS    RESTARTS   AGE   IP          NODE        NOMINATED NODE   READINESS GATES
nginx-deployment-9fbb7d78-dwjcc   1/1     Running   0          22h   10.21.1.2   centos103   <none>           <none>
nginx-deployment-9fbb7d78-r62tg   1/1     Running   0          22h   10.21.3.2   centos101   <none>           <none>
[root@centos100 nginx]# curl 10.101.231.134
<!DOCTYPE html>
<html>
<head>
<title>Welcome to nginx!</title>
<style>
html { color-scheme: light dark; }
body { width: 35em; margin: 0 auto;
font-family: Tahoma, Verdana, Arial, sans-serif; }
</style>
</head>
<body>
<h1>Welcome to nginx!</h1>
<p>If you see this page, the nginx web server is successfully installed and
working. Further configuration is required.</p>

<p>For online documentation and support please refer to
<a href="http://nginx.org/">nginx.org</a>.<br/>
Commercial support is available at
<a href="http://nginx.com/">nginx.com</a>.</p>

<p><em>Thank you for using nginx.</em></p>
</body>
</html>
网络分析
在centos100上执行 curl 10.101.231.134时发生了什么?
从centos100发出的包, curl 10.101.231.134,查看路由表应当走默认路由。所以源MAC/IP是ens33的mac和ip。而目标MAC即路由的mac,查看arp表获取

1. DNAT 将对10.101.231.134的访问分别以50%的概率转发到两个nginx pod上
由于是在centos100,即k8s master上执行的curl命令。所以数据包由本地发出。本地数据包会先经过iptables 的 nat表的OUTPUT链。如果是其他主机把数据包路由到centos100,由会先经过nat表的PREROUTING链处理
[root@centos100 nginx]# iptables -t nat -L -v -n
Chain PREROUTING (policy ACCEPT 1016 packets, 45842 bytes)
 pkts bytes target     prot opt in     out     source               destination
 217K 9752K KUBE-SERVICES  all  --  *      *       0.0.0.0/0            0.0.0.0/0            /* kubernetes service portals */

Chain OUTPUT (policy ACCEPT 698 packets, 41930 bytes)
 pkts bytes target     prot opt in     out     source               destination
 149K 8962K KUBE-SERVICES  all  --  *      *       0.0.0.0/0            0.0.0.0/0            /* kubernetes service portals */


Chain KUBE-SERVICES (2 references)
 pkts bytes target     prot opt in     out     source               destination
    1    60 KUBE-SVC-CMGMSCGHDBTF4CTN  tcp  --  *      *       0.0.0.0/0            10.101.231.134       /* ns-test/nginx-service cluster IP */ tcp dpt:80


Chain KUBE-SVC-CMGMSCGHDBTF4CTN (1 references)
 pkts bytes target     prot opt in     out     source               destination
    0     0 KUBE-SEP-OVC3HE6GXAJ6EVUM  all  --  *      *       0.0.0.0/0            0.0.0.0/0            /* ns-test/nginx-service */ statistic mode random probability 0.50000000000
    1    60 KUBE-SEP-ADWVONN5J4AU467Y  all  --  *      *       0.0.0.0/0            0.0.0.0/0            /* ns-test/nginx-service */


Chain KUBE-SEP-ADWVONN5J4AU467Y (1 references)
 pkts bytes target     prot opt in     out     source               destination
    1    60 DNAT       tcp  --  *      *       0.0.0.0/0            0.0.0.0/0            /* ns-test/nginx-service */ tcp to:10.21.3.2:80


Chain KUBE-SEP-OVC3HE6GXAJ6EVUM (1 references)
 pkts bytes target     prot opt in     out     source               destination
    0     0 DNAT       tcp  --  *      *       0.0.0.0/0            0.0.0.0/0            /* ns-test/nginx-service */ tcp to:10.21.1.2:80
数据在centos中的iptables nat表各chain的处理过程如下。经处理后,数据的目标地址被修改为了
10.21.3.2:80或者10.21.1.2,而且是50%的概率,相当于做了负载均衡

2. DNAT后经过路由,包被发往flannel.1网卡
DNAT后数据包变为
src: 10.21.0.0
dst: 10.21.1.2:80
src_mac:00:0c:29:cc:91:94
dst_mac:00:50:56:f5:ea:93
src: 10.21.0.0 因为NAT后出口为flannel.1网卡,它的IP是这个。而且由于是本机发出,修改后返回包还是能到本地。如果是其他主机发来的包,则不能修改。
查看路由表:

2.1 从路由表中查看,去往10.21.1.0/24的包要从flannel.1网卡发出。目标IP是10.21.1.2,而网卡flannel.1的网段也是10.21.1.0/32

说明目标和自己在同一个网络中,此时只需要得到目标 10.21.1.2的mac地址即可转发。于是,内核查询ARP表,但是首次查询时,发现表里并没有10.21.1.2的mac。内核会广播发关arp请求。但是被flannel容器拦截了。flannel容器的作用,在这里他会去etcd里查10.21.1.2的mac地址。并写入arp表和bridge fdb表。

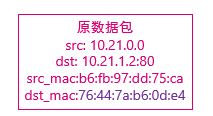
2.2数据包目标mac和源mac被修改
src: 10.21.0.0
dst: 10.21.1.2:80
src_mac:b6:fb:97:dd:75:ca
dst_mac:76:44:7a:b6:0d:e4
3. centos100的flannel.1 网卡为vxlan网卡,vni号为1.
此时不是直接转发,而是走fxlan协议。

3.1 根据linux内核对vlan的实现,将通过udp数据包,将到flannel.1上的mac数据包进行封装,然后发送。封装后的数据包如下图:但是仅从flannel.1网卡的配置,只能知道vlanid是1,UDP包的源IP是192.168.0.100,UPD包源port可以由内核分配一个。或者也使用8472. 目标UDP port是8472。UDP包会从ens33发出。通过查bridge fdb表,得到目标UDP IP为192.168.0.103


然后UDP包被封装成了上图并从ens33发出去。
tcpdump抓包后
tcpdump: listening on ens33, link-type EN10MB (Ethernet), capture size 262144 bytes
    1  2022-03-02 22:36:41.658573 00:0c:29:cc:91:94 > 00:0c:29:be:29:c8, ethertype IPv4 (0x0800), length 124: (tos 0x0, ttl 64, id 17176, offset 0, flags [none], proto UDP (17), length 110)
    192.168.0.100.44822 > 192.168.0.103.8472: [no cksum] OTV, flags [I] (0x08), overlay 0, instance 1  #上边是UDP包,下边是包里的载荷。
b6:fb:97:dd:75:ca > 76:44:7a:b6:0d:e4, ethertype IPv4 (0x0800), length 74: (tos 0x0, ttl 64, id 53863, offset 0, flags [DF], proto TCP (6), length 60)
    10.21.0.0.4892 > 10.21.1.2.80: Flags [S], cksum 0x932c (correct), seq 617516525, win 29200, options [mss 1460,sackOK,TS val 132538250 ecr 0,nop,wscale 7], length 0
[转载]ARP表和FDB表的区别_weixin_34408717的博客-CSDN博客
vxlan是vlan的一种,也就是说10.21.0.0和10.21.1.2在内核看来是二层连接通的。那么必须arp表和fdb表里有对应项。 arp表:ip对应目标Mac. fdd表: 目标Mac对应哪个interface发出去。
=========================================================================
上边是在centos100,下边进入centos103
=========================================================================
4. centos103收到发来的UDP包,拿出载荷中的MAC数据包释放到协议栈中
相当于一下收到两个包,一个是UDP包。然后是解析出来的MAC包。centos103上也建立了flannel.1网卡。vlan号也是1.linux内核会监听udp 8472端口。并把收到的UDP的数据包里内嵌的MAC包释放出来。这就像flannel.1网卡收到了内嵌的包。


看到flannel.1的配置 也是vxlan网卡,vlan id 也是1.
5. 从flannel.1网卡路由到nginx容器内网卡


5.1 centos103上nginx容器网络与主机网络连接关系
cni0, flannel.1,和ens33都处于centos103网络内。
veth pair(vetha6734914@if3 <—->veth0@if6)一端在cnetos103的网桥cni0里,另一端在nginx容器里。

5.2 flannel.1收到的是从UDP里解出来的包
此时查看centos103上的路由 如下图,指示内核将包转发到cni0网桥。

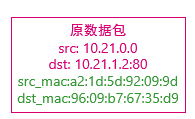
5.3 cni0网络通过arp表

由IP查出目标mac:96:09:b7:67:35:d9,将源mac改成cni0的mac,目标mac改成96:09:b7:67:35:d9(即nginx容器中eth0@if6的mac。
5.4 cni0网桥查看自己学到的mac地址,知道要从自己的那个口发出去

可看出,要从1号口,也就是vetha6734914@if3这个口发出去。 这个veth的对面就是nginx容器里了。nginx容器中的nginx服务就能收到请求包了。
抓包验证
[root@centos103 ~]#  tcpdump -tttt -# -vv -nn -e  -i  ens33 udp port 8472
tcpdump: listening on ens33, link-type EN10MB (Ethernet), capture size 262144 bytes
    1  2022-03-03 03:29:54.114921 00:0c:29:cc:91:94 > 00:0c:29:1a:c3:6b, ethertype IPv4 (0x0800), length 124: (tos 0x0, ttl 64, id 17639, offset 0, flags [none], proto UDP (17), length 110)
    192.168.0.100.57520 > 192.168.0.101.8472: [no cksum] OTV, flags [I] (0x08), overlay 0, instance 1
b6:fb:97:dd:75:ca > 7e:18:fc:a3:be:58, ethertype IPv4 (0x0800), length 74: (tos 0x0, ttl 64, id 29120, offset 0, flags [DF], proto TCP (6), length 60)
    10.21.0.0.63026 > 10.21.3.2.80: Flags [S], cksum 0x8a4a (correct), seq 3273761233, win 29200, options [mss 1460,sackOK,TS val 150130705 ecr 0,nop,wscale 7], length 0
    2  2022-03-03 03:29:54.117577 00:0c:29:1a:c3:6b > 00:0c:29:cc:91:94, ethertype IPv4 (0x0800), length 124: (tos 0x0, ttl 64, id 46334, offset 0, flags [none], proto UDP (17), length 110)
    192.168.0.101.42994 > 192.168.0.100.8472: [no cksum] OTV, flags [I] (0x08), overlay 0, instance 1
7e:18:fc:a3:be:58 > b6:fb:97:dd:75:ca, ethertype IPv4 (0x0800), length 74: (tos 0x0, ttl 63, id 0, offset 0, flags [DF], proto TCP (6), length 60)
    10.21.3.2.80 > 10.21.0.0.63026: Flags [S.], cksum 0x70be (correct), seq 1636060621, ack 3273761234, win 27960, options [mss 1410,sackOK,TS val 150627897 ecr 150130705,nop,wscale 7], length 0
    3  2022-03-03 03:29:54.117845 00:0c:29:cc:91:94 > 00:0c:29:1a:c3:6b, ethertype IPv4 (0x0800), length 116: (tos 0x0, ttl 64, id 17640, offset 0, flags [none], proto UDP (17), length 102)
    192.168.0.100.57520 > 192.168.0.101.8472: [no cksum] OTV, flags [I] (0x08), overlay 0, instance 1
b6:fb:97:dd:75:ca > 7e:18:fc:a3:be:58, ethertype IPv4 (0x0800), length 66: (tos 0x0, ttl 64, id 29121, offset 0, flags [DF], proto TCP (6), length 52)
    10.21.0.0.63026 > 10.21.3.2.80: Flags [.], cksum 0x0ba8 (correct), seq 1, ack 1, win 229, options [nop,nop,TS val 150130709 ecr 150627897], length 0
    4  2022-03-03 03:29:54.118212 00:0c:29:cc:91:94 > 00:0c:29:1a:c3:6b, ethertype IPv4 (0x0800), length 194: (tos 0x0, ttl 64, id 17641, offset 0, flags [none], proto UDP (17), length 180)
    192.168.0.100.57520 > 192.168.0.101.8472: [no cksum] OTV, flags [I] (0x08), overlay 0, instance 1
b6:fb:97:dd:75:ca > 7e:18:fc:a3:be:58, ethertype IPv4 (0x0800), length 144: (tos 0x0, ttl 64, id 29122, offset 0, flags [DF], proto TCP (6), length 130)
    10.21.0.0.63026 > 10.21.3.2.80: Flags [P.], cksum 0x8b06 (correct), seq 1:79, ack 1, win 229, options [nop,nop,TS val 150130709 ecr 150627897], length 78: HTTP, length: 78
        GET / HTTP/1.1
        User-Agent: curl/7.29.0
        Host: 10.101.231.134
        Accept: */*

    5  2022-03-03 03:29:54.118574 00:0c:29:1a:c3:6b > 00:0c:29:cc:91:94, ethertype IPv4 (0x0800), length 116: (tos 0x0, ttl 64, id 46338, offset 0, flags [none], proto UDP (17), length 102)
    192.168.0.101.45554 > 192.168.0.100.8472: [no cksum] OTV, flags [I] (0x08), overlay 0, instance 1
7e:18:fc:a3:be:58 > b6:fb:97:dd:75:ca, ethertype IPv4 (0x0800), length 66: (tos 0x0, ttl 63, id 11250, offset 0, flags [DF], proto TCP (6), length 52)
    10.21.3.2.80 > 10.21.0.0.63026: Flags [.], cksum 0x0b60 (correct), seq 1, ack 79, win 219, options [nop,nop,TS val 150627901 ecr 150130709], length 0
    6  2022-03-03 03:29:54.118836 00:0c:29:1a:c3:6b > 00:0c:29:cc:91:94, ethertype IPv4 (0x0800), length 354: (tos 0x0, ttl 64, id 46339, offset 0, flags [none], proto UDP (17), length 340)
    192.168.0.101.45554 > 192.168.0.100.8472: [no cksum] OTV, flags [I] (0x08), overlay 0, instance 1
7e:18:fc:a3:be:58 > b6:fb:97:dd:75:ca, ethertype IPv4 (0x0800), length 304: (tos 0x0, ttl 63, id 11251, offset 0, flags [DF], proto TCP (6), length 290)
    10.21.3.2.80 > 10.21.0.0.63026: Flags [P.], cksum 0x84cb (correct), seq 1:239, ack 79, win 219, options [nop,nop,TS val 150627901 ecr 150130709], length 238: HTTP, length: 238
        HTTP/1.1 200 OK
        Server: nginx/1.21.6
        Date: Thu, 03 Mar 2022 08:29:54 GMT
        Content-Type: text/html
        Content-Length: 615
        Last-Modified: Tue, 25 Jan 2022 15:26:06 GMT
        Connection: keep-alive
        ETag: "61f0168e-267"
        Accept-Ranges: bytes

    7  2022-03-03 03:29:54.118839 00:0c:29:1a:c3:6b > 00:0c:29:cc:91:94, ethertype IPv4 (0x0800), length 731: (tos 0x0, ttl 64, id 46340, offset 0, flags [none], proto UDP (17), length 717)
    192.168.0.101.45554 > 192.168.0.100.8472: [no cksum] OTV, flags [I] (0x08), overlay 0, instance 1
7e:18:fc:a3:be:58 > b6:fb:97:dd:75:ca, ethertype IPv4 (0x0800), length 681: (tos 0x0, ttl 63, id 11252, offset 0, flags [DF], proto TCP (6), length 667)
    10.21.3.2.80 > 10.21.0.0.63026: Flags [P.], cksum 0x737e (correct), seq 239:854, ack 79, win 219, options [nop,nop,TS val 150627901 ecr 150130709], length 615: HTTP
    8  2022-03-03 03:29:54.119154 00:0c:29:cc:91:94 > 00:0c:29:1a:c3:6b, ethertype IPv4 (0x0800), length 116: (tos 0x0, ttl 64, id 17642, offset 0, flags [none], proto UDP (17), length 102)
    192.168.0.100.57520 > 192.168.0.101.8472: [no cksum] OTV, flags [I] (0x08), overlay 0, instance 1
b6:fb:97:dd:75:ca > 7e:18:fc:a3:be:58, ethertype IPv4 (0x0800), length 66: (tos 0x0, ttl 64, id 29123, offset 0, flags [DF], proto TCP (6), length 52)
    10.21.0.0.63026 > 10.21.3.2.80: Flags [.], cksum 0x0a5f (correct), seq 79, ack 239, win 237, options [nop,nop,TS val 150130710 ecr 150627901], length 0
    9  2022-03-03 03:29:54.119159 00:0c:29:cc:91:94 > 00:0c:29:1a:c3:6b, ethertype IPv4 (0x0800), length 116: (tos 0x0, ttl 64, id 17643, offset 0, flags [none], proto UDP (17), length 102)
    192.168.0.100.57520 > 192.168.0.101.8472: [no cksum] OTV, flags [I] (0x08), overlay 0, instance 1
b6:fb:97:dd:75:ca > 7e:18:fc:a3:be:58, ethertype IPv4 (0x0800), length 66: (tos 0x0, ttl 64, id 29124, offset 0, flags [DF], proto TCP (6), length 52)
    10.21.0.0.63026 > 10.21.3.2.80: Flags [.], cksum 0x07ee (correct), seq 79, ack 854, win 247, options [nop,nop,TS val 150130710 ecr 150627901], length 0
   10  2022-03-03 03:29:54.119334 00:0c:29:cc:91:94 > 00:0c:29:1a:c3:6b, ethertype IPv4 (0x0800), length 116: (tos 0x0, ttl 64, id 17644, offset 0, flags [none], proto UDP (17), length 102)
    192.168.0.100.57520 > 192.168.0.101.8472: [no cksum] OTV, flags [I] (0x08), overlay 0, instance 1
b6:fb:97:dd:75:ca > 7e:18:fc:a3:be:58, ethertype IPv4 (0x0800), length 66: (tos 0x0, ttl 64, id 29125, offset 0, flags [DF], proto TCP (6), length 52)
    10.21.0.0.63026 > 10.21.3.2.80: Flags [F.], cksum 0x07ed (correct), seq 79, ack 854, win 247, options [nop,nop,TS val 150130710 ecr 150627901], length 0
   11  2022-03-03 03:29:54.119663 00:0c:29:1a:c3:6b > 00:0c:29:cc:91:94, ethertype IPv4 (0x0800), length 116: (tos 0x0, ttl 64, id 46341, offset 0, flags [none], proto UDP (17), length 102)
    192.168.0.101.45554 > 192.168.0.100.8472: [no cksum] OTV, flags [I] (0x08), overlay 0, instance 1
7e:18:fc:a3:be:58 > b6:fb:97:dd:75:ca, ethertype IPv4 (0x0800), length 66: (tos 0x0, ttl 63, id 11253, offset 0, flags [DF], proto TCP (6), length 52)
    10.21.3.2.80 > 10.21.0.0.63026: Flags [F.], cksum 0x0807 (correct), seq 854, ack 80, win 219, options [nop,nop,TS val 150627902 ecr 150130710], length 0
   12  2022-03-03 03:29:54.120369 00:0c:29:cc:91:94 > 00:0c:29:1a:c3:6b, ethertype IPv4 (0x0800), length 116: (tos 0x0, ttl 64, id 17645, offset 0, flags [none], proto UDP (17), length 102)
    192.168.0.100.57520 > 192.168.0.101.8472: [no cksum] OTV, flags [I] (0x08), overlay 0, instance 1
b6:fb:97:dd:75:ca > 7e:18:fc:a3:be:58, ethertype IPv4 (0x0800), length 66: (tos 0x0, ttl 64, id 29126, offset 0, flags [DF], proto TCP (6), length 52)
    10.21.0.0.63026 > 10.21.3.2.80: Flags [.], cksum 0x07ea (correct), seq 80, ack 855, win 247, options [nop,nop,TS val 150130711 ecr 150627902], length 0
总结
分层思想在tcp/ip协议中发挥的淋漓尽致。应用容器层,两个nginx以为自己在同一个网络10.21.0.0里,即flannel构建的vxlan里。 而实际处理主机是在网络192.168.0.0里
