安装docker
1、
docker下载
正常安装流程,最好在官网注册一个账号,本地运行 docker 后也需要账号登陆的。
2、 下载镜像
// pull images 镜像
docker pull ubuntu:18.04
// 根据镜像创建一个容器并运行,名称 images_test_for_docker
# -d 参数是让容器在后台运行
docker run -dit --name images_test_for_docker ubuntu:18.04

// 如上,容器已经新建完成,进入容器内部看看:
docker exec -it images_test_for_docker /bin/bash
如下图所示:75,,,,56是容器的id。
// 输入exit退出容器
exit

// 查看已有的容器\镜像
docker ps -a
docker images
// 将刚刚新建的容器copy并保存一份,Create a new image from a container’s changes
# command format:docker commit container_id
docker commit 75e15973ba56 php7.0_env
// 修改镜像名称
docker rename images_test_for_docker origin
(在容器内)安装nginx
// 启动,并进入
docker run -it php7.0_env /bin/bash
1、 更新apt
apt-get update
2、 安装 nginx
apt-get install -y nginx3、 启动、测试、关闭
// 启动
service nginx start
// 关闭
service nginx stop
// 重启
service nginx restart

apt-get install -y curl

// 测试
curl localhost
ps -aux
安全起见,先保存当前容器状态。
exit
docker commit container_id name
docker run -it php7.0_env /bin/bash
(在容器内)安装php7
PHP 7 is not available for Ubuntu Trusty in the standard Ubuntu repositories (2016-01-02).
You could use the PPA ppa:ondrej/php
Ubuntu 14.04, php7.0 会找不到,apt-cache search php7.0-* 也没有
1、安装工具
// install vim
apt-get install -y curl vim

// install language
apt-get install -y language-pack-en-base
locale-gen en_US.UTF-8
export LANG=en_US.UTF-8
export LC_ALL=en_US.UTF-8

apt-get install -y software-properties-common
add-apt-repository ppa:ondrej/php
apt-get update
vim 前面的 curl 不可省略
没有运行install language命令行,将会遇到错误:
UnicodeDecodeError: ‘ascii’ codec can’t decode byte 0xd1 in position 2: ordinal not in range(128)
3、安装扩展
根据自己需要,适当选择。
apt-get install -y php7.0 php7.0-mysql php7.0-fpm php7.0-curl php7.0-xml php7.0-mcrypt php7.0-json php7.0-gd php7.0-mbstring php7.0-zip php-mongodb php-memcached php-redis4、 修改配置文件
// vim /etc/php/7.0/fpm/php.ini
// /cgi.fix_pathinfo
cgi.fix_pathinfo=0
// vim /etc/php/7.0/fpm/pool.d/www.conf
listen =/run/php/php7.0-fpm.sock
// 改为
listen = /var/run/php/php7.0-fpm.sock

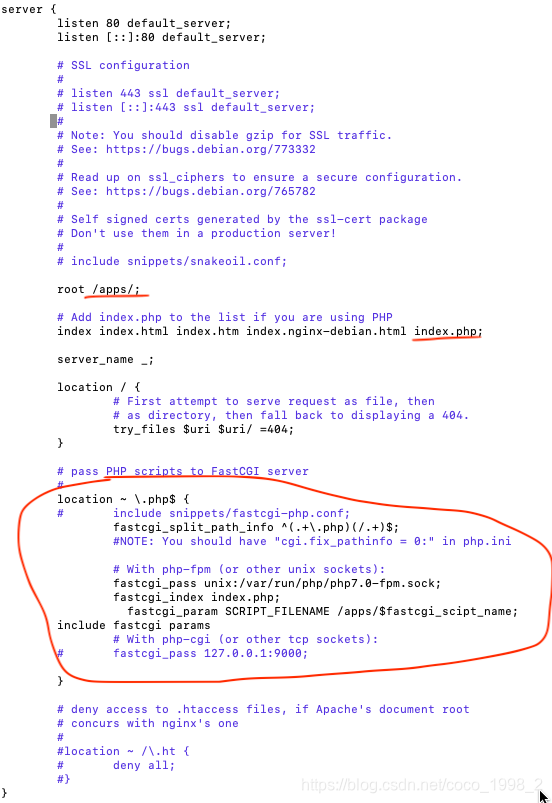
// vim /etc/nginx/sites-enabled/default
index  index.php  index.html index.htm;
// /apps/ 是上面的root 后面的路径,表示项目入口路径
fastcgi_param SCRIPT_FILENAME /apps/$fastcgi_script_name;

        location ~ \.php$ {
        #       include snippets/fastcgi-php.conf;

                fastcgi_split_path_info ^(.+\.php)(/.+)$;
        #       # With php-fpm (or other unix sockets):
                fastcgi_pass unix:/var/run/php/php7.0-fpm.sock;
                fastcgi_index index.php;
                  fastcgi_param SCRIPT_FILENAME /apps/$fastcgi_scipt_name;
         include fastcgi params
        #       # With php-cgi (or other tcp sockets):
        #       fastcgi_pass 127.0.0.1:9000;
        #}

        # deny access to .htaccess files, if Apache's document root
        # concurs with nginx's one
        #
        #location ~ /\.ht {
        #       deny all;
        #}
5、 运行
service php7.0-fpm start
service nginx start
// 查看进程状态,确认nginx启动成功
ps -aux

curl localhost
root@333aa618ca2e:/# curl localhost
<!DOCTYPE html>
<html>
<head>
<title>Welcome to nginx!</title>
<style>
body {
width: 35em;
margin: 0 auto;
font-family: Tahoma, Verdana, Arial, sans-serif;
}
</style>
参考链接:
https://blog.csdn.net/SchopenhauerZhang/article/details/86496297