Lora服务器:Chirpstack连接Lora网关实战
Chirpstack:一个开源的Lora服务项目,该项目包含Gateway Bridge,Network Server,Application Server,Gateway os等子项目,官网地址:https://www.chirpstack.io/
服务器环境:CentOS Linux release 7.8.2003 (Core)。
一,安装mosquitto。mosauitto是一个开源的MQTT消息代理软件。这个项目中,MQTT承担了各个组件之间互相通信的重任,贯穿了从网桥到AS的整个流程。
1,添加EPEL软件包安装源:yum install https://dl.fedoraproject.org/pub/epel/epel-release-latest-7.noarch.rpm
2,安装mosquitto:yum install mosquitto
3, 配置mosquitto
|
1 2 3 4 5 6 7 8 9 10 11 12 13 |
|
vi /etc/mosquitto/mosquitto.conf

#持久化配置
persistence true
persistence_location /var/lib/mosquitto/
#日志文件配置
log_dest file /var/log/mosquitto/mosquitto.log
#用户名密码认证配置
allow_anonymous false
password_file /etc/mosquitto/pwfile
acl_file /etc/mosquitto/aclfile

配置用户策略:vi /etc/mosquitto/aclfile
|
1 2 |
|
测试: mosquitto_sub -t chirpstack/# -u chirp -P 123456
日志查看:tail -f /var/log/mosquitto/mosquitto.log
二,安装gateway-bridge
1,新建一个目录,下载redhat安装包到该目录 wget https://artifacts.chirpstack.io/downloads/chirpstack-gateway-bridge/chirpstack-gateway-bridge_3.9.2_linux_386.rpm
2,安装rpm:rpm -ivh chirpstack-gateway-bridge_3.9.2_linux_386.rpm
3,为getway-bridge创建一个mqtt用户及密码:mosquitto_passwd chirp_gateway,并为该用户配置主题为“gateway/#”的读写策略.配置后重启Mosquitto
4,配置MQTT认证信息: vi /etc/chirpstack-gateway-bridge/chirpstack-gateway-bridge.toml

#配置MQTT payloads采用的协议,默认为protobuf
marshaler="json"
#配置MQTT 用户名
username="chirp_gateway"
password="123456"
#如果需要更改udp的监听端口可以改写udp_bind值,默认1700
–我的环境实际内容如下
# Integration configuration.
[integration]
# Payload marshaler.
#
# This defines how the MQTT payloads are encoded. Valid options are:
# * protobuf: Protobuf encoding
# * json: JSON encoding (easier for debugging, but less compact than ‘protobuf’)
marshaler=”protobuf”
# MQTT integration configuration.
[integration.mqtt]
# Event topic template.
event_topic_template=”gateway/{
{ .GatewayID }}/event/{
{ .EventType }}”
# State topic template.
#
# States are sent by the gateway as retained MQTT messages (by default)
# so that the last message will be stored by the MQTT broker. When set to
# a blank string, this feature will be disabled. This feature is only
# supported when using the generic authentication type.
state_topic_template=”gateway/{
{ .GatewayID }}/state/{
{ .StateType }}”
# Command topic template.
command_topic_template=”gateway/{
{ .GatewayID }}/command/#”
。。。。
# Generic MQTT authentication.
[integration.mqtt.auth.generic]
# MQTT servers.
#
# Configure one or multiple MQTT server to connect to. Each item must be in
# the following format: scheme://host:port where scheme is tcp, ssl or ws.
servers=[
“tcp://127.0.0.1:1883”,
]
# Connect with the given username (optional)
username=””
# Connect with the given password (optional)
password=””
5, 启动网桥: sudo systemctl start chirpstack-gateway-bridge。查看日志:journalctl -f -n 100 -u chirpstack-gateway-bridge
三,安装配置redis
1,yum install redis
2, vi /etc/redis.conf。找到requirepass,去掉注释并设置新的密码:requirepass redis123456
3,启动redis:systemctl start redis
4,验证密码:redis-cli -h 127.0.0.1 -p 6379 -a redis123456
四,安装配置postgresql
1,rpm源: yum install https://download.postgresql.org/pub/repos/yum/reporpms/EL-7-x86_64/pgdg-redhat-repo-latest.noarch.rpm。安装源见:https://yum.postgresql.org/repopackages/
2,安装:yum install postgresql95-server postgresql95-contrib
3,初始化数据库:/usr/pgsql-9.5/bin/postgresql95-setup initdb
4,修改postgres用户密码: passwd postgres
5,修改postgresql监听地址:vi /var/lib/pgsql/9.5/data/postgresql.conf。修改listen_addresses值为“*”
6,修改postgresql认证方式:vi /var/lib/pgsql/9.5/data/pg_hba.conf。

# TYPE  DATABASE        USER            ADDRESS                 METHOD

# "local" is for Unix domain socket connections only
local   all             all                                     peer
# IPv4 local connections:
host    all             all             127.0.0.1/32            ident
# IPv6 local connections:
host    all             all             ::1/128                 md5
# Allow replication connections from localhost, by a user with the
# replication privilege.
local   replication     postgres                                peer
host    replication     postgres        127.0.0.1/32            ident
host    replication     postgres        ::1/128                 ident

5,启动:systemctl enable postgresql-9.5.service systemctl start postgresql-9.5.service
五,安装network-server
补充一下NS的功能,NS功能很多,
Network Server component is the de-duplication of received LoRaWAN frames by the LoRa® gateways(去重复是很重要的功能) and for the collected frames handle the:
- Authentication–MAC层密钥在这
- LoRaWAN mac-layer (and mac-commands)–很复杂
-
Communication with the
ChirpStack Application Server
–不是MQTT? - Scheduling of downlink frames–ACK帧、数据帧、命令帧
分解如下特性更容易理解
-
Features
-
Device activation
-
Adaptive data-rate (ADR)
-
Channel (re)configuration
-
Device-classes
-
Device profile
-
Device Status
-
Device time
-
Frame logging
-
Gateway management
-
Gateway profile
-
Geolocation
-
Join Server
-
LoRaWAN versions
-
Multicast
-
LoRaWAN regions
-
Rejoin configuration
-
Routing profile
-
RX parameter (re)configuration
-
Service profile
-
1,添加mqtt账户:mosquitto_passwd /etc/mosquitto/pwfile chirp_network。并配置主题:“gateway/#” 的读写权限。配置后重启Mosquitto
2,添加postgresql账户及数据库
1),进入postgres用户:su postgres,输入psql指令
2),创建角色及密码:create role chirpstack_ns with login password ‘dbpassword’;
3),创建数据库:create database chirpstack_ns with owner chirpstack_ns;
4),测试:psql -h localhost -U chirpstack_ns -W chirpstack_ns。输入密码。
3,下载chirpstack-network-server:wget https://artifacts.chirpstack.io/downloads/chirpstack-network-server/chirpstack-network-server_3.10.0_linux_386.rpm
4,安装rpm:rpm -ivh chirpstack-network-server_3.10.0_linux_386.rpm
5,配置:vi /etc/chirpstack-network-server/chirpstack-network-server.toml
|
1 2 3 4 5 6 7 8 9 10 11 12 13 14 15 16 17 18 |
|
6,启动network-server:systemctl start chirpstack-network-server。查看日志:journalctl -u chirpstack-network-server -f -n 50
–我的环境实际如下:
[network_server.gateway.backend]
# Backend
#
# This defines the backend to use for the communication with the gateways.
# Use the section name of one of the following gateway backends.
# Valid options are:
# * mqtt
# * amqp
# * gcp_pub_sub
# * azure_iot_hub
type=”mqtt”
# MQTT gateway backend settings.
# Event topic template.
event_topic=”gateway/+/event/+”
# Command topic template.—这些topic要跟上面的bridge对应上
#
# Use:
# * “{
{ .GatewayID }}” as an substitution for the LoRa gateway ID
# * “{
{ .CommandType }}” as an substitution for the command type
command_topic_template=”gateway/{
{ .GatewayID }}/command/{
{ .CommandType }}”
# MQTT server (e.g. scheme://host:port where scheme is tcp, ssl or ws)
server=”tcp://localhost:1883″
# Connect with the given username (optional)
username=””
# Connect with the given password (optional)
password=””
六,安装Chirpstack-Application-server
补充一下ChirpStack Application Server功能
(1)Payload encryption / decryption
(2)web-interface (built on top of the provided
RESTful
API).
(3)User authorization–多组织、多用户管理
(4)Payloads and device events–provides different ways of sending and receiving device payloads (e.g. MQTT, HTTP, InfluxDB, …)—解密之后的数据
(5)Gateway discovery–By sending out periodical “pings” through each gateway,
(6)Live frame-logging—you are able to inspect all raw and encrypted LoRaWAN frames per gateway or device. When opening the
LoRaWAN frames
tab on the gateway or device detail page, you will see all frames passing in realtime. 加密数据
(7)Live event-logging–you are able to inspect all events from the web-interface, without the need to use a MQTT client or build an integration. When opening the
Live event logs
tab on the device detail pace, you will see all uplink, ack, join and error events in realtime.–事件,不涉及数据
1,新建Mosquitto用户和策略:mosquitto_passwd /etc/mosquitto/pwfile chrip_application。并配置主题”gateway/#”的读写权限。配置后重启Mosquitto
2,添加postgresql账户及数据库
1),进入postgres用户:su postgres,输入psql指令
2),创建角色及密码:create role chirpstack_as with login password ‘dbpassword’;
3),创建数据库:create database chirpstack_as with owner chirpstack_as;
4)开启 trigram 和 hstore
\c chirpstack_as
create extension pg_trgm;
create extension hstore;
4),测试:psql -h localhost -U chirpstack_as -W chirpstack_as。输入密码。
3,下载application-server:wget https://artifacts.chirpstack.io/downloads/chirpstack-application-server/chirpstack-application-server_3.12.2_linux_386.rpm
4,安装:rpm -ivh chirpstack-application-server_3.12.2_linux_386.rpm
5,利用openssl生成一个密钥:openssl rand -base64 32
6,配置:
#postgresql连接字符串
[postgresql]
dsn="postgres:/chirpstack_as:dbpassword@localhost/chirpstack_as?sslmode=disable"
#redis连接字符串
[redis]
url="redis://requirepass:redis123456@localhost:6379"
7,启动:systemctl start chirpstack-application-server。 查看日志:journalctl -f -n 100 -u chirpstack-application-server
七,开放端口
开放 UDP 1700 ,TCP 8080,1883
firewall-cmd --zone=public --add-port=1700/udp --permanent
firewall-cmd --zone=public --add-port=8080/tcp --permanent
firewall-cmd --zone=public --add-port=1883/tcp --permanent
firewall-cmd --reload
打开applicationServer管理页面,默认用户和密码为admin
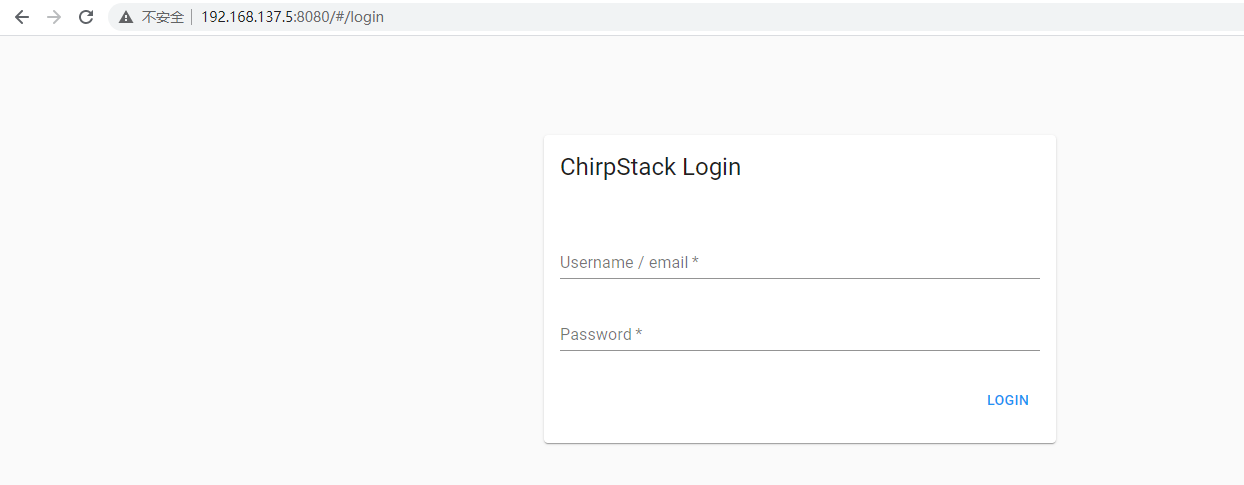
八 配置application server
打开管理界面,登录
1,添加services:

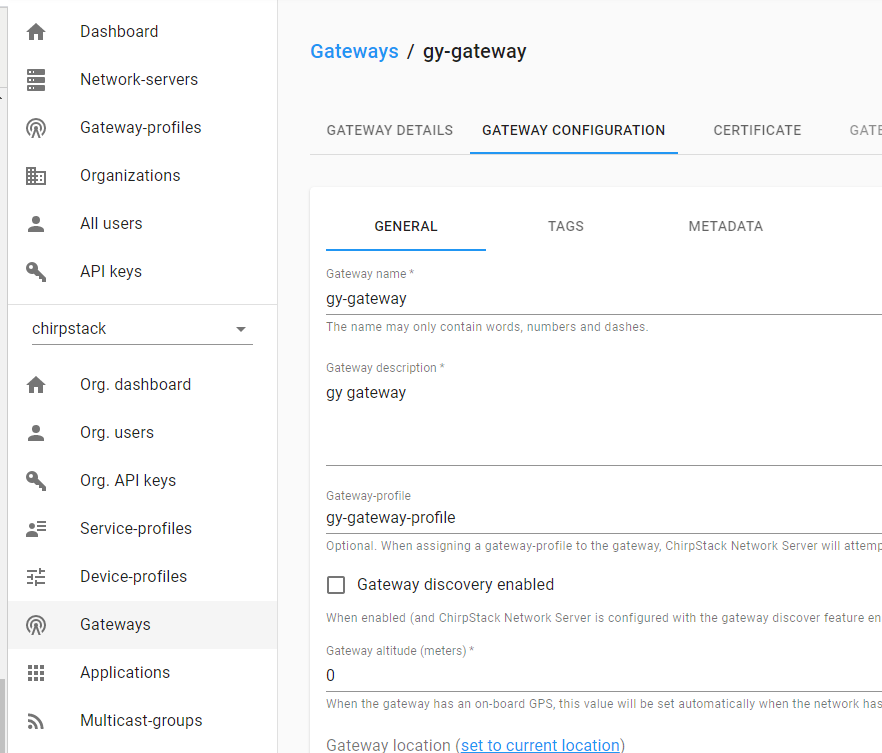
2,添加网关配置

3,配置网关,我手里有一个躬远的Lorawan网关。配置Lora服务器
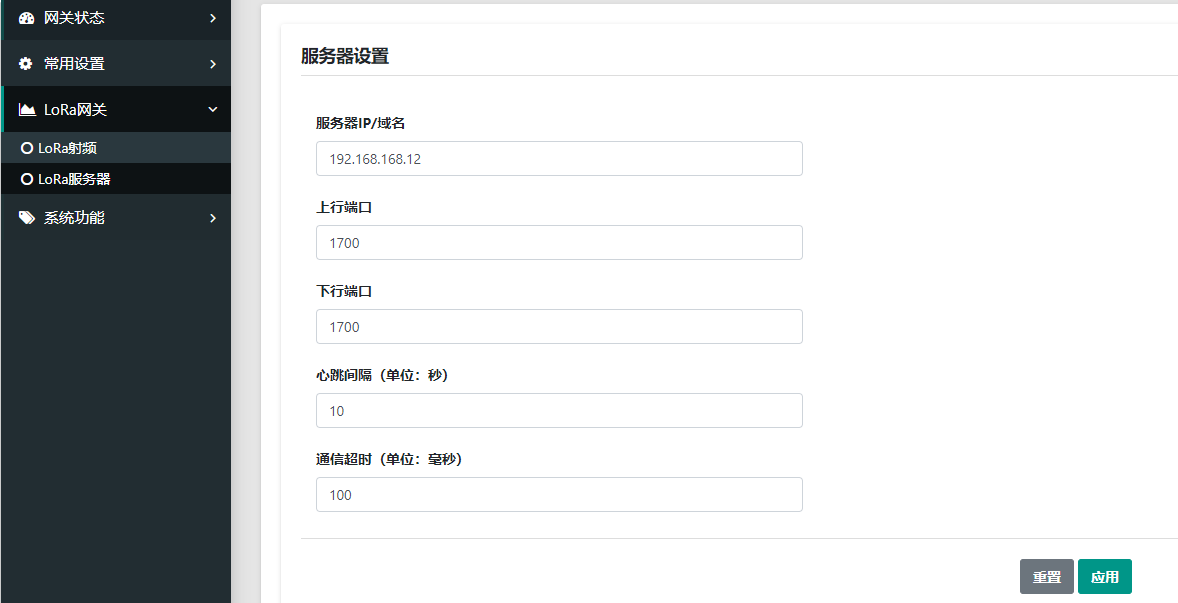
在application server添加该网关。
查看gateway-bridge日志。可以看到已经可以收到网关的udp包,并发布到Mqtt:journalctl -u chirpstack-gateway-bridge -f -n 50

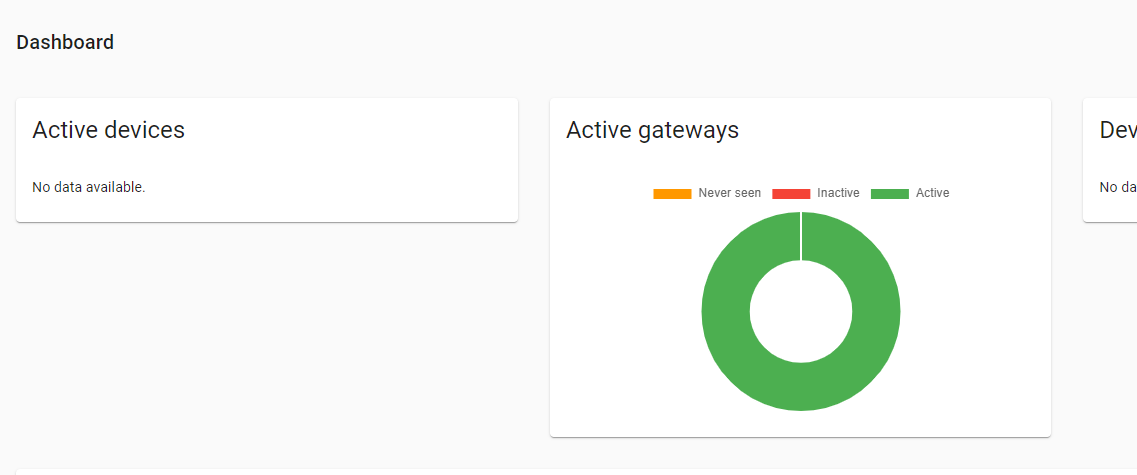
application server上该网关已经是active了。
九:添加设备。我手中有安志博的lora倾斜传感器终端,采用abp入网方式。按说明书激活后在application平台添加该设备
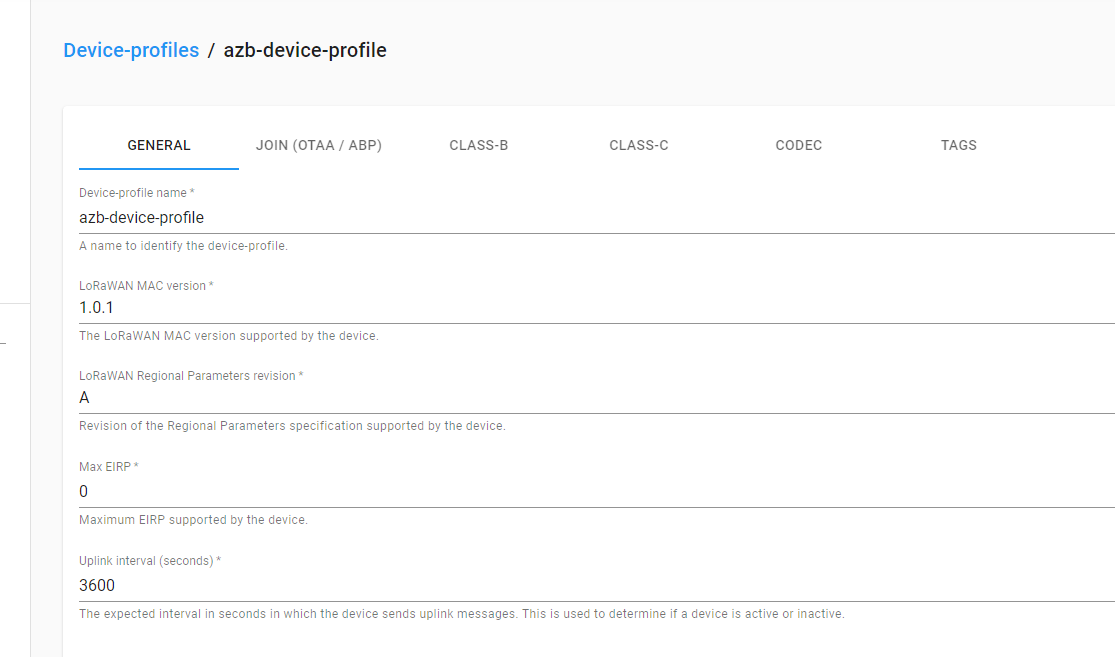
1,添加设备配置文件
2,添加应用域

3,在该应用域下添加设备
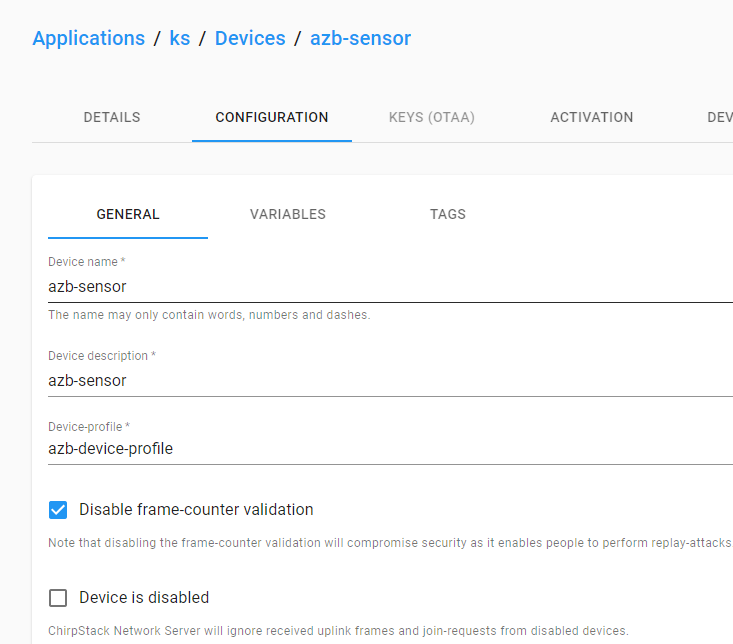
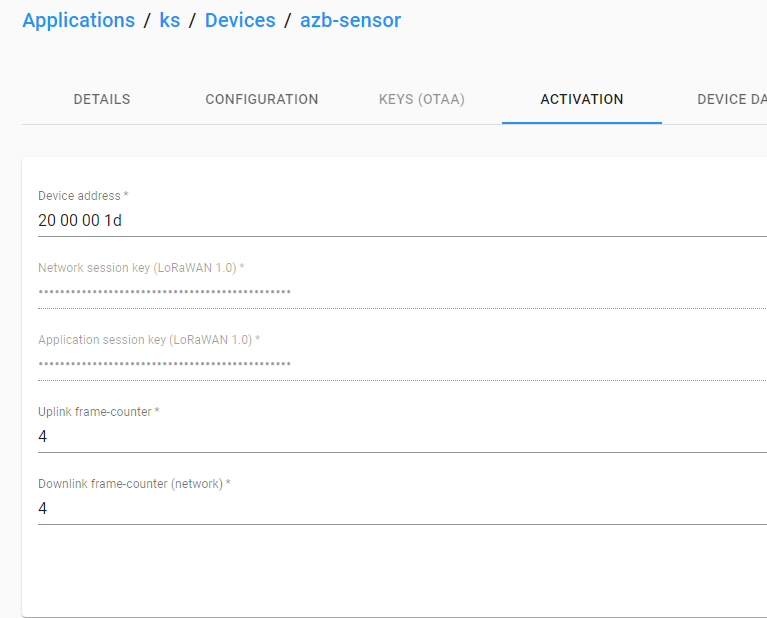
4,配置设备的入网参数。该入网参数可以由设备终端提供,也可以自己定好后发给厂家由厂家出厂时设置好。
ABP入网主要有三个参数:1,Device address 2,Network session key,3,Application session key
5,触发该lora终端,applcation平台设备上线

十,从mqtt获取设备的上行数据
利用Mosquitto_sub工具订阅application/#主题:mosquitto_sub -t application/# -u chirp_application -P 123456 。可以新建一个Mosquitto用户和策略,也可以直接用之前部署Application-server时的用户

红框中的数据即为设备所上传的数据,需要用base64解密后转为16进制。
十一,下发数据到设备
可以通过http接口或者mqtt发布二种方式,由于篇幅关系就不一一介绍。参考管网教程:
mqtt方式:https://www.chirpstack.io/application-server/integrations/mqtt/
http方式:https://www.chirpstack.io/application-server/api/http-examples/