文章目录
1. 概述
- 做项目,系统的安全性是第一位
- SpringSecurity 和 Shiro ,两者很像,除了一些类、名字不一样
-
可以做
- 认证 (你是谁)
- 授权 (你能干什么)
- 攻击防护 (防止伪造身份)
-
权限
- 功能权限
- 访问权限
- 菜单权限
- ……
2. SpringSecurity 简介
官网 : https://spring.io/projects/spring-security/
SpringSecurity是一个能够为基于Spring的企业应用系统提供声明式的安全访问控制解决方案的安全框架。
为应用系统提供声明式的安全访问控制功能,减少了为企业系统安全控制编写大量重复代码的工作。
其核心就是一组过
滤器链
,项目启动后将会自动配置。
最核心的就是 Basic Authentication Filter 用来认证用户的身份,一个在spring security中一种过滤器处理一种认证方式。

几个重要的类
-
webSecurityConfiguration
: 自定义 security 策略 -
AuthenticationManagerBuilder
: 自定义认真策略 -
@EnableWebSecurity
: 开启 WebSecurity 模式
3. 使用
1. 配置页面的访问权限
-
引入 SpringSecurity 依赖
<!--SpringSecurity --> <dependency> <groupId>org.springframework.boot</groupId> <artifactId>spring-boot-starter-security</artifactId> </dependency> -
新建一个配置文件,并且继承 WebSecurityConfigurerAdapter
@EnableWebSecurity public class SecurityConfig extends WebSecurityConfigurerAdapter { @Override protected void configure(HttpSecurity http) throws Exception { //首页可以所有人访问,但是功能页只能有权限的人能访问 http.authorizeRequests() .antMatchers("/").permitAll() // "/"根目录下的资源所有人能访问 .antMatchers("/l1/**").hasRole("vip1") // "/l1"下的所有文件只有VIP1级别的用户可以访问 .antMatchers("/l2/**").hasRole("vip2") .antMatchers("/l3/**").hasRole("vip3"); } -
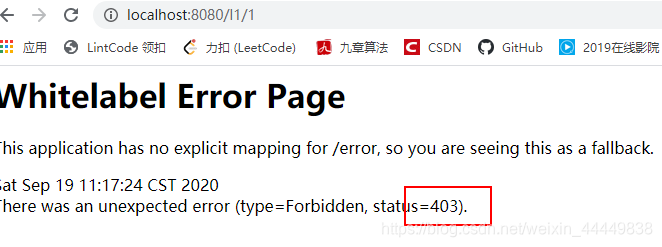
测试一下
访问 /l1 下的文件,报错
403(没有权限)

2. 登录
-
在刚刚的配置文件中添加上一句
当没有权限时,跳转到登录页//没有权限,跳转到登录页 http.formLogin(); -
再测一下
发送同样的请求,会自动跳转到登录页面

-
但是到现在都没有配置,关于自动跳转登录页的配置,所以为什么会自动跳转?
点进
formLogin

它上面有很长一段注释,看一下

“进行身份验证失败,就会发出 / login 请求,重定向到 / login?error”更多跟详细的写法:

-
定制认证的规则
还在刚刚的 SecurityConfig 配置文件中重写一个方法@Override protected void configure(AuthenticationManagerBuilder auth) throws Exception { // 从内存中读取认证的角色及身份 // 也可以配置从数据库读取 // 如果多个可以用 .and() 去拼接 auth.inMemoryAuthentication().passwordEncoder(new BCryptPasswordEncoder()) .withUser("hehe").password(new BCryptPasswordEncoder().encode("123456")).roles("vip1") .and() .withUser("root").password(new BCryptPasswordEncoder().encode("123456")).roles("vip1","vip2","vip3"); }
注意
:
在 springboot 2.1.X 中可以直接使用
在更高版本中,可能会报 PasswordEncoding 的错
在 SpringSecurity 5.0+ 中增加了很多的加密方法
使用
passwordEncoder(new BCryptPasswordEncoder())
进行密码编码 -
测试
登录
hehe
用户

访问 l1 目录下的页面

成功访问

访问其他等级的页面

无访问权限

3. 注销
-
在
http.formLogin();
的后面加上一句//注销 http.logout(); // 注销后跳转到指定页面 http.logout().logoutSuccessUrl("/"); -
点进
logout

“会发送 /logout 请求,然后重定向到 /login?success “
可用的配置

-
测试


4. 根据是否登录,显示不同内容
注意
:
SpringSecurity 4 和 5 整合的包名有些区别
两个版本在页面中的命名空间路径也有区别
两个版本在使用时也同样有区别
需要注意自己的版本与springboot 的版本是否匹配,不匹配不生效
-
导入 thymeleaf – SpringSecurity 整合包的依赖
<!--thymeleaf - SpringSecurity 整合包--> <!-- https://mvnrepository.com/artifact/org.thymeleaf.extras/thymeleaf-extras-springsecurity5 --> <dependency> <groupId>org.thymeleaf.extras</groupId> <artifactId>thymeleaf-extras-springsecurity5</artifactId> </dependency> -
在页面导入 thymeleaf – SpringSecurity 整合包的命名空间
<html lang="en" xmlns:th="http://www.thymeleaf.org" xmlns:sec="http://www.thymeleaf.org/extras/spring-security"> -
修改首页
需求:
如果未登录,只显示登录按钮
如果已登录,显示 用户名、角色、注销按钮<!--如果未登录,则显示登录按钮--> <li sec:authorize="!isAuthenticated()"> <a th:href="@{/tologin}">登录</a> </li> <!--如果已登录,显示用户名 + 注销--> <li sec:authorize="isAuthenticated()"> <span>用户名:<span sec:authentication="name"></span></span> <span>角色:<span sec:authentication="principal.authorities"></span></span> <span><a th:href="@{/logout}">注销</a></span> </li>
-
测试
未登录

登录

5. 根据不同角色,显示不同内容
-
修改页面

-
测试
未登录

登录只有 VIP1 权限的用户

登录有所有权限的用户

6. 实现登录界面”记住我“功能
-
在 SecurityConfig 中加入
//开启记住我功能
http.rememberMe();
-
测试
已经多了这样一个单选框

登录,然后关闭浏览器
再打开浏览器,进入该页面

该用户还在 -
实现原理
把该用户信息存入浏览器的 Cookie

默认保存两周(14天)
7. 设置登录页面
- 方式一
-
进入
http.formLogin();
看源码

上面的注释中,有这样一个配置项 -
修改
http.formLogin();
http.formLogin().loginPage("/tologin");/tologin :是去 登录页面 的请求

-
查看登录页面,提交表单的请求

-
测试
点击自己写的登录按钮,输入存在内存中的用户信息,登录成功

-
输入框的 name 属性

这里默认是必须要写成 “username” 和 “password” 不然 识别不到如果想要修改怎么办呢?
也有对应的方法

http.formLogin().usernameParameter("name").passwordParameter("pwd");
8. 配置自己的”记住我“
-
在页面上加入一个 ”记住我“

-
修改配置文件

这里
rememberMeParameter
的值和页面中
name
的值要一致 - 测试,浏览器被加入了 cookie,成功