目录
前言
介绍了redux的几个核心概念,循序渐进,掌握redux的概念之后,再接入react-redux,主流使用方法,以例子的形式介绍,如果耐心阅读下来,相信你可以完全掌握。
redux几个概念
reducer
- 说是reducer,其实就是一个函数,入参state(状态)与action(动作)。
- action是个对象,里面的type属性区分动作类型,根据动作类型修改状态state后,返回新的状态state。
- 里面也不一定那么死板必须是switch,用if else也可以达到同样的效果。
function counter(state = 0, action) {
  switch (action.type) {
    case 'add':
      return state + 1;
    case 'del':
      return state - 1;
    default:
      return state;
  }
}
store
-
reducer
只是一个函数而已,为什么与redux有关系?因为这个函数形式是由redux决定的,它作为
创造store的入参
。 -
createStore
是redux用于创造
store
的函数,入参就是
reducer
函数。 -
store
有几个方法,dispatch、subscribe、getState等。
- dispatch:入参就是对应reducer的action对象,中间可以自己传递动作类型type的值,触发action就是用于修改状态的
唯一方法
,action中也可以自定义额外传递其他的任何属性,比如修改state需要用的数据。- subscribe:订阅,当dispatch触发时就会调用,订阅之后可以用于自己额外做一些事情,比如手动渲染。且它的返回值就是它的注销函数。
- getState:获取状态。
import { createStore } from 'redux';

...//上面reducer代码

const store = createStore(counter);

store.dispatch({ type: 'add' });

const unSubscribe = store.subscribe(() => {
  console.log(store.getState());
});
//注销监听
unSubscribe()
reducers
- 一般一个我们尽量保持一个state,但是state可能中间存在多个数据,且需要的动作不一致,因此我们会创造很多个reducer,然后合并成一个。
- 短暂思考一下,不难理解,以下代码,all这个reducer借助不同的reducer合并在一起,并且只保持一个状态。
function num(state = 0, action) {
  switch (action.type) {
       ...
  }
}

function obj(state = {}, action) {
  switch (action.type) {
       ...
  }
}

function all(state = {}, action) {
  return {
     obj: obj(state.obj, action),
     num: num(state.num, action),
  }
}
-
all可以通过
combineReducers
方法实现,不用手写。
import { combineReducers } from 'redux'
let all = combineReducers({ num, obj })
action
-
action
就是
reducer的第二个入参
,一般action中我们都会用一个字符串定义type属性,当内容越来越多时,我们也许会使用单独文件定义type常量。
const ADD = 'add'
export default { ADD }
import { ADD } from '../actionTypes'
const action = { type: ADD }
...
store.dispatch(action)
- action创建函数,如果action需要额外的属性值用于修改状态,可以声明为函数,也比较方便,
const action = num => {
  return {
    type: 'add',
    num,
  };
};
store.dispatch(action(1));
-
还可以创建函数,自动dispatch。(
后面介绍mapDispatchToProps时就是用的这个方法,先理解
)
const action = num => {
  return {
    type: 'add',
    num,
  };
};
//被绑定的action创建函数,自动dispatch
const boundAction = num => {
  store.dispatch(action(num))
};

boundAction(1)
react-redux使用
首先你可以明确,react-redux是让redux支持react且完成了一定性能优化的库,你不想也可以就掌握redux,并用订阅subscribe去更新组件,当然这也没必要,因为react-redux中的connect方法很好用。
创建reducers
./reducers/count/index.js
const counter = (state = 0, action) => {
  switch (action.type) {
    case 'add':
      return state + action.num;
    case 'del':
      return state - action.num;
    default:
      return state;
  }
};

export default counter;
./reducers/other/index.js
const other = (state = 0, action) => {
  switch (action.type) {
   ...
  }
};

export default other;
创建多个reducer之后,整合在reducers的index.js中
./reducers/index.js
import count from './count';
import other from './other';
...
import { combineReducers } from 'redux';

const reducers = combineReducers({ count, other });
export default reducers;
在入口创建store
react-redux中的Provider用的是react中contexts的原理,让被它包裹的组件都可以用connect方法关联store。
引入创建的所有reducer生成store,在入口包裹一层Provider,并传递store。
当然也不一定要是在入口,放在你想要控制需要同一状态的许多组件的共同父级即可。
import React from 'react'
import { render } from 'react-dom'
import { Provider } from 'react-redux'
import { createStore } from 'redux'
import reducers from './reducers'
import App from './components/App'

let store = createStore(reducers)

render(
  <Provider store={store}>
    <App />
  </Provider>,
  document.getElementById('root')
)
创建actions
只需要index.js文件就够了,将所有reducer中涉及到的动作都创建对应的action创建函数。一个reducer可能需要多个action函数,比如counter就需要2个。
./actions/index.js
function add(num) {
  return {
    type: 'add',
    num,
  };
}

function del(num) {
  return {
    type: 'del',
    num,
  };
}

...

export default { add, del, ... };
创建containers容器
我们用redux的目的是为了让我们的组件可以获得全局可控的某状态,容器就是状态的承载物。
我们将需要用store中状态的组件就可以包裹上容器,容器包裹组件需要用到connnect方法。
connect是一个高阶函数,首先它有两个入参,mapStateToProps,mapDispatchToProps,一个个来。
-
mapStateToProps:需要让普通组件获得的状态值,
入参的state就是store的state,也就是我们reducers创建的store的state
,不知道有啥就去我们的在
reducers
文件夹中去找,比如我们的count,other等等。 -
mapDispatchToProps:需要让普通组件控制修改store的state的方法,入参的dispatch,同理是
store的diapatch
,我们利用前面写好的actions在里面声明
自动dispatch方法
,不知道有哪些方法同理我们去
actions
文件夹找,会看到对应的方法。 -
最后用
connect(mapStateToProps,mapDispatchToProps)
这个函数返回的还是一个函数,入参放入我们的普通组件,这里我简单命名为TestComponent。 -
后续如果其他需要使用TestComponent组件的父级组件,
不再引入TestComponent
,都去
引入当前的TestComponent的容器组件
,容器组件就是
将mapStateToProps和mapDispatchToProps中的属性和方法
都传递给了
TestComponent的props
,TestComponent组件内容仍然没变。
./Containers/TestComponentContainer/index.js
import TestComponent from '../../components/TestComponent';
import actions from '../../actions';
import { connect } from 'react-redux';

const mapStateToProps = state => {
  return {
    count: state.count,
    ...
  };
};

const mapDispatchToProps = dispatch => {
  return {
    addNum: num => {
      dispatch(actions.add(num));
    },
    delNum: num => {
      dispatch(actions.del(num));
    },
  };
};

export default connect(mapStateToProps, mapDispatchToProps)(TestComponent);
普通组件components
值和回调函数都从props获取,实现简单的控制数字加减。
./components/TestComponent/index.js
import React, { Component } from 'react';

export default class index extends Component {
  render() {
    const { count, addNum, delNum } = this.props;
    return (
      <div>
        <div>{count}</div>
        <button
          onClick={() => {
            addNum(1);
          }}
        >
          点击加1
        </button>
        <button
          onClick={() => {
            delNum(1);
          }}
        >
          点击减1
        </button>
      </div>
    );
  }
}
提升部分
自动合并action
bindActionCreators
可以代替我们手写传入参数和
dispatch
的过程,将所有的
action
合并成一个对象。
./Containers/TestComponentContainer/index.js
// ...

import actions from '../../actions';
import { bindActionCreators } from 'redux';

// ...

const mapDispatchToProps = dispatch => {
  return {
    countActions: bindActionCreators(actions, dispatch),
  };
};
然后我们调用方式便成为了这样:
./components/TestComponent/index.js
import React, { Component } from 'react';

export default class index extends Component {
  render() {
    const { count, countActions } = this.props; // 修改部分
    return (
      <div>
        <div>{count}</div>
        <button
          onClick={() => {
            countActions.addNum(1); // 修改部分
          }}
        >
          点击加1
        </button>
        <button
          onClick={() => {
            countActions.delNum(1); // 修改部分
          }}
        >
          点击减1
        </button>
      </div>
    );
  }
}
数据持久化
redux
保存的状态只能在项目重新启动时或者刷新页面就重置了,当我们需要保留用户数据,进行数据持久化时怎么办?
在使用
reducer
创造
store
时引入
redux-persist
依赖即可。
import React from 'react'
import { render } from 'react-dom'
import { Provider } from 'react-redux'
import { createStore } from 'redux'
import reducers from './reducers'
import App from './components/App'
// 需要引入一个新的依赖 redux-persist
import { persistStore, autoRehydrate } from 'redux-persist';
// 引入需要保存的本地存储,不同类型的项目可能有区别,这里用到的是浏览器的本地存储 localStorage
import storage from 'redux-persist/lib/storage';


const persistConfig = {
  key: 'key', // 本地存储时使用的键值,这里的意思是创造一个 persist:key 的键值保存 redux 状态
  storage, // 指定存储,这里是localStorage
};

const myPersistReducer = persistReducer(persistConfig, reducers); // reducer包一层
const store = createStore(myPersistReducer); // store包一层

const persistor = persistStore(store); // persistStore 返回一个可以用于控制持久化的对象

render(
  <Provider store={store}>
    <App />
  </Provider>,
  document.getElementById('root')
)
persistor
对象方法:
- purge:清除状态。
- pause:暂停持久化,此时后续的redux状态变化不会被记录。
- persist:恢复持久化,开始记录redux状态变化。
- flush:将还在挂起的状态写入磁盘,一般无挂起状态无用。
异步action
我们目前的
action
都是直接返回某个
action
对象,假如我们需要服务端数据支持来改变状态呢?我们需要一段时间来请求服务端的数据再来改变状态,这就涉及到异步的
action
。
首先我们需要引入对支持异步的中间件
applyMiddleware
包裹一下
redux-thunk
。
很简单,在创建
store
时引入即可。
// ...
import { createStore, applyMiddleware } from 'redux'
import thunk from 'redux-thunk'
// ...
const store = createStore(myPersistReducer, applyMiddleware(thunk)); // applyMiddleware(thunk)

render(
  <Provider store={store}>
    <App />
  </Provider>,
  document.getElementById('root')
)
然后
action
就可以识别异步的内容了,异步的
action
怎么编写呢?
我们不再返回一个
action
对象,而是返回一个异步函数,在
action
中就进行
dispatch
。
./actions/index.js
function add(num) {
  // ...
}

function del(num) {
  // ...
}

const asyncSetNum = () => {
  // 我们不再返回一个 action 对象,而是返回一个异步函数,将 dispatch 传入,在 action 中执行
  return async (dispatch) => {
    // 这里使用一个需要执行 1s 的 promise 模拟异步请求,该请求返回一个数字 99999
    const num = await new Promise((resolve, reject) => {
      setTimeout(() => {
        resolve(99999);
      }, 1000);
    });
    dispatch({ type: actionTypes.SET, num });
  };
};

...

export default { add, del, asyncSetNum ... };
redux日志
$ yarn add redux-logger
// ...
import { createStore, applyMiddleware } from 'redux'
import { createLogger } from 'redux-logger'

//...

// logger配置
const logger = createLogger({});

// applyMiddleware可以添加多个中间件,logger可以放在thunk后面
const store = createStore(myPersistReducer, applyMiddleware(thunk, logger));

render(
  <Provider store={store}>
    <App />
  </Provider>,
  document.getElementById('root')
)
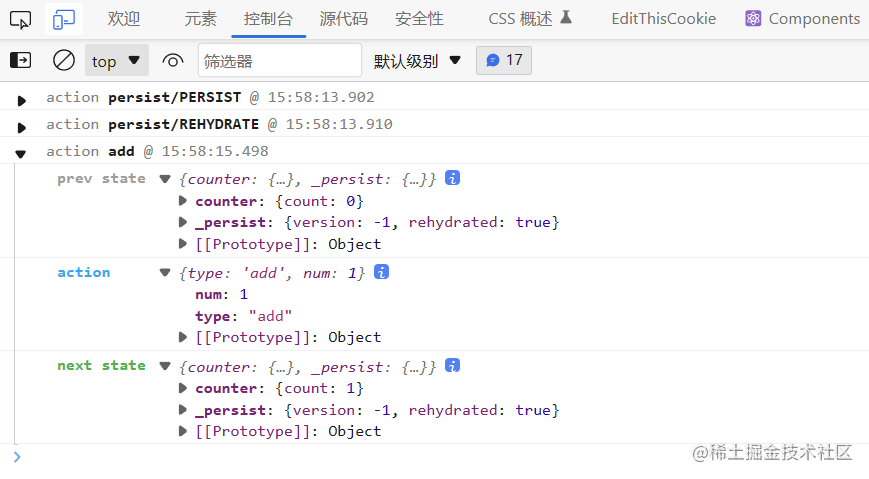
项目控制台则会在更新
redux
状态时显示对应的日志
初始状态->
action
->改变后的状态
logger
在配置时可以添加一些设置,可以去官方(
redux-logger – npm (npmjs.com)
)查看对应的设置属性,一般用的不多。
const logger = createLogger({
  collapsed: true, // 默认折叠日志
  duration: true, // 显示更新操作持续时间
  // ...
});