看了网上一些 .net core多项目解决方案的创建,感觉太麻烦了…
今天闲来无事自己创建了一下,简直了简单的要死..
直接创建 asp.net core 项目添加 Areas的方式就不说了…
多项目创建就 5 步:
环境 Visual Studio 2019、.net core 3.1
1、新建MVC主项目
a) 我创建的是 FirstDemoApplication
b)
在项目上右键 “新建”-“新搭建机架的项目”,选择”MVC区域”,名字随意,主要是为了让VS可以NuGet自动安装区域配置
2、解决方案右键添加MVC子项目
子项目名称和生成的类名按Areas来取,如:FirstDemoApplication.Areas.Admin
3、主项目上添加引用 子项目
4、设置子项目属性
a) 设置项目”输出类型”为”类库”
b) 设置生成后事件(这里是把子项目的模板文件复制到主项目的Views目录下)
mkdir "$(SolutionDir)$(SolutionName)\Areas\Admin\Views"
xcopy "$(ProjectDir)Views" "$(SolutionDir)$(SolutionName)\Areas\Admin\Views" /S /E /C /Y
c) 分别在 根目录 “Program.cs” 、”Startup.cs”上右键 “从项目排除” (子项目设类库这两没用),目录”wwwroot”删除
d)
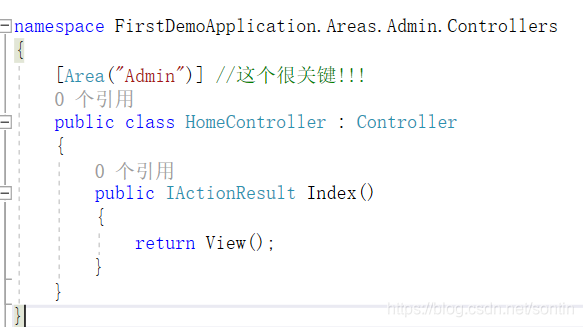
特别注意子项目的所有 Controller 必须加上 [Area(“区域名”)],这里用的是 [Area(“Admin”)]

5、主项目修改路由”Startup.cs”
    public class Startup
    {
        public Startup(IConfiguration configuration)
        {
            Configuration = configuration;
        }

        public IConfiguration Configuration { get; }

        // This method gets called by the runtime. Use this method to add services to the container.
        public void ConfigureServices(IServiceCollection services)
        {
            services.AddControllersWithViews();
            //这里别忘记开启MVC
            services.AddMvc(options => { options.EnableEndpointRouting = false; });

        }

        // This method gets called by the runtime. Use this method to configure the HTTP request pipeline.
        public void Configure(IApplicationBuilder app, IWebHostEnvironment env)
        {
            if (env.IsDevelopment()) {
                app.UseDeveloperExceptionPage();
            } else {
                app.UseExceptionHandler("/Home/Error");
                // The default HSTS value is 30 days. You may want to change this for production scenarios, see https://aka.ms/aspnetcore-hsts.
                app.UseHsts();
            }
            app.UseHttpsRedirection();
            app.UseStaticFiles();

            app.UseRouting();

            app.UseAuthorization();

            //app.UseEndpoints(endpoints =>
            //{
            //    endpoints.MapControllerRoute(
            //        name: "default",
            //        pattern: "{controller=Home}/{action=Index}/{id?}");
            //});

            //这里是很关键,endpoints.MapAreaControllerRoute 设置区域路由,没有设置路由的话你懂的
            //(name: "????", areaName: "???")这两个就是你的区域名,建议保持一致
            app.UseEndpoints(endpoints =>
            {
                endpoints.MapControllerRoute(
                    name: "default",
                    pattern: "{controller=Home}/{action=Index}/{id?}");

                endpoints.MapAreaControllerRoute(
                    name: "admin", areaName: "admin",
                    pattern: "{area:exists}/{controller=Home}/{action=Index}/{id?}");

                //有几个就 endpoints.MapAreaControllerRoute 几个

                endpoints.MapRazorPages();
            });

        }
    }
好咯..这就搞定了,主项目设为启动项目 F5看看吧…
上个图吧!
