Python自动化运维|Python操控CMD登录服务器|Python操控程序
uiautomation库学习
介绍
uiautomation这个模块是由一个大佬利用自己空闲时间开发的库。主要根据Win32这个微软的标准库来封装了一些能够操作桌面应用程序的方法。
uiautomation封装了微软UIAutomation API,支持自动化Win32,MFC,WPF,Modern UI(Metro UI), Qt, IE, Firefox(
version<=56 or >=60
, Firefox57是第一个Rust开发版本,前几个Rust开发版本个人测试发现不支持),Chrome和基于Electron开发的应用程序(Chrome浏览器和Electron应用需要加启动参数–force-renderer-accessibility才能支持UIAutomation).
使用
- uiautomation中封装了Windows UIAutomation中的各个Control和Pattern.
- Control类型有ButtonControl, TextControl, TreeControl等等。
- Pattern类型有ExpandCollapsePattern,InvokePattern等等。
- 实际使用时,要用Control或Pattern对象来获取控件信息或操作控件。
- uiautomation根据你提供的控件属性在控件树中从上往下查找控件。
实际上是更具微软的结构树,来查找可以控制的组件。
在结构树当中查找,查找到控件后对控件进行操作。
searchFromControl = None, 从哪个控件开始查找,如果为None,从根节点Desktop开始查找
searchDepth = 0xFFFFFFFF, 搜索深度
searchInterval = SEARCH_INTERVAL, 搜索间隔
foundIndex = 1 ,搜索到的满足搜索条件的控件索引,索引从1开始
Name 控件名字
SubName 控件部分名字
RegexName 使用re.match匹配符合正则表达式的名字,Name,SubName,RegexName只能使用一个,不能同时使用
ClassName 类名字
AutomationId 控件AutomationId
ControlType 控件类型
Depth 控件相对于searchFromControl的精确深度
Compare 自定义比较函数function(control: Control, depth: int)->bool
searchDepth和Depth的区别是:
searchDepth在指定的深度范围内(包括1~searchDepth层中的所有子孙控件)搜索第一个满足搜索条件的控件
Depth只在Depth所在的深度(如果Depth>1,排除1~searchDepth-1层中的所有子孙控件)搜索第一个满足搜索条件的控件
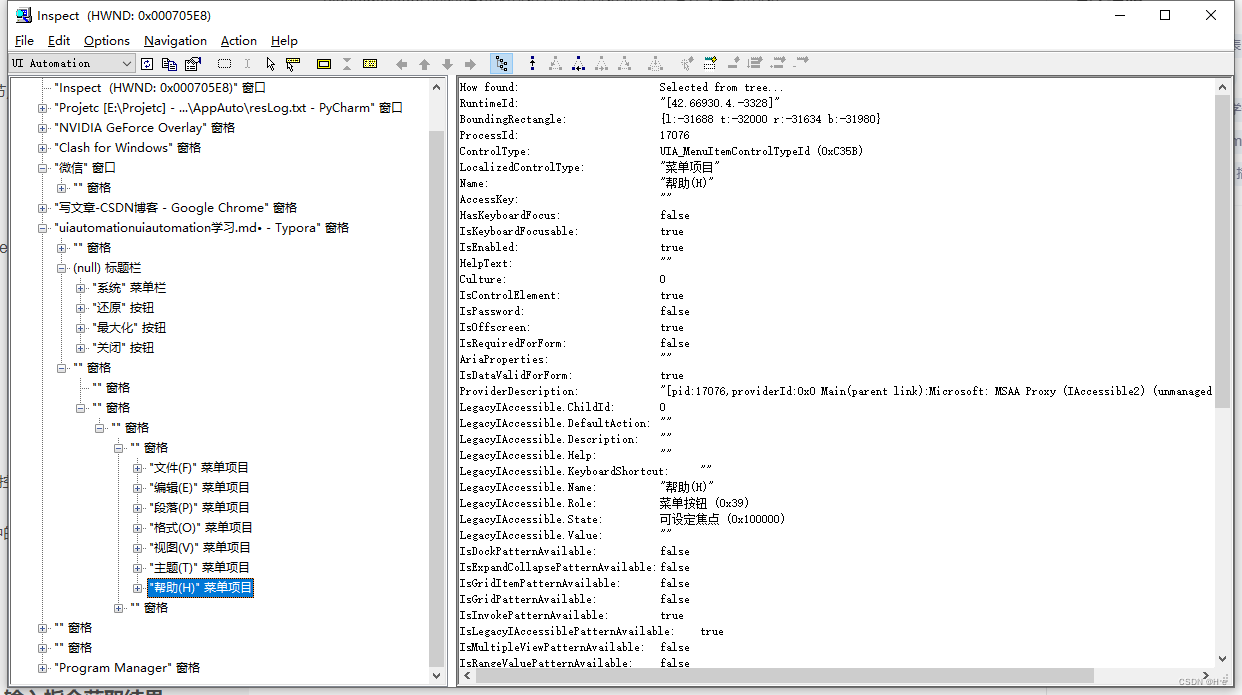
在编写代码时可以配合
inspect.exe
使用
在这个软件当中可以查清楚的查看到结构树,便于定位到需要的控件

简单的使用例子 – 在CMD当中使用SSH连接服务器,输入指令获取结果
通过Win + R 打开CMD窗口:
auto.SendKeys('{Win}{R}{enter}')  # 通过Win+R打开CMD窗口
cmdShellWindow = auto.WindowControl(searchDepth=1,ClassName="ConsoleWindowClass")  # 获取CMD窗口控制
cmdShellWindow.SetTopmost(True)  # 将窗口设置为最上层
使用SSH,连接服务器
loginCmd = f'ssh {user}@{ip}'  # user为linux服务器的用户名,ip为服务器地址
auto.SendKeys(loginCmd + "{enter}")
执行指令,获取结果
for line in open(cmdFile, 'r', encoding='utf-8').readlines():
    # 获取CMD界面结果
    head = getCommentCMD(CMD)
    auto.SendKeys('clear{enter}')
    line = line.replace('\n', '') if '\n' in line else line
    auto.SendKeys(line)
    auto.SendKeys('{enter}')
    time.sleep(0.5)
    endRes = waitResult(CMD, head)
    if endRes:
        txtContent = CMD.DocumentControl(searchDepth=1).GetTextPattern().DocumentRange.GetText()
        txtContent = txtContent.split('clear')[-1]
        writeResult(txtContent, line)
        continue
    else:
        writeResult('Falled!!')
        return
完整code
# -*- coding: utf-8 -*-
import time
import uiautomation as auto


def waitResult(CMD, head, waitTime=31):
    for count in range(1, waitTime + 1):
        time.sleep(1)
        end = getCommentCMD(CMD)
        print(f'head:{head}')
        print(f'end:{end}')
        if head == end:
            continue
        else:
            return True
    return False


def writeResult(res, cmd=None):
    resFile = './resLog.txt'
    resLog = open(resFile, 'a+', encoding='utf-8')
    content = res.split('\n')
    resLog.write('-' * 10 + str(cmd) + '-' * 10 + '\n')
    for line in content:
        line = line.strip()
        if len(line) == 0:
            continue
        resLog.write(line)
        resLog.write('\n')
    resLog.write('-' * 40 + '\n')
    resLog.write('\n')
    resLog.close()


def mainCMDWindowd(commandFile):
    auto.SendKeys('{Win}{R}{enter}')  # 通过Win+R打开CMD窗口
    cmdShellWindow = auto.WindowControl(searchDepth=1, ClassName="ConsoleWindowClass")  # 获取CMD窗口控制
    cmdShellWindow.SetTopmost(True)
    res = loginSSH(cmdShellWindow, 'xxx', '0.0.0.0', 'xxxx') # 这里为服务用户名、ip、密码
    if res:
        executeCMD(cmdShellWindow, commandFile)
        cmdShellWindow.TitleBarControl().ButtonControl(Name="关闭").Click()


def executeCMD(CMD, cmdFile):
    for line in open(cmdFile, 'r', encoding='utf-8').readlines():
        # 获取CMD界面结果
        head = getCommentCMD(CMD)
        auto.SendKeys('clear{enter}')
        line = line.replace('\n', '') if '\n' in line else line
        auto.SendKeys(line)
        auto.SendKeys('{enter}')
        time.sleep(0.5)
        endRes = waitResult(CMD, head)
        if endRes:
            txtContent = CMD.DocumentControl(searchDepth=1).GetTextPattern().DocumentRange.GetText()
            txtContent = txtContent.split('clear')[-1]
            writeResult(txtContent, line)
            continue
        else:
            writeResult('Falled!!')
            return
        # 获取指令执行后的结果


def getCommentCMD(CMD):
    txtElement = CMD.DocumentControl(searchDepth=1).GetTextPattern().DocumentRange.GetText()
    res = []
    for line in txtElement.split('\n'):
        line = line.strip()
        if len(line) == 0:
            continue
        res.append(line)
    return res[-2]


def loginSSH(CMD, user, ip, pwd):
    loginCmd = f'ssh {user}@{ip}'
    head = getCommentCMD(CMD)
    auto.SendKeys(loginCmd + "{enter}")
    endRes = waitResult(CMD, head)
    if endRes:
        auto.SendKeys(pwd + "{enter}")
        return True
    else:
        return False


if __name__ == '__main__':
    cmdfile = './CMD.txt'
    mainCMDWindowd(cmdfile)
代码使用方法:
需要准备好要在服务器上运行的指令,放在同目录下的CMD.txt文本文件当中
如:
CMD.txt:
ls
pwd
cd clash/
cat config.yaml
最终的运行结果会自动生成在同目录下的resLog.txt文件当中:
resLog.txt
----------ls----------
[root@GitLabHost ~]# ls
clash  pydInstaller  python3  qqchatgpt
[root@GitLabHost ~]#
----------------------------------------

----------pwd----------
[root@GitLabHost ~]# pwd
/root
[root@GitLabHost ~]#
----------------------------------------

----------cd clash/----------
[root@GitLabHost ~]# cd clash/
[root@GitLabHost clash]#
----------------------------------------

----------cat config.yaml----------
surance.com,Proxy
xxxxxxxxxxxxxxxxxxxxxxxxxxxxxxxxxxxxxxxxxx
# GeoIP China
- GEOIP,CN,Domestic
- MATCH,Others
[root@GitLabHost clash]#
----------------------------------------
运行效果:
需要自己实践才能知道。
代码实现功能:
自动化登录服务器,在服务器上输入内容获取结果,实现自动化运维的方法。
总结:
通过一个简单的案例,提供了一个通过Python控制桌面应用程序的方法,通过uiautomation模块可以拓展到控制QQ、微信、IE浏览器等等,更进一步的解放人的双手。但因为查找的方法,在树结构当中查找目标的效率有点慢,需要一层一层的查找,缺少优化的方法。